- Joined
- Oct 9, 2020
- Messages
- 2,242
- Points
- 488

This happened after I shorted her hairdryer, so I guess we are even...... I hope you are still married, Jack

lol
 |
As a way to introduce our brass coins to the community, we will raffle off a free coin during the month of August. Follow link ABOVE for instructions for entering. |
 |
 |
The beloved Ships in Scale Magazine is back and charting a new course for 2026! Discover new skills, new techniques, and new inspirations in every issue. NOTE THAT OUR FIRST ISSUE WILL BE JAN/FEB 2026 |
 |

This happened after I shorted her hairdryer, so I guess we are even...... I hope you are still married, Jack


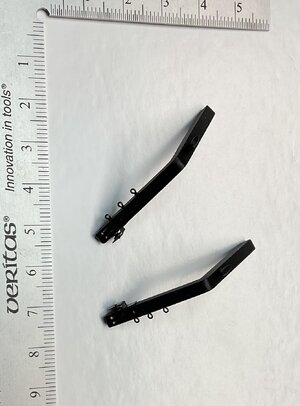
great progress my dear friend RogerJust a few shots of some progress from these past few weeks. The first photo is just a pile of parts I am playing with, which I hope will turn into a reasonable rendition of the catheads. I used Alaskan Yellow Cedar for the wood. I’ll use tiny sheaves held in place with bent and shaped brass strips for the cathead stopper cables, and ring bolts, cleats and other parts as necessary.
I have started building the carronade sleds. They are now painted with drilled and glued eyebolts along with the supplied PE plates. I used the kit supplied wheel assemblies, painted black, underneath the sleds. I’ll intermittently work away on the sleds and carronades while completing other ship parts. I placed a couple of sleds temporarily on the deck just to get a feel for height etc
I had previously installed the swivel brackets at the gunports but have now added the many eyebolts and cleats on the inner bulwarks too. The breech line eyebolt rings are also drilled out but not secured yet. I’ll secure the breech lines to the rings at the bench then mount them when the carronades are ready.
So that’s it for now, as always I appreciate your valuable time looking in on my build, as well as your always well received comments, likes and input. Have a great weekend.
View attachment 441454
View attachment 441455
View attachment 441456
View attachment 441457


True storyHello Roger, as always a very nice and precise work.
Thank you Shota. Stay safe my friend.great progress my dear friend Roger

Hi JJ, thank you for the support, much appreciated.Really nice clean build Rodger. Top marks ,JJ..
Thanks GrantTrue story
A very good looking ship model - very good work so far


Nice work, Roger. Waiting to see how you rig it.Catheads, rails and other stuff
The small stuff continues and as we all know it’s a test of patience and time. I’ve been making more pieces of the Syren jigsaw and recently returned to the bow area.
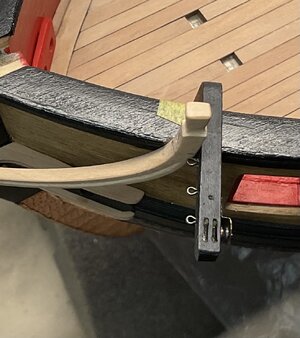
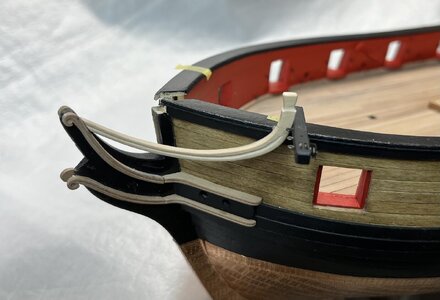
I made the catheads using AYC, added two simulated sheaves at the ends and a 2mm brass sheave. The tiny brass sheave was pinned inside a bent brass strip for the cathead cable stopper on the aft side of the overhanging cathead. The addition of three eye bolts and a previously made 5mm cleat on the inboard side completes the pieces.
The first cathead is fixed in position on the port side and now it’s the fiddly first efforts building up the rails. The upper rail on the port side is placed but not glued in position. This is helping to give me a feel for how I will approach all the other parts for this very fiddly part of the build.
The stern davits are now cut and shaped from pear and have been put aside for later. Similarly, the timberheads are in progress, cut and carved and will be mounted in the vicinity of the catheads on the cap rail for’d.
As I return to my work bench I offer my thanks to you for following my build, for the likes, comments, input and always the fun and laughter.
View attachment 448261
View attachment 448262
View attachment 448263
Thanks Vic. A little way off yet but I purchased some excellent rope/line from Ben @BenD so I’m looking forward to seeing how it all comes together.Nice work, Roger. Waiting to see how you rig it.
Thanks Paul - a good way to prove to my wife that I really do have patienceLoving these fiddly details! Railing is first class work with a nice fit...
Roger,
Catching up here - Very excellent looking work.

Hi Jack, thanks for looking in on me. Yes, the Syren certainly has it’s challenges, lots of tiny parts too that, to my eyes, are getting visually smaller as time goes bythat ship looks great. I will say though, it is not for the feint of heart.
 .
.
tell me about it. lolHi Jack, thanks for looking in on me. Yes, the Syren certainly has it’s challenges, lots of tiny parts too that, to my eyes, are getting visually smaller as time goes by.
Me tooThanks Vic. A little way off yet but I purchased some excellent rope/line from Ben @BenD so I’m looking forward to seeing how it all comes together.
