Syren 1803 1:64 Model Shipways

Roger, I am following the build and your work on the model is amazing! I have just purchased this kit from Model Shipways and it will be my next build after I complete the Vanguard kit of HM Sherbourne.

Thank you Paddy @PaddyO for your support and kind comments. I think you’ll really enjoy your Syren kit. I am particularly impressed with the accompanying manual, it is very well written in a helpful progressive format.
 
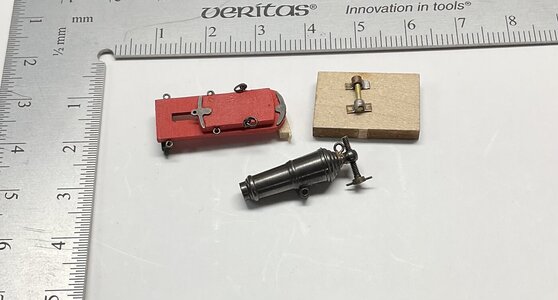
Carronade construction and preparation.

The first carronade test piece is ready for construction. I added a lug underneath the carronade, fabricated two brackets with a trunnion for pivoting, made up a ringbolt each side on the bed for the breeching rope, previously added a breech ring, added a small handle at the base of the elevating screw, blackened the carronades and parts as necessary. Eye bolts were fitted in place for the tackle and blackened PE parts for the pivot plate and iron plate on the bed and carriage.

If this all goes together as planned I’ll continue with the other 15 carronades then start the rigging. Thanks for following along as I alternate between house maintenance, yard (garden) work and the workbench :).

IMG_4929.jpeg
 
;)Carronade construction and preparation.

The first carronade test piece is ready for construction. I added a lug underneath the carronade, fabricated two brackets with a trunnion for pivoting, made up a ringbolt each side on the bed for the breeching rope, previously added a breech ring, added a small handle at the base of the elevating screw, blackened the carronades and parts as necessary. Eye bolts were fitted in place for the tackle and blackened PE parts for the pivot plate and iron plate on the bed and carriage.

If this all goes together as planned I’ll continue with the other 15 carronades then start the rigging. Thanks for following along as I alternate between house maintenance, yard (garden) work and the workbench :).

View attachment 463645
Good evening Roger. More to scale parts, modifications, lost parts, tears;), tidy soldering, blackening and plenty patience are contributing to a wonderful carronade…Cheers Grant
 
Carronade construction and preparation.

The first carronade test piece is ready for construction. I added a lug underneath the carronade, fabricated two brackets with a trunnion for pivoting, made up a ringbolt each side on the bed for the breeching rope, previously added a breech ring, added a small handle at the base of the elevating screw, blackened the carronades and parts as necessary. Eye bolts were fitted in place for the tackle and blackened PE parts for the pivot plate and iron plate on the bed and carriage.

If this all goes together as planned I’ll continue with the other 15 carronades then start the rigging. Thanks for following along as I alternate between house maintenance, yard (garden) work and the workbench :).

View attachment 463645
Those carronades are going to be incredible ! Great work Roger.
 
Good evening Roger. More to scale parts, modifications, lost parts, tears;), tidy soldering, blackening and plenty patience are contributing to a wonderful carronade…Cheers Grant
Thanks Grant, yes lots of little parts and a big effort to avoid more lost pieces, manly tears and words my wife does not want to hear ROTF. I always appreciate your input.

Those carronades are going to be incredible ! Great work Roger.
Hi Paddy, a fiddly and repetitive part of the build but hopefully worth it. Thanks.

Great work on the Carronade, should look great fully rigged!
Thank you Kurt. I’m going to use rope I purchased from Ben (Ropes of Scale) for the rigging. His rope is that good I know it will enhance the look of the carronades.
 
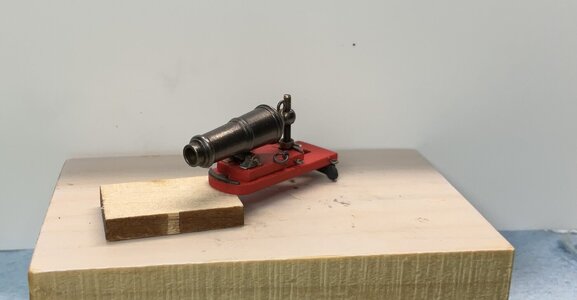
First 18lb carronade

The first carronade is complete with all of its various components. I mentioned earlier I changed out the kit carronades and then made additional parts to enhance the look of the replacements. So there are 23 parts in all, not including the ropework, tackle etc. Since this is the first one there’s some tweaking and improvements to do. I’ll adjust as I work through the other 15 carronades.

So now it’s back to house painting :(. Thanks for looking in on my progress.

IMG_4967.jpeg
 
The first carronade test piece is ready for construction. I added a lug underneath the carronade, fabricated two brackets with a trunnion for pivoting, made up a ringbolt each side on the bed for the breeching rope, previously added a breech ring, added a small handle at the base of the elevating screw, blackened the carronades and parts as necessary.
All your extras are fabulous. Super looking carronades as a result of you adding all the details on your own.
Allan
 
First 18lb carronade

The first carronade is complete with all of its various components. I mentioned earlier I changed out the kit carronades and then made additional parts to enhance the look of the replacements. So there are 23 parts in all, not including the ropework, tackle etc. Since this is the first one there’s some tweaking and improvements to do. I’ll adjust as I work through the other 15 carronades.

So now it’s back to house painting :(. Thanks for looking in on my progress.

View attachment 465731
Good afternoon Roger. Wow- stunning details. I love the elevation thread, pomel and adjuster screw. Very accurate. Only 15 more to go ;) . Cheers Grant
 
Good afternoon Roger. Wow- stunning details. I love the elevation thread, pomel and adjuster screw. Very accurate. Only 15 more to go ;) . Cheers Grant
Thanks Grant. The elevation “screw” came with the carronade barrel from Caldercraft, I just cut to scale and filed to length, blackened and added the handle at the base of the screw. Yes, 15 to go despite Paul’s effort to get me to up it to 100 ROTF.
 
Back
Top