
-

SUBSCRIBE TO SHIPS IN SCALE TODAY!
The beloved Ships in Scale Magazine is back and charting a new course for 2026!
Discover new skills, new techniques, and new inspirations in every issue.
NOTE THAT OUR NEXT ISSUE WILL BE MARCH/APRIL 2026 -

Win a Free Custom Engraved Brass Coin!!!
As a way to introduce our brass coins to the community, we will raffle off a free coin during the month of August. Follow link ABOVE for instructions for entering.
You are using an out of date browser. It may not display this or other websites correctly.
You should upgrade or use an alternative browser.
You should upgrade or use an alternative browser.
The Black Pearl
- Thread starter Dave Stevens (Lumberyard)
- Start date
- Watchers 35

LOL.... Yes, poor Dave. I did the original research. He is now translating your build log and posting for all to see!!!!! We like to keep Dave busy!!I see that Dave Stevens is translating my website.
Welcome aboard SOS, Mellpapa! Great to have you among us!!
- Joined
- Dec 1, 2016
- Messages
- 6,656
- Points
- 728


It is the relief part of the stern. The stern relief of the Zvezda Black Swan
was made with silicone and duplicated with resin.

Cut the burr cleanly.
It took a long time.

Then, I applied light green, put a stain on it, and finished with a dry brush
with light green mixed with light gray.

I glued it with an instant adhesive... I took it with a strobe, but it's a bit hard to see.

I took a picture with natural light.
Is it better than before!
But it's hard to see.

Shoot the relief part up

Pay attention to the red circle!
The corners of the roof are also glued.

Pay attention to the red circle!
The corners of the port roof are also glued.

The statues are also smeared and light green finishes with a dry brush.

It is a statue on the stern side.

Statue on the starboard side...

It's a smear and a dry brush, but do you understand well when you upload it?

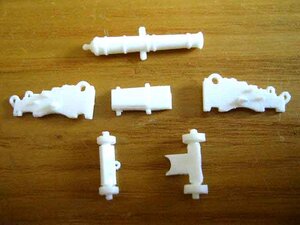
Next, the cannon was also molded with silicon and duplicated with resin...
Duplicates are not too loose. I'm tired...

I can cut out the cannon and carriage parts from this duplicate resin, but deburring is a pain.

There is only one cannon, but the carriage has five parts.

I'll be depressed... Tohoho...
I left the cannon attached to the air vent. When there are about 10 cannons, mold again with silicon.
Then cut it off and drill the hole in the cannon.

Even so, the parts aren't loosely cut out...
However, for the time being, I don't want to use silicon or resin.
I would like to wear gloves, but I can't really like working with gloves, so I end up working without gloves.
The hands are covered with resin, and when washing hands, use pumice stones to scrape off the resin.
Then, the skin of my hand becomes thin (laughs)
Thanks to that, my hands are tingling.
Attachments
Mellpapa - A very hearty Welcome Aboard ! Have been a fan of your Black Pearl and am delighted to see you here.
- Joined
- Dec 1, 2016
- Messages
- 6,656
- Points
- 728
it is a great honor to have you and your work on our international forum.
this topic has now reached 6,000 views and is still getting bigger.
what is I'll be depressed... Tohoho...?
I see that Dave Stevens is translating my website.
A big thanks to Dave Stevens. ( ´ ▽ ` )ノ
it is my honor to show your work to the international community of model builders and i thank you for allowing me to present your work.
- Joined
- Jun 28, 2020
- Messages
- 560
- Points
- 403

Wow!
Thank you all for making me feel so welcome.
It's an honor to speak with people with a passionate heart.
Please feel free to use my drawings and photos. All are free.
If you find mistakes in the drawings, please fix them yourself and produce them.
Please make a better black pearl.
I have reproduced a statue, a relief and a cannon from the zvezda kit.
The bow statue is made by me.

- Joined
- Jun 28, 2020
- Messages
- 560
- Points
- 403
Welcome aboard! Your work is very inspiring for me.
I would be honored if my crafting could help you with your crafting.
I would be honored if my crafting could help you with your crafting.
Now thats cool as it gets
") An artist and a decent guy.
An artist and a decent guy.Clair
- Joined
- Jun 28, 2020
- Messages
- 560
- Points
- 403
Now thats cool as it gets
Clair
Thank you!
Mr. Clair.
- Joined
- Dec 1, 2016
- Messages
- 6,656
- Points
- 728
part 6 of the Mellpapa build
translated

Cut out the parts of the cannon and carriage that were duplicated with the resin
... After cutting out about 12 sets...

I'm completely tired!
I'm no longer happy.
I will make another part.

So, I decided to make the red arrow part.
From the top, upper rail, middle rail, upper cheekney, lower cheekney..
However, I will use this name for the time being.

Make an upper cheekney pattern and check if it fits.
If it's a real sailing ship, this part will have grating, but...
from the material of the movie, it seems that it is just a piece of wood.

When the pattern is OK, trace it to a 2mm thick cypress and cut it out.

Here, my own mellpapa chopper prototype No. 7 is active.
The cut will be vertical.
You can find out more by going to the following.

5cm width is cut in one shot!

It is a 1 mm thick and 2 mm wide cypress cutting.

Glue the cypress material cut out above to the side surface,
and glue the cypress board material of 1mm thickness and 10mm width to the front side.
This part is a board for making the decorative part of the beak head.

The upper cheek knee on the port side was made by shaving or cutting and pasting.
It looks like a bird is flying.

I made an upper cheek knee on the starboard side using the same method.
All you have to do is glue it to the bow.

Make a pattern of the lower teakney and check it according to the hull.
Trace to 0.6mm aviation veneer and cut out, then cut into 1mm thick wood board material.

A 1.6 mm thick lower cheekney is created.

To make the upper and middle rails, we will make a jig with 5.5mm thick cena veneer.
The photo is for the upper rail.

Immerse the 1mm thick and 3mm wide cypress into the jigs of the upper rail and middle rail,
and when it becomes soft, stack 3 pieces of the cypress and push it into the jig and leave it overnight.
Since it is dried in the jig mold, three layers of glue are bonded with a tight bond, and then the
jig mold is pressed again.
When the tight bond is dry, take it out and carve it with a chisel to make each rail.
translated
Cut out the parts of the cannon and carriage that were duplicated with the resin
... After cutting out about 12 sets...
I'm completely tired!
I'm no longer happy.
I will make another part.
So, I decided to make the red arrow part.
From the top, upper rail, middle rail, upper cheekney, lower cheekney..
However, I will use this name for the time being.
Make an upper cheekney pattern and check if it fits.
If it's a real sailing ship, this part will have grating, but...
from the material of the movie, it seems that it is just a piece of wood.
When the pattern is OK, trace it to a 2mm thick cypress and cut it out.
Here, my own mellpapa chopper prototype No. 7 is active.
The cut will be vertical.
You can find out more by going to the following.
5cm width is cut in one shot!
It is a 1 mm thick and 2 mm wide cypress cutting.
Glue the cypress material cut out above to the side surface,
and glue the cypress board material of 1mm thickness and 10mm width to the front side.
This part is a board for making the decorative part of the beak head.
The upper cheek knee on the port side was made by shaving or cutting and pasting.
It looks like a bird is flying.
I made an upper cheek knee on the starboard side using the same method.
All you have to do is glue it to the bow.
Make a pattern of the lower teakney and check it according to the hull.
Trace to 0.6mm aviation veneer and cut out, then cut into 1mm thick wood board material.
A 1.6 mm thick lower cheekney is created.
To make the upper and middle rails, we will make a jig with 5.5mm thick cena veneer.
The photo is for the upper rail.
Immerse the 1mm thick and 3mm wide cypress into the jigs of the upper rail and middle rail,
and when it becomes soft, stack 3 pieces of the cypress and push it into the jig and leave it overnight.
Since it is dried in the jig mold, three layers of glue are bonded with a tight bond, and then the
jig mold is pressed again.
When the tight bond is dry, take it out and carve it with a chisel to make each rail.
- Joined
- Dec 1, 2016
- Messages
- 6,656
- Points
- 728

It is pasting of each part.
First, glue the lower cheekney

Glue the upper cheek knee and glue while adjusting the length of the upper rail.

Glue the middle rail.
Bonding of the starboard side rail parts is complete.

This is the port side.

It is a photo taken from the front of the bow. The rail was a little too thick.
But I don't care. It's hard to make if the parts are thin.
The left and right head timbres.

The part surrounded by a red frame is the head timbre. There are only 5 in the picture, though only 4 are shown.
The inside is engraved, so I will reproduce it as well.


Stick a thin plate on a 1mm thick and 2mm wide plate so that it is engraved.
It's a detailed work, so your eyes get tired.


You have two. This alone is a little thin. Then, cut out a 0.5 mm thick plate...


Paste it on the back. Smooth the surface with sandpaper.

Cut this and stick it in.

The third port from the front is pasted on the port side.

This is the starboard side, and the third one is attached from the front.
It's a friend.

I managed to put the fifth one on the starboard side.

This is the fifth port on the port side.
Hohe, I managed to make it.

It is a photograph seen from the front side of the bow.
Hmm... There are some parts that are a little crazy, but...
I don't have the motivation to fix it anymore, so I'll call it "good."
I managed to make the bow rail part. It's still a tattoo, but it's in shape
- Joined
- Dec 1, 2016
- Messages
- 6,656
- Points
- 728
part 7

Create a waterway
I will make a jig for making a waterway. Carve the center of a suitable bar with a V-shaped chisel.
The depth is about 0.8mm.
Put masking tape around them.

Place 1mm x 1mm square timber in the V-shaped part...

Shave off the part that comes out of the V-shape with a sandpaper.
This completes the waterway bar.

I put a red frame around the waterway part.

Waterway in front of the captain's room.

There is a drain hole under the gun port. The red frame is the waterway.

It is a waterway along Bluwork.

I made the hole part of the anchor rope, I forgot the name ... (red frame part).

It is a close-up image. It's fluffy. After this, sandpaper was applied and the shape was adjusted.

This is the starboard side.

It is a close-up image.

The shape is further adjusted on the left and right, and the basic colors are painted.
Produced a cannon

Well, it's a cannon. You got tired of it before, and you interrupted it.
I removed the burrs from the carriage and other parts, made a silicone model of the barrel of the cannon, and duplicated it with resin. I wish I had twenty, but I tried to duplicate about 84. When the BP issue is completed, we will also make the 1/72 FD issue!
But a little too much.

I cut it out beautifully from the runner.
Keep about 20 for BP and keep the rest.

This is a photo of the painting being prepared.
Stick double-sided tape on the cigarette case and attach the parts to it.
Cannon can only make visible parts, so you can complete 12!
The rest is reserve.
The 20 barrels put together are for the barrel to be inserted from the gun port, and will be cut in half later.

For the time being, assemble one and examine the shape...
Cut the red frame part because the eyebolt part is a little different.
Also, the base plate for adjusting the height of the gun is a little too long, so cut it.
The eyebolt is remade with a 0.5mm brass wire.

Carriage parts with the red frame cut.

The state where basic painting is finished.
Carriage parts are painted red brown.
The barrel is painted matte black.

I assembled 12 pieces.
Only the two lower right ones have eyebolts.
I attached eyebolts to everything after taking a picture.
About painting...
After assembling the carriage part, put a stain on it with enamel and dry it,
then dry brush with earth and dark yellow.
Gun barrel is silver and dry brush before assembly.

The size doesn't look right, so I put it on a 10-yen coin and shot it.
25mm from the back of the carriage to the tip of the barrel.
1/72 cannon... small and difficult to make. My eyes hurt.

I made 12 of them, so I immediately put them on the deck!
Umm...cool.
But I have to make bleaching ropes and guntails for 12 cannons... the parts used for them...
48 eyebolts
48 S-shaped hooks
24 first pulleys
24 second pulleys
I was distracted.....waterfall sweat...
Create a waterway
I will make a jig for making a waterway. Carve the center of a suitable bar with a V-shaped chisel.
The depth is about 0.8mm.
Put masking tape around them.
Place 1mm x 1mm square timber in the V-shaped part...
Shave off the part that comes out of the V-shape with a sandpaper.
This completes the waterway bar.
I put a red frame around the waterway part.
Waterway in front of the captain's room.
There is a drain hole under the gun port. The red frame is the waterway.
It is a waterway along Bluwork.
I made the hole part of the anchor rope, I forgot the name ... (red frame part).
It is a close-up image. It's fluffy. After this, sandpaper was applied and the shape was adjusted.
This is the starboard side.
It is a close-up image.
The shape is further adjusted on the left and right, and the basic colors are painted.
Produced a cannon
Well, it's a cannon. You got tired of it before, and you interrupted it.
I removed the burrs from the carriage and other parts, made a silicone model of the barrel of the cannon, and duplicated it with resin. I wish I had twenty, but I tried to duplicate about 84. When the BP issue is completed, we will also make the 1/72 FD issue!
But a little too much.
I cut it out beautifully from the runner.
Keep about 20 for BP and keep the rest.
This is a photo of the painting being prepared.
Stick double-sided tape on the cigarette case and attach the parts to it.
Cannon can only make visible parts, so you can complete 12!
The rest is reserve.
The 20 barrels put together are for the barrel to be inserted from the gun port, and will be cut in half later.
For the time being, assemble one and examine the shape...
Cut the red frame part because the eyebolt part is a little different.
Also, the base plate for adjusting the height of the gun is a little too long, so cut it.
The eyebolt is remade with a 0.5mm brass wire.
Carriage parts with the red frame cut.
The state where basic painting is finished.
Carriage parts are painted red brown.
The barrel is painted matte black.
I assembled 12 pieces.
Only the two lower right ones have eyebolts.
I attached eyebolts to everything after taking a picture.
About painting...
After assembling the carriage part, put a stain on it with enamel and dry it,
then dry brush with earth and dark yellow.
Gun barrel is silver and dry brush before assembly.
The size doesn't look right, so I put it on a 10-yen coin and shot it.
25mm from the back of the carriage to the tip of the barrel.
1/72 cannon... small and difficult to make. My eyes hurt.
I made 12 of them, so I immediately put them on the deck!
Umm...cool.
But I have to make bleaching ropes and guntails for 12 cannons... the parts used for them...
48 eyebolts
48 S-shaped hooks
24 first pulleys
24 second pulleys
I was distracted.....waterfall sweat...
I was recently visiting with a friend of mine and showed him some pictures of a 3-D puzzle I had recently acquired and built and he recommended I post the pictures here. THe first is the cover art for thie puzzle:

Now this is sold as the Queen Anne's Revenge but it quite obvious that that is not what this ship is. It is the Black Pearl.
here are some photos of the completed puzzle. It even has led's to light her up. Enjoy.


Now this is sold as the Queen Anne's Revenge but it quite obvious that that is not what this ship is. It is the Black Pearl.
here are some photos of the completed puzzle. It even has led's to light her up. Enjoy.
OH, by the way, CubicFun also make one of the Victory, the Esmeralda and a mississippi river boat. They all look like a fun way to kill a few hours in front of the tv.
Last edited:
Hard to believe that is a puzzle. Especially considering it has lights!!!! Thanks for sharing.OH, by the way, CibicFun also make one of the Victory, the Esmeralda and a mississippi river boat. They all look like a fun way to kill a few hours in front of the tv.