
I didn't think to look a zvesda for the bp, I've built a few of there models and are generally really nice to buildTake a look at the Zvezda plastic kits.

-

SUBSCRIBE TO SHIPS IN SCALE TODAY!
The beloved Ships in Scale Magazine is back and charting a new course for 2026!
Discover new skills, new techniques, and new inspirations in every issue.
NOTE THAT OUR NEXT ISSUE WILL BE MARCH/APRIL 2026 -

Win a Free Custom Engraved Brass Coin!!!
As a way to introduce our brass coins to the community, we will raffle off a free coin during the month of August. Follow link ABOVE for instructions for entering.
You are using an out of date browser. It may not display this or other websites correctly.
You should upgrade or use an alternative browser.
You should upgrade or use an alternative browser.
The Black Pearl
- Thread starter Dave Stevens (Lumberyard)
- Start date
- Watchers 35


Other way around. The Revell was a limited edition run, licensed from Zvezda. The mold is from Zvezda.Wasn't the zvezda just a rebrand of the revell one?
Yup... its cool. See my previous post here for the full story on the plastic kits:Ahh ok
The Black Pearl
Please focus your attention to the drawings Dave shows in Post #10 of this thread. These are original Adobe Illustrator drawings created by Mr Mellpapa, a Japanese model builder who became very interested in the Black Pearl after watching the movies. As a member of a local model club, Mr...
shipsofscale.com
- Joined
- Dec 1, 2016
- Messages
- 6,656
- Points
- 728

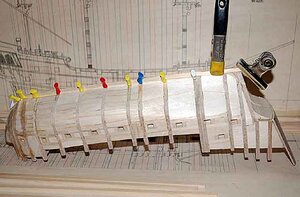
Almost the gun port is completed.

When the gun port is completed, insert the filler between the frames.
Mix the sawdust with Tight Bond to make a putty and fill the bumps on the bow.

With the filler, the shape of the hull is completed. This is the starboard side.

This is the port side.

When the gun port is completed, insert the filler between the frames.
Mix the sawdust with Tight Bond to make a putty and fill the bumps on the bow.
With the filler, the shape of the hull is completed. This is the starboard side.
This is the port side.
- Joined
- Dec 1, 2016
- Messages
- 6,656
- Points
- 728
I'm pasting Garport Strake. If you do not stick this, you cannot attach the keel.
The transom part is also made of balsa and glued.
.jpg")
I've finished attaching Garport Strake.
After this, I attached the keel. I'm anxious about the adhesive, so I'm using a brass wire.

Next, attach the outer plates of the transom counters on the stern.
I forgot to take the picture with the stern skin attached. It is a photo taken after I noticed after sticking out the outer panel on the side.

After finishing attaching the stern skin, stick the side skin support plate.
The picture shows the position where the support board is attached.

The outer plate support plate was made with 1 mm thick balsa, stuck and dried, and then sandpaper was applied to eliminate steps.

The position of the wales is drawn on the hull.

The wale plate is a 1 mm thick plate, and the other outer plates are a 2 mm thick plate. Both are boards with a width of 3 mm.

I will finish the outer skin of the hull a little more.

I managed to finish pasting.

The wales and rails have 1mm thick plates, so there are steps. A plate with a thickness of 2 mm is attached to this part to form a wale and a rail protruding 1 mm.

A photograph of the central part of the hull.
The transom part is also made of balsa and glued.
I've finished attaching Garport Strake.
After this, I attached the keel. I'm anxious about the adhesive, so I'm using a brass wire.
Next, attach the outer plates of the transom counters on the stern.
I forgot to take the picture with the stern skin attached. It is a photo taken after I noticed after sticking out the outer panel on the side.
After finishing attaching the stern skin, stick the side skin support plate.
The picture shows the position where the support board is attached.
The outer plate support plate was made with 1 mm thick balsa, stuck and dried, and then sandpaper was applied to eliminate steps.
The position of the wales is drawn on the hull.
The wale plate is a 1 mm thick plate, and the other outer plates are a 2 mm thick plate. Both are boards with a width of 3 mm.
I will finish the outer skin of the hull a little more.
I managed to finish pasting.
The wales and rails have 1mm thick plates, so there are steps. A plate with a thickness of 2 mm is attached to this part to form a wale and a rail protruding 1 mm.
A photograph of the central part of the hull.
Attachments

Last edited:
- Joined
- Dec 1, 2016
- Messages
- 6,656
- Points
- 728

Here, while sticking the outer plate on the bow side and the bow part, I will also stick the deck part.
After attaching the outer plate, cut the column of the frame and stick the inner plate of bulwark with 1 mm thick cypress.

It is a lower plate making for making a deck.
1mm thick balsa is vertically connected and pasted, and cut into A-4 size.

The deck is printed on a 1 mm thick A-4 size balsa with an Epson inkjet printer.
A printer that can print thick paper can print on a 1 mm thick balsa.

You can see that it was nicely printed.

Cut out the balsa deck and attach a 1 mm thick deck board <1 mm thick and 3 mm width> to the balsa printing surface. Before sticking the deck to the hull, the deck under the stairs should be painted black. When the stairs are made and installed, the inside cannot be seen very well. So it doesn't matter if you paint it black.

The deck part is up. We are also making gratings <lattice> etc. The grid is 1 mm.
I also stuck the wale and rail part. It goes out 1mm.

This is a picture of the stern side.
Also pay attention to the rails and wales!

This is the bulkhead part of the bow.

Close-up photo of the partition wall.

It is a work of the bulkhead part of the captain's room.

Is it like this when you paint with colors?
If you make it too dark,
you won't know what it is.

Reproduce the nail lid on the deck with the tip of a toothpick.
It's very troublesome and takes a lot of time...

I painted the deck and bulwark part. I made a bow stem and a beak head and glued them together. I use brass wire to connect.

It is a close-up photo of the bow stem and beak head
- Joined
- Dec 1, 2016
- Messages
- 6,656
- Points
- 728

I made various things such as handrails of bulwarks, columns, round decorations, bay windows of the captain's room.
The work of handrails and pillars is the same as the work of Flying Dutchman.

You can see the bulkhead of the captain's room, the deck above the captain's room, the handrail,
and the round decoration.

This is the bow side.
Do you understand the handrails and columns well?
You can see the position of the bowsprit well.

It is up around Bowsprit on the bow.

It is an improvement of the round ornament part.

This is the bay window of the captain's room on the starboard side.
The window frame was printed on a transparent plastic plate with an Alps thermal transfer printer.
It's a little too tight to assemble the window frame with wood.
I wish I could make the window frame by etching... I thought about introducing etching technology
several times, but I have not yet introduced it.
It's OK because it can be reproduced with an Alps thermal transfer printer.

It is the bay window part of the captain's room on the stern side.
The decoration of the relief was made by molding
with an interesting clay "Oyumaru" sold at a 100 yen shop, and duplicated it with a resin.

Window of the captain's room on the stern port side
Photo taken from diagonally above.

Window of the captain's room on the stern port side
Photo taken from the side.

It is a photo looking up diagonally from the stern port side.
Since it is a temporary group, there is a gap.

The roof of the bay window of the captain's room was carved out from the balsa block
and glued onto the bay window.
By the way, it is the roof part of the bay window, but it looks like a small round tile.
As you can see, it looks like a scale.
The 1/72 model also reproduces a scaly shape with round roof tiles.
Use a punch with a diameter of 1.5 mm to remove the memo paper and pull it one by one.
I managed to paste it from the bottom up to the third tier.
It's a roof part on the left, right, and back...it's tough.

I shot it up but the roof part was white.
Tohoho… ( I don't know what tohoho translated to)

This time I was able to shoot well.

Oh, this is also flying white...
Tohoho...

Oh, I was able to shoot well.
You took the picture in the middle of the third stage.
I'm sure my eyes were tired and I stopped on the way.

From the bottom, I stuck to the 7th step.
If you stick the first layer of the memo paper that you pulled out in a circle,
the second layer will be shifted by half horizontally, and it will be quite half.

I shot it at a different angle, but it's a little white.

It is the back roof. This also flew a little white.

I was able to shoot well. Pay attention to the starboard side roof part!

Pay attention to the port side roof!

Dave ITS COMING ALONG VERY NICE. What plans are you using and were can i get them? Thanks
Those are from the Mellpapa plans - as well as his build log. The reason for the broken English is that Dave is trying to translate it as he goes.
I learned more in 3 posts than in all the last year of being me. Great job Dave, thank you for doing this!!
Clair
Clair
- Joined
- Dec 1, 2016
- Messages
- 6,656
- Points
- 728

I'm tired of sticking only round roof tiles, so I filled the gap in the red arrow with woodwork putty.

The putty is also filled in the gap between the rail and the support (red arrow part).

Fill the putty in the gap between the rail and the round ornament (red arrow)!

This photo is in a state where it is filled with putty and modified.

In addition, it is pasted with round roof tiles. I pasted it on the front part of the starboard roof first.

I also pasted the front part of the port side roof first.

The roof tiles are still on the 9th level from the bottom...

This is the roof of the stern

Port side roof

I will stick to each one one by one, I will call it training, or a punishment game ...
work that makes me sad ...

I pasted up to the 11th row, counting from the bottom.
The goal is close, but...
it is a starboard roof.

This is the roof of the stern part.
If you look at this, you can see that "Oops, it's mochi."

This is the roof on the port side, Mouchi. Gambare...
But, take a break with strength……

Now, paste it again and the back part will end.

The starboard side is finally pasted!

Pasting is completed on the port side as well!

For the back, stick one more layer and you're done!

After a while...

finished! Finally the roof tiles have been pasted!
- Joined
- Dec 1, 2016
- Messages
- 6,656
- Points
- 728

Masking for painting the roof.

I sprayed Tamiya's Super Surfacer.

It is a close-up image of the roof tile after spraying the super surfacer.

Light green (original color made by mixing various lacquer Mr.COLOR) was sprayed with a handpiece.

This is a shot with different angles.

Stern roof
Light green is mixed with light gray, and dry brush and enamel are used to add stains.

Starboard side roof

Port side roof
I think it was good.
I feel like I've won. But I don't want to do anything for a month...

I painted the hull with the basic color (basic color I decided: walnut of oily oil stain)
and glued the bay window of the captain's room to the stern.
Then, I tried to temporarily assemble the statue part.
This is the starboard side

Port side

The bay window is up.

Close-up image of the statue under temporary assembly
I haven't done stains or stains yet.

Stern side

Image from diagonally behind

Starboard side image

Starboard side: Image seen from below

Image looking up from the starboard side diagonally below
There is a relief on the stern roof and there are still some parts that I have to work on,
but next I want to do something about the rail part of the bow.
But I'm tired of the roof tiles and don't want to do anything for the time being (laughs)
Dave or anybody else, I am wondering how the snail skin was made, is it carved out od block of wood or?

Hallo, @mellpapaPull out the notepaper with a 1.5mm diameter punch. I stuck the white, round notepaper with the red arrow pulled out on the roof.
A warm welcome here on board of our friendly forum - Great to have you on board

Welcome aboard Mr Mellpapa. We are huge fans of you and your Black Pearl!!!Pull out the notepaper with a 1.5mm diameter punch.
Yes, welcome, my name is Mike, I first found your website and translated to EnglishThat my more beautiful black pearls will be made.
We were doing Black Pearl history research for models
We have many people here building Black Pearls. Mostly ZHL kits.
We credit you as the "father" or "original" Black Pearl model builder in the world.
WELCOME MY FRIEND.