Excellent work, nice one Jim
-

Win a Free Custom Engraved Brass Coin!!!
As a way to introduce our brass coins to the community, we will raffle off a free coin during the month of August. Follow link ABOVE for instructions for entering.
-

PRE-ORDER SHIPS IN SCALE TODAY!
The beloved Ships in Scale Magazine is back and charting a new course for 2026!
Discover new skills, new techniques, and new inspirations in every issue.
NOTE THAT OUR FIRST ISSUE WILL BE JAN/FEB 2026
- Home
- Forums
- Ships of Scale Group Builds and Projects
- HMS Alert 1777 1:48 PoF Group Build
- HMS Alert 1777 1:48 Group Build Logs
You are using an out of date browser. It may not display this or other websites correctly.
You should upgrade or use an alternative browser.
You should upgrade or use an alternative browser.
Many, many thanks for your comments and likes, my friends! This is awesome, I am glad you like the idea. Cannot be happier!
...but we left some metalsmith work to do, to finish the doors. So hinges...First, you have to make a decision on how you want to present your doors with working hinges or static. Working hinges will require a different approach and some design modifications but on a 1:48 scale, it is possible to make. For this session, we will imitate hinges and the door will be shut close. BTW, even if you decide to show the door wide open or just a bit open, you can still imitate the hinges,
I will use brass tubing 0.8mm diameter for knuckles, and 0.5mm brass wire for the pin. Cut the tubing less smaller by 1.00mm than the actual hinge size. The size of the hinge determined by measuring the milled groove on the saddle we made in the previous post. Cut the pin with the exact size of the grove. I use my miniature sawblade and miter box to cut all parts.
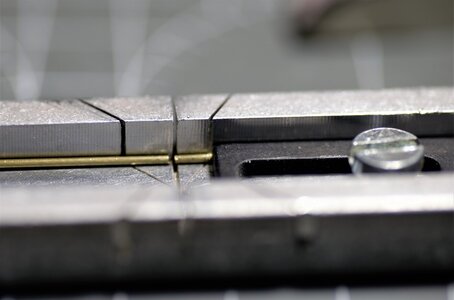
Using the smallest 'cup' bur round both ends of the pin. Now, insert the pin into the tubing until the ends show from both sides. Isn't a part looks like a hinge?
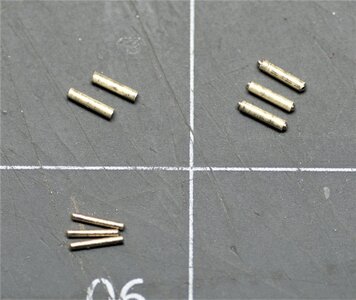
On the upper left, tubing cut into the size and represent knuckles, bottom left - the pins cut and ends rounded. The upper right image depicts the ready hinges. Technically, we can use them as-is, but we will add a final 'touch' to make them complete and authentic The hinge made out of two or more knuckles on either of the leaves' sides. I Will assume that our hinge should have two knuckles on the door side leave, and one knuckle on the saddle or jump side.
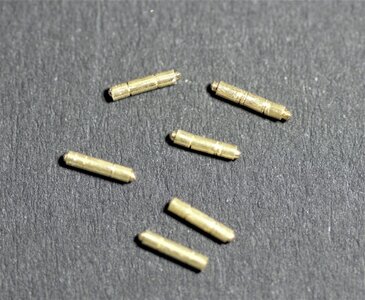
Using the # 11 knife blade, I touch the hinge at the position of the end of the first knuckle and roll the hinge until I see a nice cutting line. Don't press too hard, you may cut it thru. Now, position the knife at another side and roll it again until you see the nice groove. Don't roll back and first, forward only.
Now you have a complete hinge.
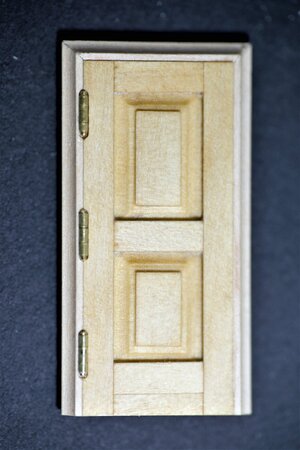
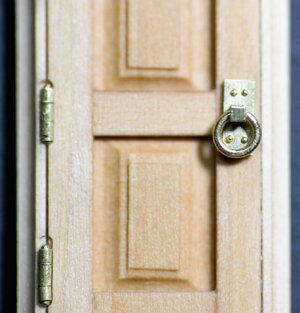
...and here is the door with hinges installed. I use a very thin CA glue and a looper applicator, the glue is hardly visible on the macro image. You are the witness!!!!
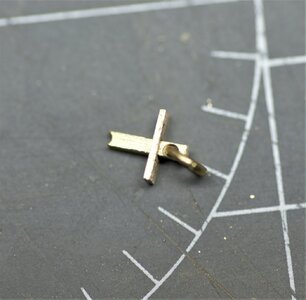
The final part left to finish the door is the door handle. A plain handle ring would be too simple for such a fancy door, a simple 'Google' search reveals some contemporary doors and one of their handle I like most. I use a 2.00mm x 0.5mm brass strip as the plate and a brass square wire 1.00mm x1.00mm as the ring holder. Again, the mill helps me to drill 0.3mm holes.
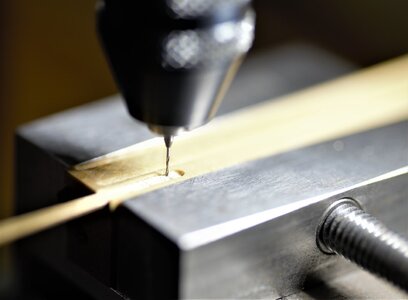
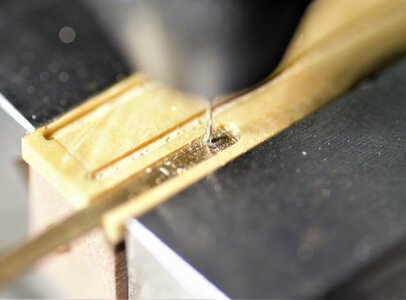
The hole for the ring holder drilled with a 0.6mm drill bit, then shaped square with the mini file. The ring is 6.00mm brass wire
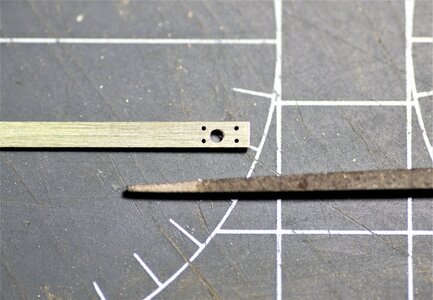
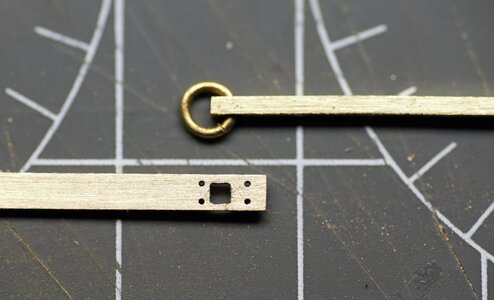
Here is the result
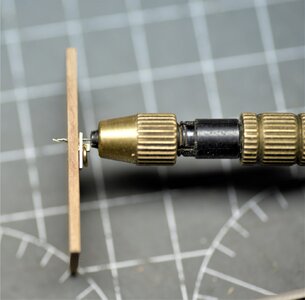
Time to attach the handle to the door. Drilled the holes for the bolts.
...and the moment we were waiting since yesterday has arrived. The door completed and the supervisor makes inspections. I hope he likes it.
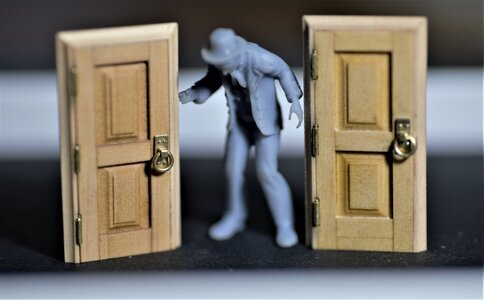
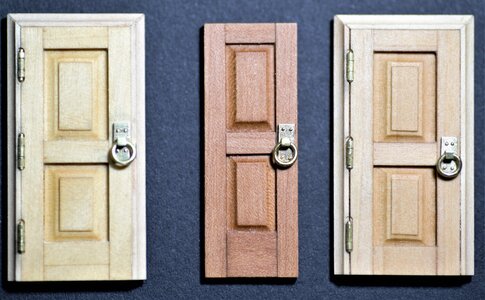
Well, that is it, my friends. The doors' journey comes to the end. I hope you can use the idea and make it better! Many thanks, again. Will return to limber Starke soon. Stay tuned...
...but we left some metalsmith work to do, to finish the doors. So hinges...First, you have to make a decision on how you want to present your doors with working hinges or static. Working hinges will require a different approach and some design modifications but on a 1:48 scale, it is possible to make. For this session, we will imitate hinges and the door will be shut close. BTW, even if you decide to show the door wide open or just a bit open, you can still imitate the hinges,
I will use brass tubing 0.8mm diameter for knuckles, and 0.5mm brass wire for the pin. Cut the tubing less smaller by 1.00mm than the actual hinge size. The size of the hinge determined by measuring the milled groove on the saddle we made in the previous post. Cut the pin with the exact size of the grove. I use my miniature sawblade and miter box to cut all parts.

Using the smallest 'cup' bur round both ends of the pin. Now, insert the pin into the tubing until the ends show from both sides. Isn't a part looks like a hinge?

On the upper left, tubing cut into the size and represent knuckles, bottom left - the pins cut and ends rounded. The upper right image depicts the ready hinges. Technically, we can use them as-is, but we will add a final 'touch' to make them complete and authentic
Using the # 11 knife blade, I touch the hinge at the position of the end of the first knuckle and roll the hinge until I see a nice cutting line. Don't press too hard, you may cut it thru. Now, position the knife at another side and roll it again until you see the nice groove. Don't roll back and first, forward only.
Now you have a complete hinge.

...and here is the door with hinges installed. I use a very thin CA glue and a looper applicator, the glue is hardly visible on the macro image. You are the witness!!!!

The final part left to finish the door is the door handle. A plain handle ring would be too simple for such a fancy door, a simple 'Google' search reveals some contemporary doors and one of their handle I like most. I use a 2.00mm x 0.5mm brass strip as the plate and a brass square wire 1.00mm x1.00mm as the ring holder. Again, the mill helps me to drill 0.3mm holes.


The hole for the ring holder drilled with a 0.6mm drill bit, then shaped square with the mini file. The ring is 6.00mm brass wire


Here is the result

Time to attach the handle to the door. Drilled the holes for the bolts.

...and the moment we were waiting since yesterday has arrived. The door completed and the supervisor makes inspections. I hope he likes it.


Well, that is it, my friends. The doors' journey comes to the end. I hope you can use the idea and make it better! Many thanks, again. Will return to limber Starke soon. Stay tuned...
GREAT - Very good work
OMG too cute. I'll have to get one of those machines. these would be tough with only a number 11 and a sanding stick. HahaMany, many thanks for your comments and likes, my friends! This is awesome, I am glad you like the idea. Cannot be happier!
...but we left some metalsmith work to do, to finish the doors. So hinges...First, you have to make a decision on how you want to present your doors with working hinges or static. Working hinges will require a different approach and some design modifications but on a 1:48 scale, it is possible to make. For this session, we will imitate hinges and the door will be shut close. BTW, even if you decide to show the door wide open or just a bit open, you can still imitate the hinges,
I will use brass tubing 0.8mm diameter for knuckles, and 0.5mm brass wire for the pin. Cut the tubing less smaller by 1.00mm than the actual hinge size. The size of the hinge determined by measuring the milled groove on the saddle we made in the previous post. Cut the pin with the exact size of the grove. I use my miniature sawblade and miter box to cut all parts.
View attachment 210405
Using the smallest 'cup' bur round both ends of the pin. Now, insert the pin into the tubing until the ends show from both sides. Isn't a part looks like a hinge?
View attachment 210407
On the upper left, tubing cut into the size and represent knuckles, bottom left - the pins cut and ends rounded. The upper right image depicts the ready hinges. Technically, we can use them as-is, but we will add a final 'touch' to make them complete and authenticThe hinge made out of two or more knuckles on either of the leaves' sides. I Will assume that our hinge should have two knuckles on the door side leave, and one knuckle on the saddle or jump side.
Using the # 11 knife blade, I touch the hinge at the position of the end of the first knuckle and roll the hinge until I see a nice cutting line. Don't press too hard, you may cut it thru. Now, position the knife at another side and roll it again until you see the nice groove. Don't roll back and first, forward only.
Now you have a complete hinge.
View attachment 210413
...and here is the door with hinges installed. I use a very thin CA glue and a looper applicator, the glue is hardly visible on the macro image. You are the witness!!!!
View attachment 210415
The final part left to finish the door is the door handle. A plain handle ring would be too simple for such a fancy door, a simple 'Google' search reveals some contemporary doors and one of their handle I like most. I use a 2.00mm x 0.5mm brass strip as the plate and a brass square wire 1.00mm x1.00mm as the ring holder. Again, the mill helps me to drill 0.3mm holes.
View attachment 210417 View attachment 210418
The hole for the ring holder drilled with a 0.6mm drill bit, then shaped square with the mini file. The ring is 6.00mm brass wire
View attachment 210419View attachment 210420
Here is the result
View attachment 210421
Time to attach the handle to the door. Drilled the holes for the bolts.
View attachment 210422
...and the moment we were waiting since yesterday has arrived. The door completed and the supervisor makes inspections. I hope he likes it.
View attachment 210425
View attachment 210423
View attachment 210424
Well, that is it, my friends. The doors' journey comes to the end. I hope you can use the idea and make it better! Many thanks, again. Will return to limber Starke soon. Stay tuned...
Incredible what you have done. I’m in awe of your workmanship.
Jan
Jan
If you making your models from scratch, the mill is one of those tools you must have. The type\brand of a mill would depend on the budget and the person's preferences. The mill is in no way a substitution for the CNC machien\router, but one of the essentials tools alone with precision tablesaw and methal lathe, IMHO.I'll have to get one of those machines. these would be tough with only a number 11 and a sanding stick. Haha
A hobby knife is also an essential tool even if you are mostly building from the kits, it is a table tool, it is never to leave the table - always there when you need it.
Hi Jim,
Fannnnnnntassssssticccccc doors, can I order these from you .
.
You are setting the new bench mark here.
Do you make them functional?
Fannnnnnntassssssticccccc doors, can I order these from you
You are setting the new bench mark here.
Do you make them functional?
Thank you, Mon Amie. Well...I offer those to you for free in exchange for help on planking the hull and ceilingFannnnnnntassssssticccccc doors, can I order these from you.
You are setting the new bench mark here.
Do you make them functional?
I have the idea to make the hinges from injection needles, these are available in much smaller sizes then brass tube.Thank you, Mon Amie. Well...I offer those to you for free in exchange for help on planking the hull and ceilingThe doors that showed in the post are static and not functional. But, with a modified hinge we can make them functional, I have some ideas...we shall see...
The brass tubes available in small sizes as well, I think the smallest can be found at 0.3mm OD and 0.2mm ID. Does the size I use 0.8mm look out of scale?I have the idea to make the hinges from injection needles, these are available in much smaller sizes then brass tube.
The injection needles will be hard to solder...they are steel, my guess.
No your hinges look very nice.The brass tubes available in small sizes as well, I think the smallest can be found at 0.3mm OD and 0.2mm ID. Does the size I use 0.8mm look out of scale?
The injection needles will be hard to solder...they are steel, my guess.
Soldering brass or steel is no difference, it will both be fine with Silver soldering.
I have never found brass or copper pipe smaller then 1mm.
If we would look to scale at 1:48 a 1 mm hinge would be 48 mm thick whereas a real fine door hinge would certainly below 2 cm thick, to scale this would be around 0,4 mm.
Do you have a link to these smaller sizes?
Guess Jimsky buy in US. Here you can buy them in Germany in 0.3 mm https://knupfer.info/shop/index.php/deutsch/profile-rohre/teleskop-rohr.htmlIf we would look to scale at 1:48 a 1 mm hinge would be 48 mm thick whereas a real fine door hinge would certainly below 2 cm thick, to scale this would be around 0,4 mm.
Do you have a link to these smaller sizes?
(also have many other goodies e.g. very good drills in 0.2 and 0.3 mm for a reasonable price and 0.3 mm width fine tooth saw blades for proxoxxon FET and . . . ).
Or even closer to your home https://modelbouwcompany.nl/ALBION-ALLOYS-MBT04-MICRO-BRASS-TUBE-0.4-MM-X-0.2-MM-I.D
I have no luck soldering steel with any type of solder... something I will learn from you.  It is the Albion precision metals that make them. below are the links for small size tubing (brass)


Albion MAT03 Aluminium Micro Tube 0.3 mm x 0.1 mm i.d. 3-PACK 5060102458630 | eBay
Each piece is 12" long. Aluminum micro-tube.
www.ebay.com

Albion Alloys MBT04 - Micro Tube Brass 0 4 X 0.0079in for sale online | eBay
Find many great new & used options and get the best deals for Albion Alloys MBT04 - Micro Tube Brass 0 4 X 0.0079in at the best online prices at eBay! Free shipping for many products!
www.ebay.com
Exactly, Poul, I bought some 2.55mm drillbits from Germany in November 2020 still didn't receive it and most-likey will not... Find micro drill bits is hard to find here. It is mostly extremely expensive.Guess Jimsky buy in US.
Hehe. I have the opposite problem. When I was in learning as electrician I silver soldered many hundreds of 6 mm stainless steel tubes but I can't solder extremely small brass parts. Very small brass parts seems to almost vaporize as soon as I hit them with the flame.I have no luck soldering steel with any type of solder...
So... ya saying that it is possible to solder (not weld) steel in general? What solder?
Silver and proper flux for Silver solder. (flux 6).So... ya saying that it is possible to solder (not weld) steel in general? What solder?
I'd say almost any kind of silver solder. Maybe 45-55% AG is preferable. Flux is slightly more important as some flux are not suitable for e.g. stainless steel.
Just checked, mine is 55% I use the flux from Regner.

 www.regner-dampftechnik.com

Flussmittel | REGNER
Flussmittel zum Hartlöten mit Silberloten.100ml in Weithalsflasche
 www.regner-dampftechnik.com


