-

Win a Free Custom Engraved Brass Coin!!!
As a way to introduce our brass coins to the community, we will raffle off a free coin during the month of August. Follow link ABOVE for instructions for entering.
-

PRE-ORDER SHIPS IN SCALE TODAY!
The beloved Ships in Scale Magazine is back and charting a new course for 2026!
Discover new skills, new techniques, and new inspirations in every issue.
NOTE THAT OUR FIRST ISSUE WILL BE JAN/FEB 2026
- Home
- Forums
- Ships of Scale Group Builds and Projects
- HMS Alert 1777 1:48 PoF Group Build
- HMS Alert 1777 1:48 Group Build Logs
You are using an out of date browser. It may not display this or other websites correctly.
You should upgrade or use an alternative browser.
You should upgrade or use an alternative browser.
Looking very good Jimsky
Completely correct, this is actually how you steer a wind surf board.I think soThe Centre of Force at the sail area should be right on the top of the centre of the underwater part of the hull
View attachment 214099
Many thanks to all for the interest, it gives me the motivation.
Since the Celling and all Thickstuff will require treenailing the subject for this evening discussion is - Treenail (verb) or imitate treenails or trunnels (you name it) Many methods already discussed, and from time-to-time, a new thread pops up, discussing yet another method as this seems a very 'hot' topic. For years, I am using one of the old methods - actual treenails made from 1 x 1 mm square stock and draw thru a drawplate. I like this method and it is well adapted among Russian modelers, but on the smallest scale it is impossible, well..., almost impossible to draw a 0.4mm treenail stick. But for the scale of 1:48 why not?
First I prepare the timber which I will use for the tests. Thre strips were cut on tablesaw and using my sophisticated sanding machine 'Handxxon' make them the same thickness. I lay all strips n the flat surface on the double-sticky tape (on the ends only) and using the tool made them the same.
Then, I glue the black paper to the entire stock. Once dry, using the sharp razor blade slice as individual planks. When I glue the planks, I choose a free pattern. It doesn't reflect a specific shift of the butts pattern, it is rather just for the test.

The first sample was made from 0.8mm x 5.00mm Castello. I use black paper to simulate caulking. It is divided into three rectangles:
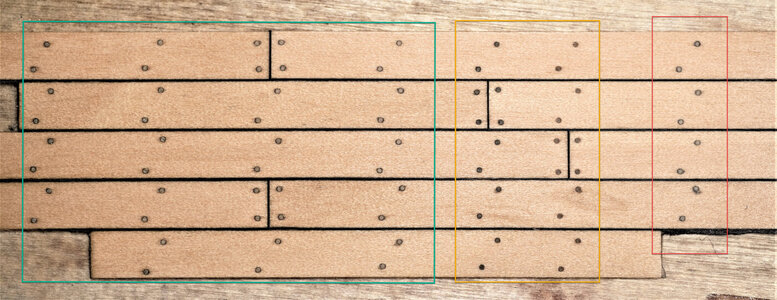
Red rectangle: this is the 0.5mm hole and the lead (H) from a mechanical pencil (0.5mm) inserted and lightly twisted
Orange rectangle: this is just treenails from pearwood (no blackening of any kind)
Green rectangle: This is the treenail rod rubbed against graphite powder
Some macro images
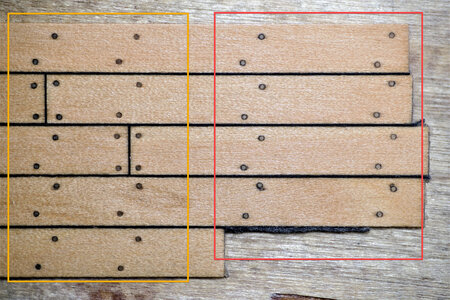
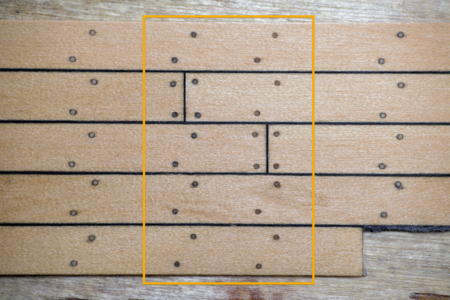

Technically the 'red' and 'green' examples look the same, it seems that rubbing the treenail rod against graphite powder just easier than insert the lead into each hole. What I don't like is - a bit of 'fuzziness' around the hole, but this is MACRO, and the bare eye will not see it. The test is planned for the deck planking.
The next set of samples is the 'gamechanger', IMHO. No actual treenails, just imitation!!!! This is something I didn't expect myself. Frankly, I choose the base idea as the method my friend Maarten @Maarten uses in his Alert build log. Check it out, highly recommend it, with lots of learning materials and great craftsmanship.
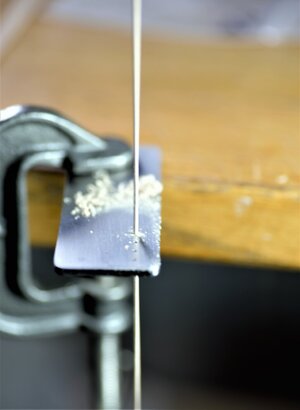
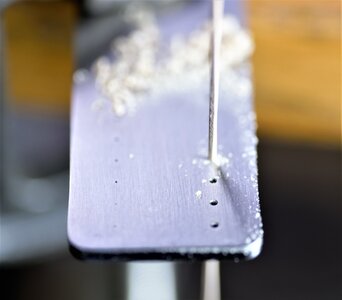
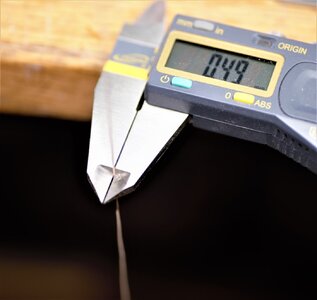
So I use the syringe needle with an external diameter of 0.8mm (yellow color) to cut off the yellow head with a cut-off wheel.
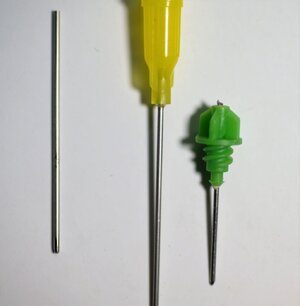
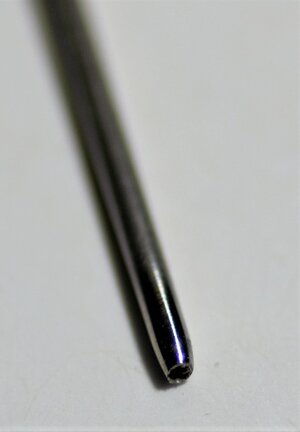
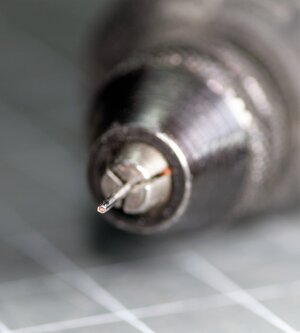
Shaped around the edge to form a sharp-pointed ring. So far the same steps as Maarten did, but that's it. The tool is ready. I tight the needle in my rotary tool and start using it like a drill. The key to success is low speed and no pressure. Start by touching with age, just a bit of angle until it touches the surface, then immediately make it flat against the planks. Don't push too hard, it needs just a touch, otherwise, you will drill thru. With a bit of practice, I am sure you will grasp great results. I absolutely love the results, hope you like them too. It eliminates the need for drawing treenails and drill holes.
This is planned to use for deck planking. The sample below is Pear (it is off-white color). Same caulking techniques as for the above methods - black paper.
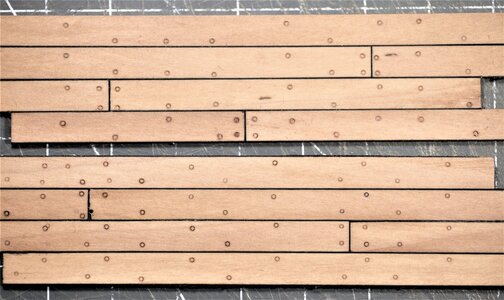
You will see different results. I was playing with speed and pressure. Also, at some point the working surface gets dull, You don't have to shape it again, just use a polishing paste against the hard felt. A few turns and the tool ready again. Below some MACRO. I love macro, it reveals all the flaws.
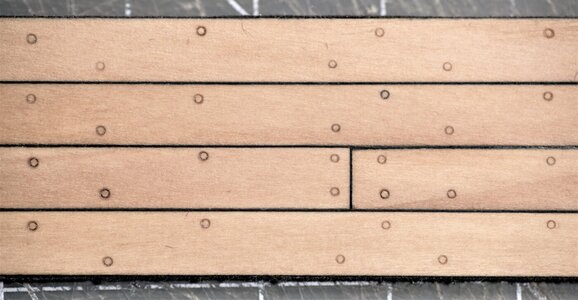
The last image is the combination of the Pear (will use for Celling) and Swishpear (will use for Thickstuff). This is without oil
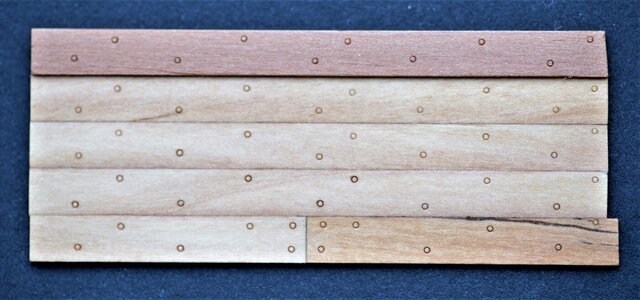
This is with one coat of Linseed oil. The oil penetrates in grooves and emphasizes the color imitating perfect caulking. Not too dark, not light. For my taste. BTW, all drilling is freehand, I didn't use the pencil to line up, but think, it is a good idea to line up first.
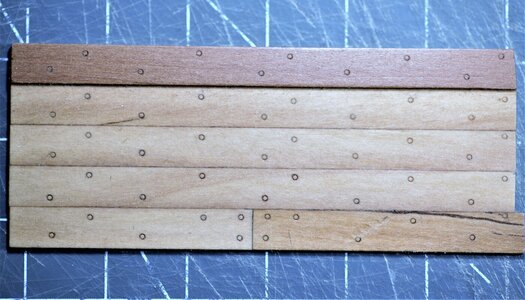
...and macro
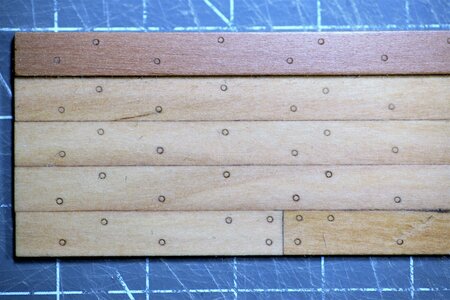
This is how natural Pear looks
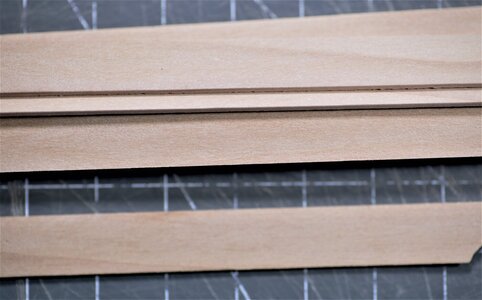
That's it, for now, folks. It is your turn, and I need your opinion. Which example you like the most and why? Please ask me any question you will come with, I will be glad to answer.
see you soon and thanks for your feedback,
Since the Celling and all Thickstuff will require treenailing the subject for this evening discussion is - Treenail (verb) or imitate treenails or trunnels (you name it)
First I prepare the timber which I will use for the tests. Thre strips were cut on tablesaw and using my sophisticated sanding machine 'Handxxon' make them the same thickness. I lay all strips n the flat surface on the double-sticky tape (on the ends only) and using the tool made them the same.

Then, I glue the black paper to the entire stock. Once dry, using the sharp razor blade slice as individual planks. When I glue the planks, I choose a free pattern. It doesn't reflect a specific shift of the butts pattern, it is rather just for the test.


The first sample was made from 0.8mm x 5.00mm Castello. I use black paper to simulate caulking. It is divided into three rectangles:

Red rectangle: this is the 0.5mm hole and the lead (H) from a mechanical pencil (0.5mm) inserted and lightly twisted
Orange rectangle: this is just treenails from pearwood (no blackening of any kind)
Green rectangle: This is the treenail rod rubbed against graphite powder
Some macro images


Technically the 'red' and 'green' examples look the same, it seems that rubbing the treenail rod against graphite powder just easier than insert the lead into each hole. What I don't like is - a bit of 'fuzziness' around the hole, but this is MACRO, and the bare eye will not see it. The test is planned for the deck planking.
The next set of samples is the 'gamechanger', IMHO. No actual treenails, just imitation!!!! This is something I didn't expect myself. Frankly, I choose the base idea as the method my friend Maarten @Maarten uses in his Alert build log. Check it out, highly recommend it, with lots of learning materials and great craftsmanship.
Hms Alert by Maarten [COMPLETED BUILD]
Thx again for your comments and likes. Today I am stil working on the thickstuff and shelf clamps. The last three are placed of which the shelf clamp is the most critical. The SB shelfclamp had its wood grain positioned under and angle causing the strake to brake into pieces when steaming and...
shipsofscale.com
So I use the syringe needle with an external diameter of 0.8mm (yellow color) to cut off the yellow head with a cut-off wheel.


Shaped around the edge to form a sharp-pointed ring. So far the same steps as Maarten did, but that's it. The tool is ready. I tight the needle in my rotary tool and start using it like a drill. The key to success is low speed and no pressure. Start by touching with age, just a bit of angle until it touches the surface, then immediately make it flat against the planks. Don't push too hard, it needs just a touch, otherwise, you will drill thru. With a bit of practice, I am sure you will grasp great results. I absolutely love the results, hope you like them too. It eliminates the need for drawing treenails and drill holes.
This is planned to use for deck planking. The sample below is Pear (it is off-white color). Same caulking techniques as for the above methods - black paper.

You will see different results. I was playing with speed and pressure. Also, at some point the working surface gets dull, You don't have to shape it again, just use a polishing paste against the hard felt. A few turns and the tool ready again. Below some MACRO. I love macro, it reveals all the flaws.

The last image is the combination of the Pear (will use for Celling) and Swishpear (will use for Thickstuff). This is without oil

This is with one coat of Linseed oil. The oil penetrates in grooves and emphasizes the color imitating perfect caulking. Not too dark, not light. For my taste. BTW, all drilling is freehand, I didn't use the pencil to line up, but think, it is a good idea to line up first.

...and macro

This is how natural Pear looks

That's it, for now, folks. It is your turn, and I need your opinion. Which example you like the most and why? Please ask me any question you will come with, I will be glad to answer.
see you soon and thanks for your feedback,
The syringe needle treenails definitely look better.
Is the darker colour of the treenail outer- circle due to:
Is the darker colour of the treenail outer- circle due to:
- Burn't wood
- Shadow
- Bruising or exposing end grain.
- something else?
Hi Jim,
Great comparison. I most like the seringe methode. It is easy, quick and with very good results.
Great comparison. I most like the seringe methode. It is easy, quick and with very good results.
Excellent eye gunsighting alignment and hand control in locating these. I think that your enjoyment in the experimentation is your major reward as you will select the one that you are most satisfied with on the decks. Well done. Rich (PT-2)Many thanks to all for the interest, it gives me the motivation.
Since the Celling and all Thickstuff will require treenailing the subject for this evening discussion is - Treenail (verb) or imitate treenails or trunnels (you name it)Many methods already discussed, and from time-to-time, a new thread pops up, discussing yet another method as this seems a very 'hot' topic. For years, I am using one of the old methods - actual treenails made from 1 x 1 mm square stock and draw thru a drawplate. I like this method and it is well adapted among Russian modelers, but on the smallest scale it is impossible, well..., almost impossible to draw a 0.4mm treenail stick. But for the scale of 1:48 why not?
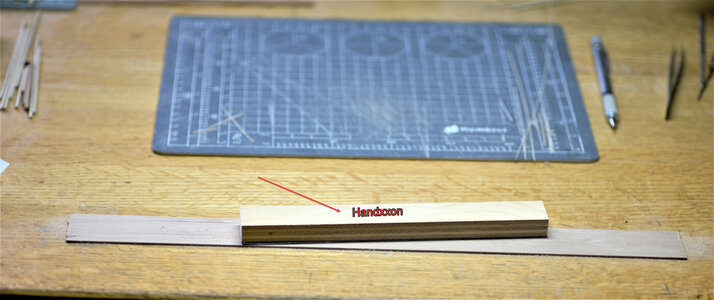
First I prepare the timber which I will use for the tests. Thre strips were cut on tablesaw and using my sophisticated sanding machine 'Handxxon' make them the same thickness. I lay all strips n the flat surface on the double-sticky tape (on the ends only) and using the tool made them the same.
View attachment 214187
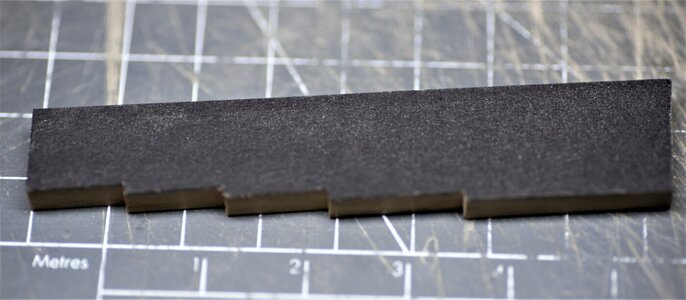
Then, I glue the black paper to the entire stock. Once dry, using the sharp razor blade slice as individual planks. When I glue the planks, I choose a free pattern. It doesn't reflect a specific shift of the butts pattern, it is rather just for the test.
View attachment 214188 View attachment 214189
The first sample was made from 0.8mm x 5.00mm Castello. I use black paper to simulate caulking. It is divided into three rectangles:
View attachment 214190
Red rectangle: this is the 0.5mm hole and the lead (H) from a mechanical pencil (0.5mm) inserted and lightly twisted
Orange rectangle: this is just treenails from pearwood (no blackening of any kind)
Green rectangle: This is the treenail rod rubbed against graphite powder
Some macro images
View attachment 214191
View attachment 214192
View attachment 214193
Technically the 'red' and 'green' examples look the same, it seems that rubbing the treenail rod against graphite powder just easier than insert the lead into each hole. What I don't like is - a bit of 'fuzziness' around the hole, but this is MACRO, and the bare eye will not see it. The test is planned for the deck planking.
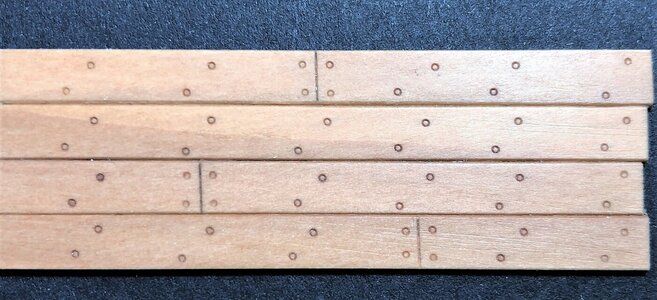
The next set of samples is the 'gamechanger', IMHO. No actual treenails, just imitation!!!! This is something I didn't expect myself. Frankly, I choose the base idea as the method my friend Maarten @Maarten uses in his Alert build log. Check it out, highly recommend it, with lots of learning materials and great craftsmanship.
Hms Alert by Maarten [COMPLETED BUILD]
Thx again for your comments and likes. Today I am stil working on the thickstuff and shelf clamps. The last three are placed of which the shelf clamp is the most critical. The SB shelfclamp had its wood grain positioned under and angle causing the strake to brake into pieces when steaming and...shipsofscale.com
So I use the syringe needle with an external diameter of 0.8mm (yellow color) to cut off the yellow head with a cut-off wheel.
View attachment 214202View attachment 214203View attachment 214204
Shaped around the edge to form a sharp-pointed ring. So far the same steps as Maarten did, but that's it. The tool is ready. I tight the needle in my rotary tool and start using it like a drill. The key to success is low speed and no pressure. Start by touching with age, just a bit of angle until it touches the surface, then immediately make it flat against the planks. Don't push too hard, it needs just a touch, otherwise, you will drill thru. With a bit of practice, I am sure you will grasp great results. I absolutely love the results, hope you like them too. It eliminates the need for drawing treenails and drill holes.
This is planned to use for deck planking. The sample below is Pear (it is off-white color). Same caulking techniques as for the above methods - black paper.
View attachment 214195
You will see different results. I was playing with speed and pressure. Also, at some point the working surface gets dull, You don't have to shape it again, just use a polishing paste against the hard felt. A few turns and the tool ready again. Below some MACRO. I love macro, it reveals all the flaws.
View attachment 214196
The last image is the combination of the Pear (will use for Celling) and Swishpear (will use for Thickstuff). This is without oil
View attachment 214201
This is with one coat of Linseed oil. The oil penetrates in grooves and emphasizes the color imitating perfect caulking. Not too dark, not light. For my taste. BTW, all drilling is freehand, I didn't use the pencil to line up, but think, it is a good idea to line up first.
View attachment 214198
...and macro
View attachment 214199
This is how natural Pear looks
View attachment 214200
That's it, for now, folks. It is your turn, and I need your opinion. Which example you like the most and why? Please ask me any question you will come with, I will be glad to answer.
see you soon and thanks for your feedback,
I think I would need to see them IRL before I could say with certainty which version I would personally prefer.
Before I looked at your pictures I would have thought my peronal preference would be treenails without any blackening whatsoeve (provided that the scale is big enough to indistinctly see / sense the threenails) but now I'm not so sure. What is really surprising to me is that on your pictures the whole dowel looks much darker when there is no blackening at the edge. Strange! Did you use any glue or something?
PS: For such experiment I would use the same type of wood for planks as is to be used for the deck as I think the hardness of the wood and other properties can have a big impact, not at least on the 'fuzzyness'
They all look good. For a realistic look I'd mix then as in reality they would never be identical. BTW when sanding sealer is used the pear took on a beautiful orange natural tint. ( just sealed mine!)
My friend - this is a very good comparison of the different methods.
And I have to state, that the "new" method with the syringe needle.
My only concern would be the accuarcy to find the correct location of the treenail.
When I make them with the normal drilled one plus wire or treenail etc. I point the location first with a small scriber - with this the head / center of my drill has a good lead. And I drill with a handdrill nor powerdrill - So I think, that I will have some problems here with this new method - but I will give it a try.
Thanks for your feedback, John. The answer is a combination of all, my big guess. While exercise, I have not smelled burning wood, but I am sure there some friction, even so, it is not a high speed and hard press. Shadow would be more appropriate, and oil adds to the shadow.The syringe needle treenails definitely look better.
Is the darker colour of the treenail outer- circle due to:
- Burn't wood
- Shadow
- Bruising or exposing end grain.
- something else?
Many thanks, Rich, You are correct, I like to experiment, I think, it helps to find an optimal solution and makes our hobby much interesting.Excellent eye gunsighting alignment and hand control in locating these. I think that your enjoyment in the experimentation is your major reward as you will select the one that you are most satisfied with on the decks. Well done. Rich (PT-2)
Thanks, Poul (a.k.a. Falcon's eye) The wood for treenails is the same as the one I use for the planks. It is also a mystery to me, all do, the timber has some dark spots. I will do more tests this evening specifically for the first method to find out why the spot is much darker (different grain direction, perhaps?), and yes, I am using PVA glue when inserting treenail.I think I would need to see them IRL before I could say with certainty which version I would personally prefer.
Before I looked at your pictures I would have thought my peronal preference would be treenails without any blackening whatsoeve (provided that the scale is big enough to indistinctly see / sense the threenails) but now I'm not so sure. What is really surprising to me is that on your pictures the whole dowel looks much darker when there is no blackening at the edge. Strange! Did you use any glue or something?
PS: For such experiment I would use the same type of wood for planks as is to be used for the deck as I think the hardness of the wood and other properties can have a big impact, not at least on the 'fuzzyness'
Many thanks for the feedback, Uwe. Yes, the accuracy is a big concern, specifically on the deck, the flaws will be visible as a blemish. However, with some training and experience, it is possible to archive decent results. I am also thinking, that if you draw the pencil lines it should help to aim more accurately. What would happen if instead of tightening it in the rotary tool, just position the needle and top lightly to make a mark...Hmm... I shall try...My friend - this is a very good comparison of the different methods.
And I have to state, that the "new" method with the syringe needle.
My only concern would be the accuarcy to find the correct location of the treenail.
When I make them with the normal drilled one plus wire or treenail etc. I point the location first with a small scriber - with this the head / center of my drill has a good lead. And I drill with a handdrill nor powerdrill - So I think, that I will have some problems here with this new method - but I will give it a try.
Thanks for your comments, Paul. What kind of sanding sealer do you use? Can you show the images? Is it use after sanding or before sanding?They all look good. For a realistic look I'd mix then as in reality they would never be identical. BTW when sanding sealer is used the pear took on a beautiful orange natural tint. ( just sealed mine!)
Thank you, Mon Amie! I do like the syringe method very much (the most), the only drawback, is the consistency some are deeper than others. I have to play with speed and pressure, also forming (shaping\sharpening) the end playing a vital role. But, yes, I love this method, besides it simplify treenailing production it does look realistic, IMHOHi Jim,
Great comparison. I most like the seringe methode. It is easy, quick and with very good results.
- Joined
- Sep 28, 2020
- Messages
- 287
- Points
- 168

I also like the syringe needle "nails" best!
Christian
Christian
Hi Jim the product is https://www.feastwatson.com.au/products/indoor-products/prep/sanding-sealer/
IT drys with a flat to very low sheen. I find it brings out the natural color of the wool whist sealing of any porous gain.
IT is normally used to seal wood after sanding and so that any later gloss finish works correctly. However due to the matte finish I use it as a final coat. It drys fast with no oily residue.
It is petroleum based, not water based. As I'm about 2-3 days from completing the Alert, you will have to wait till the video ( Last bits to do, & rope rails).
IT drys with a flat to very low sheen. I find it brings out the natural color of the wool whist sealing of any porous gain.
IT is normally used to seal wood after sanding and so that any later gloss finish works correctly. However due to the matte finish I use it as a final coat. It drys fast with no oily residue.
It is petroleum based, not water based. As I'm about 2-3 days from completing the Alert, you will have to wait till the video ( Last bits to do,
 & rope rails).
WOW!!! Already finishing? I am not even close to mid-way of finishings interiorAs I'm about 2-3 days from completing the Alert,
@PoulD Hello, my friend. Mystery solved, For the deck planking sample I use Castello planks, and...treenails made in the past time, most-likely different batch. This is why they show surprisingly dark. Yesterday, I made another test board and treenails from the same timber batch as deck planks. Both deck planks, as well as the treenails from Pear.I think I would need to see them IRL before I could say with certainty which version I would personally prefer.
Before I looked at your pictures I would have thought my peronal preference would be treenails without any blackening whatsoeve (provided that the scale is big enough to indistinctly see / sense the threenails) but now I'm not so sure. What is really surprising to me is that on your pictures the whole dowel looks much darker when there is no blackening at the edge. Strange! Did you use any glue or something?
PS: For such experiment I would use the same type of wood for planks as is to be used for the deck as I think the hardness of the wood and other properties can have a big impact, not at least on the 'fuzzyness'
Here is the actual test. On the left row, I top the needle with a hummer. The middle rows are treenails without blackening of any kind, The right row is just drilled (for other options?). Finished with one coat of Linseed oil, and rubbed with steel wool 400 grit. What do you think? I like it.
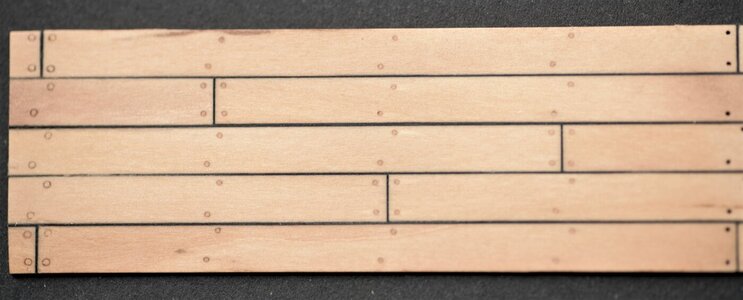
and MACRO

One more test. This one without caulking imitation.
