VERY WELL EXPRESSED JIM WISHING YOU AND YOURS A SAFE HOLIDAY WE CAN ALL CELEBRATE PEACE ON EARTH GOOD WILL TO MANKIND. GOD BLESS STAY SAFE YOU AND YOURS DON
-

Win a Free Custom Engraved Brass Coin!!!
As a way to introduce our brass coins to the community, we will raffle off a free coin during the month of August. Follow link ABOVE for instructions for entering.
-

PRE-ORDER SHIPS IN SCALE TODAY!
The beloved Ships in Scale Magazine is back and charting a new course for 2026!
Discover new skills, new techniques, and new inspirations in every issue.
NOTE THAT OUR FIRST ISSUE WILL BE JAN/FEB 2026
- Home
- Forums
- Ships of Scale Group Builds and Projects
- HMS Alert 1777 1:48 PoF Group Build
- HMS Alert 1777 1:48 Group Build Logs
You are using an out of date browser. It may not display this or other websites correctly.
You should upgrade or use an alternative browser.
You should upgrade or use an alternative browser.
Thank you, Don.VERY WELL EXPRESSED JIM WISHING YOU AND YOURS A SAFE HOLIDAY WE CAN ALL CELEBRATE PEACE ON EARTH GOOD WILL TO MANKIND. GOD BLESS STAY SAFE YOU AND YOURS DON
Warmest wishes for a wonderful Christmas and a lovely new year that is full of good thoughts, good deeds, and thankfulness for all we have.
Dear Jim
merry Christmas to you and your family
Thank you, my friend!
Jim,Hello mates! Being busy with other routine staff, called life, I have not updated the log for a while. But..., I am happy to provide some updates, and one of those that I returned to the hull assembly. But first, and foremost important, I'd like to credit all of you for keeping the interest and providing your valuable feedback whether it is 'likes' and\or comments.
Just to recap where we left. We have completed installed and bolted the Lower deck or sometimes called the fore platform deck clamp.
View attachment 239426
View attachment 239427
View attachment 239429
View attachment 239430
To continue with the ongoing tasks, we will install a Deck clamp and Beam shell. Take a look at the drawings from the AOTS book (circled red), the number 37 is the Beam shell and the number 38 is the Deck clamp.
View attachment 239446
The image in the instruction manual 6.6 (page 26) shows the Deck clamp as three parts connected with the scarf joint. However, all three pieces represented as a single piece of timber and labeled as EL95 located on board #20.
View attachment 239641
At this point, you have to make a decision whether you want to cut the scarf joints or simply imitate them. The part is not long enough to tolerate mistakes. If you are uncertain of your skills making true scarf joints from the first cut, do not attempt! You can imitate for your satisfaction. However, making true scarfs make it somewhat easy to fit and install inside the hull as you will work with three short pieces as opposed to single\long timber. Choosing to work with a single piece, it is advisable to soak the timber in the water to make it more pliable. The timber can easily break if you are not patient enough. Here comes in to play the top holding parts CL37, CL40, and CL43 (port and starboard), they will help to identify the position of the Deck clamp. You may need to trim (both ends of part EL95 so it will fit perfectly your hull. Special attention to the stern facing end. The end of the Deck clamp has to fit between the Wind and Deck transoms. (see below)
View attachment 239451
View attachment 239459
View attachment 239460
Another checkpoint should be the bow area both Deck clamps must be position at the top of the cut off for the Deck hook (in the image below dry fitted, (part EL81)
View attachment 239462
Once the glue completely dried, the holes predrilled a brass wire inserted and heads are rounded using the cup burr. Finally, using the push tool (self-made) all the heads are pushed down. The photo was taken from an earlier stage but depicts the same process.
View attachment 239463 View attachment 239464
To be continued...the next we will install the Breast hooks. Thank you!
The nail heads look absolutely authentic. Could you share your method of creating the heads? What tool did you use to cup burr the heads and how you pushed the nails in.
Very much appreciated,
Trevor
Hello Trevor and thanks for your interest in my Alert build log. If you are referencing the bolts holding the keelson, they are made from steel sewing pins blackened with heat and oil.Jim,
The nail heads look absolutely authentic. Could you share your method of creating the heads? What tool did you use to cup burr the heads and how you pushed the nails in.
Very much appreciated,
Trevor
The rest of my bolts imitations were made with Twincut burr (see below description). They are not like the actual bolts, they are the wire with rounded at one end, and pushed to the predrilled hole.
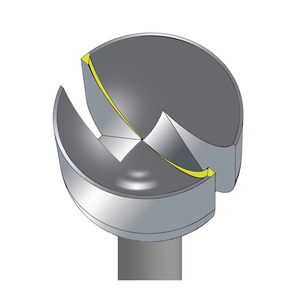
3-in-1 Twincut Cup Bur
It's called a 3-in-1 cup bur because it shortens, rounds, and polishes in one easy step. Twincut geometry features Dual Chip Channels that permit more rapid removal of excess material. There's no need for multiple passes to allow for chip removal because of the Chip Channels. And as the bur rounds the article being worked, it polishes at the same time. Thinner cup walls make it easier to work on tightly spaced prongs. They are 3⁄32" shanks.

Many thanks Jim. I wasn't aware the tool existed. Now I know more.
Trevor
Trevor
Hallo my friend Jim alias @JimskyGreat news, folks!! Today July 27th, 2020, I have purchased the Trident Model Alert kit! The purchase experience was pleasant, straight forward, without hiccups, and took about 3~5 minutes. With this great news, I am officially joining the Alert group build and starting my own build log.
When looking at the wonderful kit review by Uwe, I realize that most likely I should build the model 'out of the box' without modifications. For the most part, this will be the route to follow, however, there will be some.... Curious enough? Join me in my build journey and be alert to my upcoming posts about The Naval Cutter Alert by Jimsky!
Let's share the knowledge to avoid any challenges, and make this group build fun and enjoyable!
to be continued...
we wish you all the BEST and a HAPPY BIRTHDAY

Enjoy your special day and celebrate your day with friends and family
Keep care
Congrats Jim, enjoy the day.
Hallo Jim, the very best wishes for your birthday, much joy, happiness and especially health.
From me too. A very happy birthday and enjoy this special day.Hallo my friend Jim alias @Jimsky
we wish you all the BEST and a HAPPY BIRTHDAY
Enjoy your special day and celebrate your day with friends and family
Keep care
Dima, please accept my sincere congratulations on your birthday. I wish you good health, prosperity in business, good spirits and optimism. 

- Joined
- Apr 20, 2020
- Messages
- 6,242
- Points
- 738

To our dear and special friend Jim alias known as @Jimsky
congratulations on your birthday, I wish you lots and lots of happiness, joy, health and that you will continue to be a friend and colleague who gives from his knowledge and experience from a great love for the friends and for this unique hobbie


congratulations on your birthday, I wish you lots and lots of happiness, joy, health and that you will continue to be a friend and colleague who gives from his knowledge and experience from a great love for the friends and for this unique hobbie


Happy Birthday!!!!
Happy Birthday, Jim. Enjoy the day!
Regards, Peter
Regards, Peter
Happy birthday Jim and enjoy the day! 
Let yourself go really well in the circle of your loved ones and friends and stay healthy!
Thomas

Let yourself go really well in the circle of your loved ones and friends and stay healthy!
Thomas
Happy Birthday Jim. Wishing you many happy returns of the day!
Wonderful! I'll add my birthday greetings to the many already offered. I hope you have a wonderful day celebrating you!


