Not yet, right now it's still in 2-D.Wow! This build is in 3-D !
View attachment 361393
-

Win a Free Custom Engraved Brass Coin!!!
As a way to introduce our brass coins to the community, we will raffle off a free coin during the month of August. Follow link ABOVE for instructions for entering.
-

PRE-ORDER SHIPS IN SCALE TODAY!
The beloved Ships in Scale Magazine is back and charting a new course for 2026!
Discover new skills, new techniques, and new inspirations in every issue.
NOTE THAT OUR FIRST ISSUE WILL BE JAN/FEB 2026
- Home
- Forums
- Ships of Scale Group Builds and Projects
- Bluenose PoF Group Build
- Bluenose Group Build Logs
You are using an out of date browser. It may not display this or other websites correctly.
You should upgrade or use an alternative browser.
You should upgrade or use an alternative browser.
The Schooner Bluenose 1921, POF Yuanqing Models 1:72 [COMPLETED BUILD]
Good morning once again.
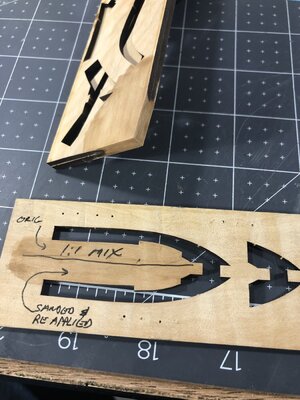
I thought you all might like to know the outcome of my surface finish experiment. Paul @dockattner wanted to know what the effect of sanding on a surface that had already been coated with my poly mixture. As you can see below its very hard to tell any difference where I sanded down half the sample and then recoated it. This is very helpful to know. In addition, I got to wondering how the end grain from two directions took the stain/poly mixture as very often I have found end grain wood stains much darker than the surface cuts. As you can see all sides take up the stain equally which is really great news. This is my first time working with pearwood and I'm impressed.

Oh, and I'll add my two cents in regarding laser char. It's just awful!!!!
Anyway, hope this is useful information.
Happy modeling.
PS. I believe applying the mixture with a cloth to be superior to using a brush.
I thought you all might like to know the outcome of my surface finish experiment. Paul @dockattner wanted to know what the effect of sanding on a surface that had already been coated with my poly mixture. As you can see below its very hard to tell any difference where I sanded down half the sample and then recoated it. This is very helpful to know. In addition, I got to wondering how the end grain from two directions took the stain/poly mixture as very often I have found end grain wood stains much darker than the surface cuts. As you can see all sides take up the stain equally which is really great news. This is my first time working with pearwood and I'm impressed.

Oh, and I'll add my two cents in regarding laser char. It's just awful!!!!
Anyway, hope this is useful information.
Happy modeling.
PS. I believe applying the mixture with a cloth to be superior to using a brush.
Good Daniel. Now you can proceed with confidence knowing whatever you decide to do with regard to the timing of stain and finish won't lead to a bad result. Nice to know there is grace available even in the modeling world. 
The pearwood is nice to work with and it looks so good, I couldn't bring myself to paint the hull! 
Good morning,
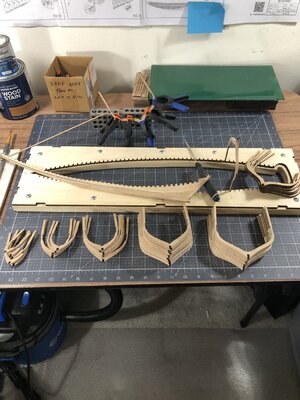
Once again not much to show however there is still progress happening here. I now only have 14 more frames to punch out and glue up. I cut out the center portion of the jig leaving a small shelf for the rib extensions to sit on.

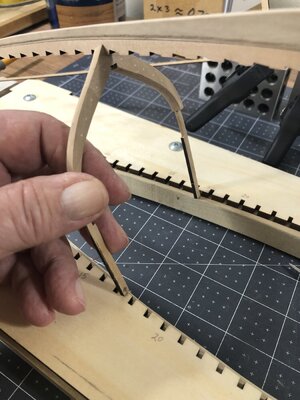
I have considered several ways gluing the frames onto the keel and with the exception of the first 5 or 6 frames, there is enough flex in the frame extensions to insert first into the keel then rotate down onto the jig and open the extensions into the jig slots. I would first have to temp fix the keel assembly accurately over and in line with the jig where it cannot move then proceed with the frame installations. I have checked (dry fitted) each frames slots (and jig slots) for fit onto the keel/jig with just enough filing to get a good tight fit without having to force anything.

I will end up gluing all ribs to the keel before applying any poly stain finish. So that's where I'm at so far and hope you all enjoy this short update. Thanks for checking in and happy modeling!
Once again not much to show however there is still progress happening here. I now only have 14 more frames to punch out and glue up. I cut out the center portion of the jig leaving a small shelf for the rib extensions to sit on.

I have considered several ways gluing the frames onto the keel and with the exception of the first 5 or 6 frames, there is enough flex in the frame extensions to insert first into the keel then rotate down onto the jig and open the extensions into the jig slots. I would first have to temp fix the keel assembly accurately over and in line with the jig where it cannot move then proceed with the frame installations. I have checked (dry fitted) each frames slots (and jig slots) for fit onto the keel/jig with just enough filing to get a good tight fit without having to force anything.

I will end up gluing all ribs to the keel before applying any poly stain finish. So that's where I'm at so far and hope you all enjoy this short update. Thanks for checking in and happy modeling!
Hi Daniel. Nice to see that you have started with the final placement of the frames. They look neat and you have mastered a working method. You will enjoy watching the shape of the hull grows frame by frame.Good morning,
Once again not much to show however there is still progress happening here. I now only have 14 more frames to punch out and glue up. I cut out the center portion of the jig leaving a small shelf for the rib extensions to sit on.
View attachment 362880
I have considered several ways gluing the frames onto the keel and with the exception of the first 5 or 6 frames, there is enough flex in the frame extensions to insert first into the keel then rotate down onto the jig and open the extensions into the jig slots. I would first have to temp fix the keel assembly accurately over and in line with the jig where it cannot move then proceed with the frame installations. I have checked (dry fitted) each frames slots (and jig slots) for fit onto the keel/jig with just enough filing to get a good tight fit without having to force anything.
View attachment 362881
I will end up gluing all ribs to the keel before applying any poly stain finish. So that's where I'm at so far and hope you all enjoy this short update. Thanks for checking in and happy modeling!
Regards, Peter
- Joined
- Sep 3, 2021
- Messages
- 5,198
- Points
- 738

Nice assembly approach, Daniel. This may work handsomely.Good morning,
Once again not much to show however there is still progress happening here. I now only have 14 more frames to punch out and glue up. I cut out the center portion of the jig leaving a small shelf for the rib extensions to sit on.
View attachment 362880
I have considered several ways gluing the frames onto the keel and with the exception of the first 5 or 6 frames, there is enough flex in the frame extensions to insert first into the keel then rotate down onto the jig and open the extensions into the jig slots. I would first have to temp fix the keel assembly accurately over and in line with the jig where it cannot move then proceed with the frame installations. I have checked (dry fitted) each frames slots (and jig slots) for fit onto the keel/jig with just enough filing to get a good tight fit without having to force anything.
View attachment 362881
I will end up gluing all ribs to the keel before applying any poly stain finish. So that's where I'm at so far and hope you all enjoy this short update. Thanks for checking in and happy modeling!
Thanks Peter, It's all just sanding till your blue in the face.Hi Daniel. Nice to see that you have started with the final placement of the frames. They look neat and you have mastered a working method. You will enjoy watching the shape of the hull grows frame by frame.
Regards, Peter
Thanks Johan, the only other practical way I can think of is dropping them in through the jig, but it would be way more complicated calling for an elevated jig. The secret will be holding the keel solid tight in its inverted position which I believe I can do.Nice assembly approach, Daniel. This may work handsomely.
- Joined
- Sep 3, 2021
- Messages
- 5,198
- Points
- 738

I used an elevated jig, dropping the frames from above onto the keel. With a little tweaking I got the frame ends into the jig, thus securing the frame. I started off with installing like three frames spread out over the keel and worked my way towards frame 31.Thanks Johan, the only other practical way I can think of is dropping them in through the jig, but it would be way more complicated calling for an elevated jig. The secret will be holding the keel solid tight in its inverted position which I believe I can do.
Your keel is not as fixed as you might like though; the ultimate position is determined once the 49 frames are in place (not counting the half frames). Depending on the total height of the frames (more or less flexibility), the keel might "meander" a little bit around a theoretical centerline. My eyes were not good enough to observe that phenomenon though.
Daniel,
Ok. now I know where you were hiding. I'll go back to go through your log. Looking to be a nice super detailed kit. I kept looking in wood kits forums...
Re; my PM from a couple of weeks ago - forget it - will stay active with your log.
Regards,
Ok. now I know where you were hiding. I'll go back to go through your log. Looking to be a nice super detailed kit. I kept looking in wood kits forums...
Re; my PM from a couple of weeks ago - forget it - will stay active with your log.
Regards,
Looks amazing detailed model, i will follow your work logs.Good morning,
Once again not much to show however there is still progress happening here. I now only have 14 more frames to punch out and glue up. I cut out the center portion of the jig leaving a small shelf for the rib extensions to sit on.
View attachment 362880
I have considered several ways gluing the frames onto the keel and with the exception of the first 5 or 6 frames, there is enough flex in the frame extensions to insert first into the keel then rotate down onto the jig and open the extensions into the jig slots. I would first have to temp fix the keel assembly accurately over and in line with the jig where it cannot move then proceed with the frame installations. I have checked (dry fitted) each frames slots (and jig slots) for fit onto the keel/jig with just enough filing to get a good tight fit without having to force anything.
View attachment 362881
I will end up gluing all ribs to the keel before applying any poly stain finish. So that's where I'm at so far and hope you all enjoy this short update. Thanks for checking in and happy modeling!
Regards and good luck .
I will definitely do one more dry fit with all the frames and try to establish where any major problems may occur. I suspect there will be some vertical challenges to deal with due to the keel not seating well between adjacent frames, hopefully this will reveal itself in a dry mockup. I'm hoping to hold longitudinal alignment with a few lateral braces along the length of the keel.the keel might "meander" a little bit around a theoretical centerline.
- Joined
- Sep 3, 2021
- Messages
- 5,198
- Points
- 738

The keel won't give you much issues in the vertical plane, the more though from your frames. But, the more accurate you've done all your frame dry-fitting, the less issues you'll find.I will definitely do one more dry fit with all the frames and try to establish where any major problems may occur. I suspect there will be some vertical challenges to deal with due to the keel not seating well between adjacent frames, hopefully this will reveal itself in a dry mockup. I'm hoping to hold longitudinal alignment with a few lateral braces along the length of the keel.
Hi John, I'm glad you found my build log, looking forward to any comments you may have.Daniel,
Ok. now I know where you were hiding. I'll go back to go through your log. Looking to be a nice super detailed kit. I kept looking in wood kits forums...
Re; my PM from a couple of weeks ago - forget it - will stay active with your log.
Regards,
Hello Estis, I'm delighted to have you aboard, hope you enjoy.Looks amazing detailed model, i will follow your work logs.
Regards and good luck .
Yup, we all have Heinrich’s problem, “Sanding Elbow”.Thanks Peter, It's all just sanding till your blue in the face.
Daniel,
You're getting a lot of sage advice - far be it for me to "add" though I will say that I agree with Dean62 regarding pearwood. I should be painting
the hull on my current build white - but that would be a "crime against nature"

You chose an awesome kit. Your work is excellent - perfect choice....
You're getting a lot of sage advice - far be it for me to "add" though I will say that I agree with Dean62 regarding pearwood. I should be painting
the hull on my current build white - but that would be a "crime against nature"

You chose an awesome kit. Your work is excellent - perfect choice....
Great progress Daniel! I first glued frame one, and the last frame before the half frames at the stern, to the keel. Then I glued those two frames and keel to the jig as a sub assembly. Then I started gluing frames one by one to the keel and jig. Something to consider. 


