Titanic 1/350 MiniCraft Kit build

I have received my decking from ScaleDecks. I sealed them with Testor Dullcote on both sides. I hope that eliminates the expansion while gluing as described in the instructions for the deck material. Scale Decks recommends Gorilla wood glue but I have seen people recommending Gorilla Acrylic Hobby glue also. I am wondering what the pros and cons are.
 
Looks great. I didn't put the stripe on mine as I couldn't figure out how to mask over the raised rivets. Now I wish I had tried harder. Yes, the decal stripe looks like nothing but a bunch of aggravation! I used Gators Grip glue and a lot of clamps for the decks. So far they have stayed put.
 
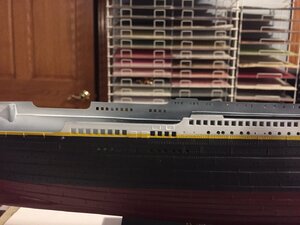
Help!! trying to position the sheer line towards the aft end of the ship. If I follow the "natural" line underneath the larger port holes midship then it cuts through the square windows further aft. What have others done to solve this? sheer line.JPG
 
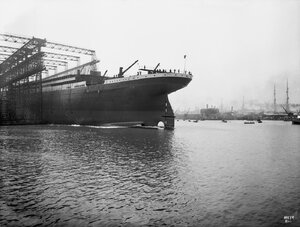
This problem is due to the fact that the Windows are located higher than necessary. The problem is solved by transferring them below, but it is very difficult. The main difficulty is to put the Windows on a certain line so that they do not walk. This photo illustrates the position of the portholes relative to the panoramic Windows .
Launching_of_Titanic_2.jpg
 
This problem is due to the fact that the Windows are located higher than necessary. The problem is solved by transferring them below, but it is very difficult. The main difficulty is to put the Windows on a certain line so that they do not walk. This photo illustrates the position of the portholes relative to the panoramic Windows .
View attachment 174117
Great picture, thanks. The windows on the kit are too low relative to the port holes and that cut out in the hull. I will just have to live with the line cutting through the windows or I will never get this thing finished! Most anything else I would do would probably end up looking worse
 
That problem exists on my hull too. I am thinking of lowering the top of that sheer line only under the windows and keeping the bottom edge od the line as it is.
 
I don't know if you're aware of it but there is a site devoted to this specific model and its issues. They mention just cheating that gold stripe down to the bottom of the sills on those windows that are in the wrong place. I think it is in the hull section of the site. You might want to look it over as it has a lot of information. https://rivet-counter.com/Rivet_Counter_Pages/Contents.html. There is also another site by a guy who built an unbelievably perfect version of this kit, another site that you can look at for ideas and information. http://www.titanicmodel.net/
 
I don't know if you're aware of it but there is a site devoted to this specific model and its issues. They mention just cheating that gold stripe down to the bottom of the sills on those windows that are in the wrong place. I think it is in the hull section of the site. You might want to look it over as it has a lot of information. https://rivet-counter.com/Rivet_Counter_Pages/Contents.html. There is also another site by a guy who built an unbelievably perfect version of this kit, another site that you can look at for ideas and information. http://www.titanicmodel.net/
I've been looking at his site. Crazy all the detail he put into that. It took him something like 13 years. I would never live long enough even if I was able to recreate that!
 
I'm going to use Scale Decks on this build. and PE from Tom's. At 77 years, I don't think 13 years would be feasible, but that being said, I am going to incorporate as much as possible from his build. His build is fantastic. I used PE on my n scale rr, using a razor for the bending, and know pe can make you cross eyed! Patience is the name of the game.
I've used Scale Decks before on the Connie I am building, and they are fantastic. The same goes for their service! He now offers two decks for the Titanic, one for an OOB build and one for a PE build. I believe he ships both to you, giving you leeway in your choices. I still can't post pics here, but my Connie build can be seen on Fotki...Rick-Wayburn.y15@fotki.com.
I agree that Scaledecks are the nicest looking decks, but beware of the additional height when stacking the decks as it relates to fitting the side walls to the decks. On my Minicraft it took quite a bit of modification to get the decks to fit in the groove on the promenade walls. With other types of ships there probably aren't any issues but ocean liners with multiple decks of wood seem to cause fitment issues with wood decks that tuck under in my experience. I hope you have a smooth build!

As far as the Titanic built by Art Braunschweiger I am amazed how realistic it looks, it really is outstanding.
 
Thanks Chris. I ran into that problem with Scale Deck on the Constitution, and that was only one deck, the spar deck. I had forgotten about that, thanks for the reminder. On the Connie, I removed the bulkheads after marking the bulwarks on the gun deck and cut the Scale Deck out along the markings so there was no scale deck under the bulkhead to the Captain's quarters. End of problem, but it took some time and a lot of caution. It takes a new blade too to not tear the scale deck.
I am doing my Connie and the Titanic together...while waiting for glue and paint to dry on one, I work the other. Breaks up the boredom a bit too.
 
I'm going to use Scale Decks on this build. and PE from Tom's. At 77 years, I don't think 13 years would be feasible, but that being said, I am going to incorporate as much as possible from his build. His build is fantastic. I used PE on my n scale rr, using a razor for the bending, and know pe can make you cross eyed! Patience is the name of the game.
I've used Scale Decks before on the Connie I am building, and they are fantastic. The same goes for their service! He now offers two decks for the Titanic, one for an OOB build and one for a PE build. I believe he ships both to you, giving you leeway in your choices. I still can't post pics here, but my Connie build can be seen on Fotki...Rick-Wayburn.y15@fotki.com.
I have the same plan as you. I have the Scale Decks and PE from Tom's. I also plan to use some of Art Braunschwieger's ideas - but the scratch building he did goes WAY beyond Photo Etch. What he did making the binnacles and engine telegraphs for example is phenomenal. But it doesn't hurt to aim high.
 
Last edited:
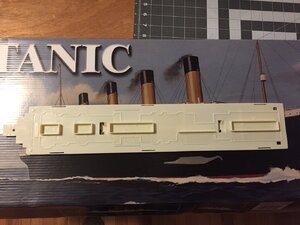
Decks did not fit properly at first, the forward deck did not lie properly into the aft deck, and the issue was that the pegs on the forward deck were just a tad too large to fit into the receptacle openings attaching it to the aft section... remedied by the old pin drill.
 
When you add the first two decks, per instructions, there are two holes and tabs where the first two sections join. On my Titanic, the tabs were a little larger then the receiving holes, and I had to use a pin drill to enlarge the female ends so they would fit together properly.
 
Good job. If you use those locating tabs as it will throw off the whole model, especially the bridge area. I ground them off and glued some toothpicks in place as a stop so I knew where to place the deck when gluing it down. A lot of things don't line up on that kit out of the box. The wood decks just make it more interesting to get it lined up lol!5 Toothpick Stops For Deck Placement.jpg
 
I am still tweeking that yellow sheer line. The line did not come out even on the compound curve around the stern. My first attempt was to mask off the white above and black below. This time I painted the general area yellow. I will cover the yellow with a thin strip of tape and paint the black below it. I have started scraping the raised wood lines off the decking. This will keep me busy for a while. I am using the flat side of a scribing tool from UMM-USA.scraped-deck.JPG
 
Take a block of wood, mark where you want the sheer line to be, drill a hole through the block at that level, so you can put a pencil or some type of marker in the block. (You want a sharp point on the marker.) You will need to do this twice, once to mark the lower edge of the sheer line and one for the top of the sheer line. Do this with the ship mounted on the stand or secured in a holder. Holding the marker against the hull, move it around the hull. (I found it easier to move the hull against the marker.) This will give you a nice straight edge guide for the sheer line, upper and lower edges. Use two blocks for this, one upper and one lower. And the stern discrepancies in the sheer line come out perfect.
Why are you getting rid of the the raised lines on the deck (wood markings?That's just extra work, not necessary as the Gorilla Glue will work just fine over them. The Scale Deck will hide those.
When I used the Scale Deck on my Constitution, it raised the bulwarks on the Captain's quarters just enough to affect the spar deck fit, so I placed the bulwark on the gun deck, marked where the bulwark would be and cut the Scale Deck out under the bulwark, It takes a new blade to do this and caution. I haven,t tried to fir the upper decks on the Titanic so don't know if this would be a Titanic issue or not, but there are more decks on the Titanic, and it did affect the one deck (spar deck) on the Constitution. Chris SC reminded me of this problem, which was a good thing because I had forgotten about it. Just another thing to keep in mind.
 
Last edited:
Back
Top