Titanic 1/350 MiniCraft Kit build

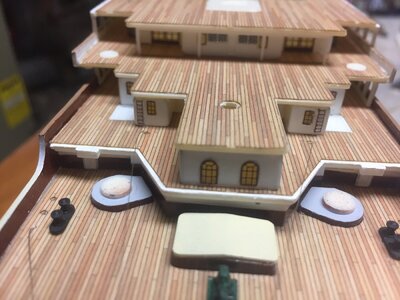
I am using cnopy glue on the decks. It holds well but can be removed too.
I wanted originally to light this build but the wiring and led lights were complicated. Nw thinking of using fiber optics.
 
I see the way Tom's presents the instructions is difficult! It isn't easy figuring out which windows go where!
I agree! I ran into trouble with the promenade deck walls and parts 1 & 17. If you put all the part 1 that the instructions called for then there is no place to put part 17. At least the way I read them. I ended up taking the 4 aft most parts 1 off of each side and replaced with 4 parts 17. I am working on the ladders for the funnels now. The diagram in the instructions is pretty much worthless IMO. Great PE but the instructions leave room for improvement
 
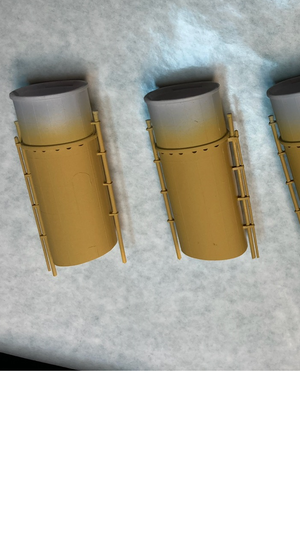
Finally got the piping attached. I thought I had the indentions for the kit part ladders all filled. It didn't become apparent until I had attached the piping and primed the funnel that they still needed work. Would have been much easier to fill sand w/o the pipes in the way! A few years ago some guy at our local IPMS club meeting brought in some old paint he was giving away . One of them that I grabbed was Humbrol Matt 63. That will be my WhiteStar buff! I think it will look good with the black tops. I don't think anyone can "prove" it's not accurate!

titanic-103.png
 
That's looking great! I'm using the Testor's Window Maker and Glue to mount the windows. It seems to work well, and kills two birds with one stone. While gluing the window frames in place, it makes windows too.
 
That's looking great! I'm using the Testor's Window Maker and Glue to mount the windows. It seems to work well, and kills two birds with one stone. While gluing the window frames in place, it makes windows too.
how did you apply the Window Maker to attach frame to wall? Did you just let it wick between the two parts? That would be awesome if it worked that way. I put my white glue on the wall then stuck the frame on it. I had to wipe away excess glue.
 
I'm not ready to face the funnel ladders yet so I thought I would work on the small ladders scattered around the ship. For the most part I removed the molded on ladders before assembly and painting. These two I missed somehow. I was able to scrape them off with a new X-Acto blade. I had debated whether to use the PE ladders but now am glad I did. I think they look much nicer than anything you could do with the molded ones.

titanic-100.JPG
 
Last edited by a moderator:
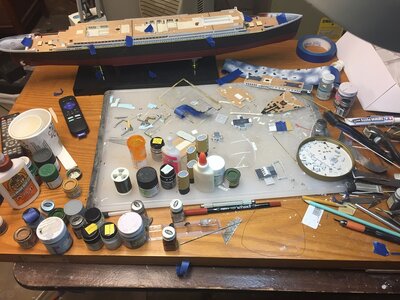
Probably shouldn't share this but I thought it might some of you feel better about your work areas. The "circled" area at bottom-center-right is my "effective" work space!


titanic-102.JPG
 
Wow! That looks like my work space. My wife will come down and say "This place is a disgrace!" Then she cleans it up, and I can't find a thing until it gets messed up again! Seems to be a guy/gal thing.
 
Great job on your build.!! Amazing work. I’m glad to see the interest in this ship is still alive and well. I’ve been working, in my spare time, on an Academy 1:400 Titanic with Flyhawk resin, PE and wooden deck . I’m also lighting the kit with LEDs and fiber optic. It’s my first attempt doing all of this detailing on a ship. I agree with you that applying PE can be tedious work, yet in the end will be well worth effort. I will continue to watch your progress with great interest.
 
Yesterday evening I wanted to make a photo of my working place, but I forgot to make it...... I will do today
Only to show, that you are not the only one with using at the end only 5% of the space and the 95% are for storage etc..... ;)
 
Great job on your build.!! Amazing work. I’m glad to see the interest in this ship is still alive and well. I’ve been working, in my spare time, on an Academy 1:400 Titanic with Flyhawk resin, PE and wooden deck . I’m also lighting the kit with LEDs and fiber optic. It’s my first attempt doing all of this detailing on a ship. I agree with you that applying PE can be tedious work, yet in the end will be well worth effort. I will continue to watch your progress with great interest.
Thanks. I'm not familiar with that Academy kit. I hope it is better than the MiniCraft one. Not really complaining but I find that many of the subjects that I want to build are available only in these older out-dated kits. I considered doing the lighting - that really adds a lot to the overall effect but I wanted to keep it as simple as possible or I would never finish. This was my first experience with the wood deck and overall I was very pleased. I wish I had waited to apply the wood decking to a later stage in the process. I find myself having to be very careful not to mess them up. The poop deck is a good example. You have to be very careful filling the gap between the deck and hull w/o messing up the wood deck. please comment on any techniques you have found useful or let me know if you have a better way of doing something. may be too late for this build but there is always the next one.
 
Did you blacken the brass PE? I noticed on your photos (great build by the way) that the brass frames seem to be more
brown. I rinsed mine in white vinegar, rinsed with clean water, and soaked in Blacken It. They came out more like a dark gun metal blue/black.
I used Testor's Make Windows glue to mount them. So far, so good.
I soaked white thread in Elmer's glue, the white stuff, and filled in the poop deck gap with that. It wasn't as messy as putty.
I am not familiar with a blackening process. I just painted them with Testor's gloss brown. Thanks for the white glue on a thread idea! I'll try that the next time
 
how did you apply the Window Maker to attach frame to wall? Did you just let it wick between the two parts? That would be awesome if it worked that way. I put my white glue on the wall then stuck the frame on it. I had to wipe away excess glue.
I put a small dab on the top and bottom of the frame with a toothpick. I used canopy glue. It dries clear. The first few frames were overdone on the glue, but getting the hang of it there was very little glue to clean up. the small dab on top and bottom seems to hold the frames well.
 
I am not familiar with a blackening process. I just painted them with Testor's gloss brown. Thanks for the white glue on a thread idea! I'll try that the next time
Blackening is a simple process. I used it on the brass gun barrels on the spar deck of my Constitiution.
I put WHITE vinegar in a saucer, lay the photo etch pane in and let it sit for a few minutes to remove any release oils on the brass. It is acidic so a few minutes is all you need.
Clean the vinegar off with clear water and put the panes on a paper towel to dry out. Wrap the pane so both sides dry.
Using Blacken It in the same manner, a little in a saucer, letting the PE soak...but it helps here to use a tooth pick to move the PE a little in the solution. In about 4 minutes your PE will be a dark bluish/black. How dark it becomes is determined by how long you soak it. You can reuse the Black It so don't heave it overboard.
You are now ready to glue or paint your PE.
With Tom's PE for the Titanic, I soaked the sheets one by one before separating the individual pieces, since they are so small. But when I cut the individual pieces off, I had bright brass spots where they attached to the sprue. I touched those up with some semi gloss black Testor's I had laying around.
I let them set for 48 hours before gluing them to the hull.
What ever you do, do not use the good china saucers as this tends to promote some severe conflicts. Women do not seem to understand the modeler's world!
 
Back
Top