• SUBSCRIBE TO SHIPS IN SCALE TODAY!

    The beloved Ships in Scale Magazine is back and charting a new course for 2026!
    Discover new skills, new techniques, and new inspirations in every issue.

    NOTE THAT OUR NEXT ISSUE WILL BE July/August 2026
  • Win a Free Custom Engraved Brass Coin!!!
    As a way to introduce our brass coins to the community, we will raffle off a free coin during the month of August. Follow link ABOVE for instructions for entering.

USS Constitution by BlueJacket 1:96

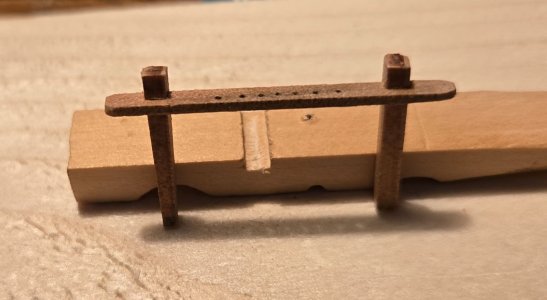
Monkey rail is done. Compared to the others, it was pretty simple. The illustration in the BJ instructions do not show any sheaves in the bitts (main topsail bitts) so I didn't put any in. The instructions do not give any dimensions so I had to guess at the height. The width was taken from the Spar deck plan. I assumed the rail would be even with the top rail on the main rail. The spar deck plan shows this rail as being square on the ends, bt I went ahead and rounded off the ends like all the others.
20260608_120841.jpg

Now that all the fife rails are finished, I can get back to the ship's wheel... oh boy.
 
Mah oh man, I can't believe the level of detail you're adding to the gun deck. Even if you leave some of the spar deck planking off, how much of this is going to be visible to anyone viewing your completed project? - especially if you put it into a case. You and Jon seem to be birds of a feather. I mean that in a good way. Awesome!
Wow! Fantastic work and attention to detail on a fabulous kit. I've been to BlueJacket in Searsport, ME many times and never grow tired of looking at their models. I have a few still in boxes andI hope to get to before I completely lose what eye-hand coordination and dexterity I still have. This getting old stuff is for the birds. Hahaha! Keep up the great woek
 
Thanks for popping in and greatly appreciate the compliment. I know I'm insane for the details I've put in, especially at this scale, but I'm retired and what else am I gonna do? As for the getting old part, my grandpa always said it was not for the faint of heart :). I always say, it beats the alternative. Only one way not to get older.
Hope to have some new details to show soon. This ships wheel is kicking my a$$.
 
Hello Folks,
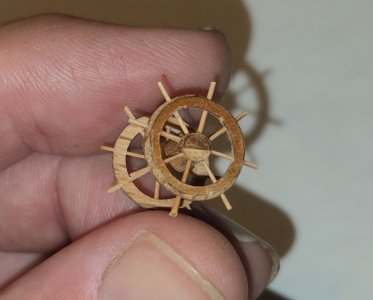
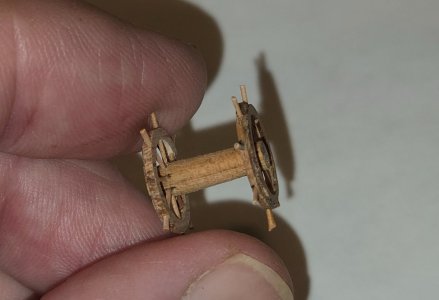
Finally have something to post. I have spent a very frustrating week trying to create the ship's wheel from my remaining Constitution wood. As I had mentioned back in post #33, removing the wheel from the laser cut piece was tricky. I tried using a thicker piece, .050" this time, but it still wanted to break when trying to remove the inner circle. I didn't have this problem when working with the pine, but something about the grain of this wood, when cut very thin like this, the fibers simply don't want to stay together. After destroying half a dozen wheels I was ready to abandon the idea of making the wheel from the Connie wood, but came up with a compromise. I first made a wheel from oak that I had thinned down to .050". This wheel was quite sturdy, and I was able to easily handle it and get the holes drilled for the spokes. I was just going to use this, but came up with the idea of glueing the Connie piece to the face of the wheel. After sanding down both sides, I got the overall thickness back to .050" and still had enough of the oak to drill holes for the spokes. An added benefit was that the ring made from the Connie wood was just slightly smaller in diameter, so when the two pieces were glued together it gave the face some contour similar to the actual wheel. Next, I used the dowel that Peter ( @Der Alte Rentner ) had made for me from the Connie wood. I drilled the holes to accept the spokes. Since these holes are very close to each other, it's a bit more challenging to get them oriented properly. To do so, I inserted a piece of .020" styrene rod into the first hole and used that as a guide to position the next hole. After each hole, I would put another piece of styrene in until I had worked my way all the way around. Finally came the spokes. These were made as described before by putting a small piece of wood into the collet of a dremel and using sandpaper between two fingers, very carefully thinning it down until I had a small dowel that was about .020" thick. Once all my spokes were ready I assembled the whole thing. Again, a tricky operation. I found it easiest to get the first two spokes glued securely with the hub properly centered. Once that was done, the others could be pushed into place fairly easily.
So after a grueling week, here is what I came up with
20260615_184151.jpg 20260615_184200.jpg

Now I'm working on the base and side frames and should have that wrapped up by tomorrow.
 
Those wheels look like they could break if you looked at them wrong, but by glueing a face onto the wheels, you made plywood which is strong. Well done.

Jon
 
Hello All,
Another victim here of the MSW disaster. Two and a half years into my build and sadly, I did not keep a personal copy of my log. So, instead of trying to re-do the entire thing from the beginning, I am going to start up my log from where I am. As it stands, I am just getting started on the spar deck. Here are a few photos of the ship currently
View attachment 596698 View attachment 596699


View attachment 596705

View attachment 596704
wow, that deck looks very impressive great work!!
 
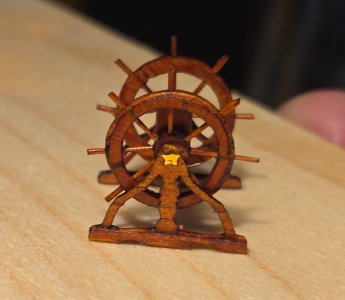
Side frames are done, everything stained and glued together and a couple extra details added

20260617_110245.jpg

I used Minwax Red Oak for the stain and the gold star on the side is a fingernail decal. Looking at the super close up photo, I realized that one of the spokes was not aligned perfectly, but I didn't really notice this when looking at in in real scale, so I'm pretty sure no one else will either unless they pull out a magnifying glass.

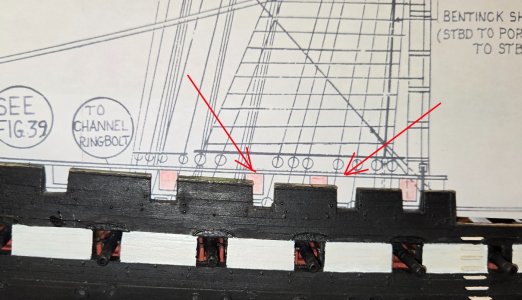
I was going to move on to the pin rails on the bulwarks next. I'm planning to use the Persimmon wood I have to make these. I was double checking all the measurements and realized that a couple sections of the bulwarks were not as wide as they needed to be to accept the properly sized rail. This got me worried. After going back and rechecking, sure enough, two of the spar deck gun ports are a bit off. They are the ones basically midship just aft of the main mast

20260617_101859.jpg
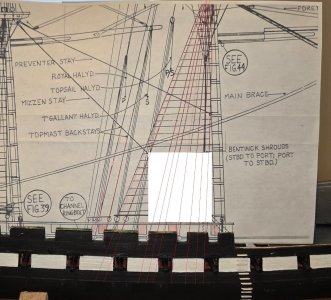
Although it would be easy enough to adjust the pin rails, this of course causes serious issue with the placement of the shrouds and deadeyes. Since basically the second "crown" of the bulwark (right to left) should be longer and the third shorter, I thought I could possibly just move some of the shrouds over just a bit. That doesn't work, because the gunports below, being in their proper positions, do not allow for such an adjustment. I've studied it a bit and do think that I could come up with an adjusted shroud placement, but I don't know what complications that might set me up for later.
here is where I need some advice from you more experienced ship builders. I know absolutely nothing about rigging a ship. This is my first, so I definitely do not understand all the interactions of everything on a ship like this. My question to you all is whether moving these shrouds will cause serious problems later. Obviously they will not be historically accurate, but at this point I have to consider it. I know I could move the gun ports, but honestly not a task I wish to do unless you folks tell me it is my only real option.

I'll be waiting (painfully) to hear what any of you might have to say
 
Based on your May 4, 2026 posting (your first and only posting of the full spar deck), I would repair the spar gun ports. I realize that you have added components to the spar deck since then, but those should not interfere with slicing off the bulwarks, adjusting their size and positioning them back into their proper locations. I had to do the same thing with a couple of my spar guns ports. Mistakes, as you pointed out, have a way of rippling down the road. So, it might be a pain to repair it now, but that repair could save you a world of agony later on. Yes, you might get away with this error and most viewers of the model will never know that it exists, but this is me, little things like this would drive me crazy. Look at this way, are you building the model to a time schedule to get a finished product or are you building it for the creation journey, time be dammed, and the completed model is just a pleasant by-product of your effort? This just my personal opinion, not expert advice.
 
Hi Jon,
Actually, the spar deck has not been glued down yet, and all the "components" have not been attached either. I did this intentionally, because I knew installing the pin rails would inevitably create some debris, which would make its way down onto the gun deck. by waiting to permanently secure the spar deck, I figured I could clean up the gun deck one last time prior. I guess that was fortuitous, as correcting the bulwarks will no doubt create some saw dust. I know it will be a pain and worst, it will likely be difficult to hide the "fix" without installing some new planking, but I know it is probably the best thing to do. We'll see what others think, but for now, I'm heading in that direction.
 
By the way Jon,
I never responded to your comment about my ship's wheel. To say they are delicate would be like saying a Ferrari is "nice car". The whole assembly weighs about as much as a small cricket and holding it is like trying to touch something without leaving fingerprints. I had hoped the whole thing would have been made from the Connie wood that I had, but at least 75% of it is. You are quite right, making "plywood" is much stronger. If I had it to do all over again, I would have started with that.
 
Hi Jon,
Actually, the spar deck has not been glued down yet, and all the "components" have not been attached either. I did this intentionally, because I knew installing the pin rails would inevitably create some debris, which would make its way down onto the gun deck. by waiting to permanently secure the spar deck, I figured I could clean up the gun deck one last time prior. I guess that was fortuitous, as correcting the bulwarks will no doubt create some saw dust. I know it will be a pain and worst, it will likely be difficult to hide the "fix" without installing some new planking, but I know it is probably the best thing to do. We'll see what others think, but for now, I'm heading in that direction.
Hi Frank, the lower deck gun ports seem to be in the correct positions. However, if you reposition the deadeyes to match the existing gun ports on the spar deck, the deadeye chain plates will obstruct the front of the lower deck gun port, which you wouldn't want. I agree with Jon. The only solution is to correct the positions of those two gun ports on the upper deck.
 
Hello Mustafa,
You are correct about the position of the chain plates. I realized that fairy quickly when I started looking at the possibility of moving the shrouds. I spent a lot of time and anguish over this yesterday and I did come up with a reposition plan that I believe will work, albeit very tight
20260617_122252.2.jpg
There's not a lot of movement in the shrouds except for one and it would allow me to get around the gunports on both decks (barely). After sleeping on it and thinking a little more, I must agree with you gentlemen. The best course of action, no matter how painful, will be to correct the bulwarks and get the gun ports in their proper location. First off, who knows what complications it will bring if I move thigs. Inevitably, something will end up in the way...Murphy and I never get along. Second, I have tried my best to build this ship as she was in 1812 and even though it would be a minor change, like Jon, it would bother me. So, I guess it's time for some surgery :(
 
Thanks Mustafa, I need all the encouragement I can get.
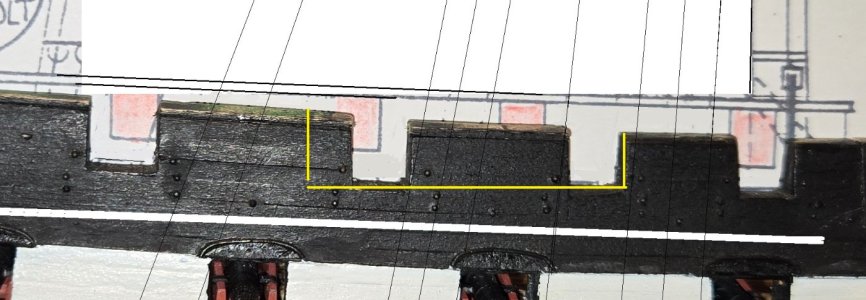
So my plan is to remove the following section. By using the existing edge of one of the ports, I only needed to make one vertical cut

20260617_101859.2.jpg

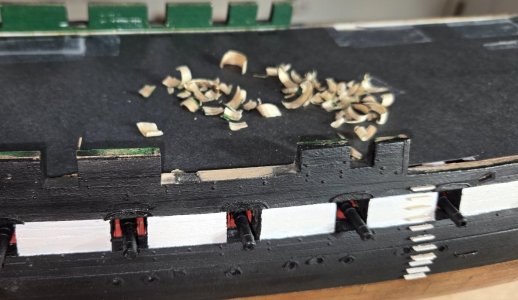
After taking a few deep breaths, I made the first cut with a razor knife. Then I basically just carved out the crown in the center using an Xacto blade until I very nearly reached the bottom of the ports. Then I used a sanding stick to smooth out the reaining bit. Finally, once that piece was removed, I used the razor knife to make a horizontal cut for the last little piece, then cleaned everything up with the sanding stick.
Phase I complete :)
20260618_142310.jpg
 
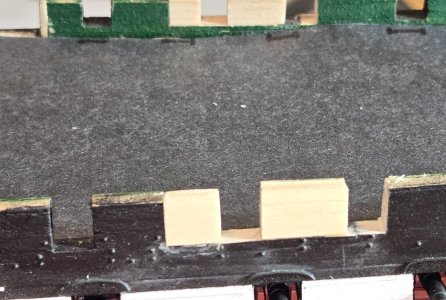
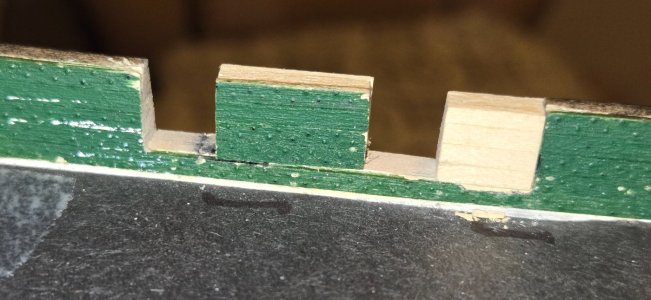
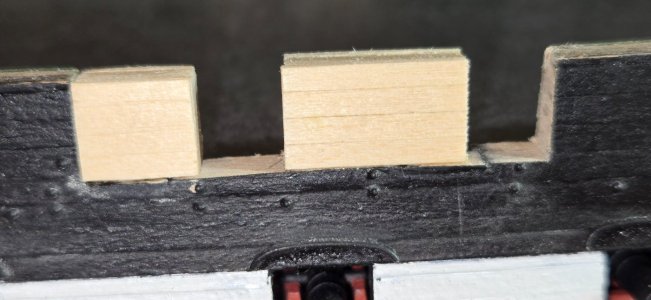
Well, the surgery was a success, at least to me. It went much better than I feared. After cutting out the section of bulwark that needed to be altered, I cut a piece of stock wood to fit the space. I measured the width of the bulwark at the base of the cut and thinned down this stock piece, accounting for the two layers of planking that would be added. Once the piece was thinned down, I first added planking to the inside. This allowed me to position the piece so that it was flush with the inside bulwark and I could fine tune the width. The bulwark is tapered, so it is thinner at the top than at the bottom. To get the proper shape and taper, I used a combination of Xacto blade and sanding stick to get it very close. Then, after adding the outside planking, I did some final sanding to get it to fit perfectly flush with the existing outside hull, This sanding took away a little of the planking detail, but it gave me a nice clean seam, which after a little putty and paint will not be visible. Once the piece was properly shaped, It was cut to the appropriat lengths to allow for the gunports and glued in place. I was able to recover the planking from the removed section on the port side and thus salvage the rivet detail. Was not able to do this on the starboard side20260619_205945.jpg

20260619_230159.jpg 20260619_230622.jpg

A little putty and paint and I will be ready to move on to the pin rails and other details on the bulwarks

 
Well, the surgery was a success, at least to me. It went much better than I feared. After cutting out the section of bulwark that needed to be altered, I cut a piece of stock wood to fit the space. I measured the width of the bulwark at the base of the cut and thinned down this stock piece, accounting for the two layers of planking that would be added. Once the piece was thinned down, I first added planking to the inside. This allowed me to position the piece so that it was flush with the inside bulwark and I could fine tune the width. The bulwark is tapered, so it is thinner at the top than at the bottom. To get the proper shape and taper, I used a combination of Xacto blade and sanding stick to get it very close. Then, after adding the outside planking, I did some final sanding to get it to fit perfectly flush with the existing outside hull, This sanding took away a little of the planking detail, but it gave me a nice clean seam, which after a little putty and paint will not be visible. Once the piece was properly shaped, It was cut to the appropriat lengths to allow for the gunports and glued in place. I was able to recover the planking from the removed section on the port side and thus salvage the rivet detail. Was not able to do this on the starboard sideView attachment 613396

View attachment 613397 View attachment 613398

A little putty and paint and I will be ready to move on to the pin rails and other details on the bulwarks

I knew you'd handle this easily. Good job, Frank!
 
Back
Top