A
-

Win a Free Custom Engraved Brass Coin!!!
As a way to introduce our brass coins to the community, we will raffle off a free coin during the month of August. Follow link ABOVE for instructions for entering.
-

PRE-ORDER SHIPS IN SCALE TODAY!
The beloved Ships in Scale Magazine is back and charting a new course for 2026!
Discover new skills, new techniques, and new inspirations in every issue.
NOTE THAT OUR FIRST ISSUE WILL BE JAN/FEB 2026
You are using an out of date browser. It may not display this or other websites correctly.
You should upgrade or use an alternative browser.
You should upgrade or use an alternative browser.
USS Constitution "Old Ironsides " 1:93 Scale Mamoli
- Thread starter Aussie048
- Start date
- Watchers 17
-
- Tags
- constitution mamoli
A
Aussie048
Guest
Hi Denis
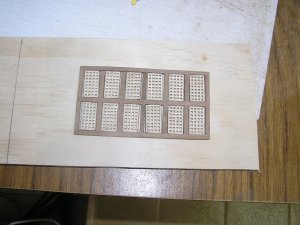
Looks like the second planking occurs next and the onto placing 750 a side of faux copper tiles. Won't that bit be fun. 750 a side sounded better than 1500 faux copper tiles.
No doubt I will stray a bit and work on some other parts whilst that is happening.
Cheers
Geoff
Looks like the second planking occurs next and the onto placing 750 a side of faux copper tiles. Won't that bit be fun. 750 a side sounded better than 1500 faux copper tiles.
No doubt I will stray a bit and work on some other parts whilst that is happening.
Cheers
Geoff
A
Aussie048
Guest
Hi Denis
Not genuine; fake or false.
These are faux copper tiles are stained green and probably made of limewood about 0.5mm thick. The idea of the green is to make an aged look once they are painted and lightly sanded.
I did look at replacing them but I cannot get the right size and the cost is a bit off putting.
It would be a lot of work making 1500 tiles.
I did do them on my Norfolk Sloop.
As for sticking them on I am open to suggestions as PVA take a bit to long to dry.
Cheers
Geoff
A
Aussie048
Guest
great progress mate.
Great - I see that you got 'er closed up.
Donnie
Donnie
A
Aussie048
Guest
Thanks Brian and Donnie for looking in.
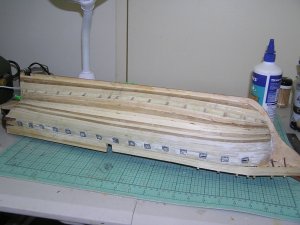
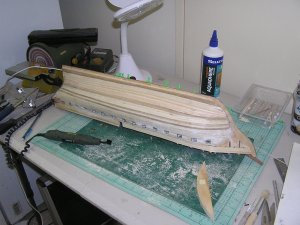
Now that is a good feeling that most of the first planking has finished. Just a few stealers and underneath the forecastle deck. File out the lower gun ports as they are a bit rough inside and square off.
If I get that done in the next week or so I will be happy.
Got a lot on, with looking at the CAD stuff.
Cheers
Geoff
A
Aussie048
Guest
After enjoying a workshop conducted by one of our club members on rigging it was time for the trip home.
Obviously it would be a trip and the discussion around model ship building. Brian who I enjoyed the company brought up the topic of copper tiles and suggested I make them. I first thought what a lot of work but the idea grew on me. This idea came about because of a build log by Neptune John on his HMS Investigator.
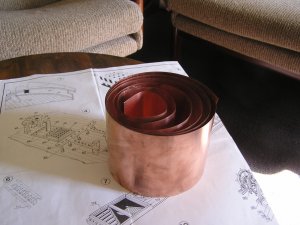
Well the copper foil is now been ordered.
Cheers
Geoff
Canoe21
Lawrence
Hello Geoff
Your Connie sure is looking good these days with the first planking completed, it sure is nice to see all of those fine hull lines finally come to life. In the three ships that I built the Cutty Sark, the HMS Victory, and the HMS Bounty I have always purchased my copper plates from the Model Dock Yard and applied them to the hull with CA. That is a very slow and sticky job. No matter how careful on is my fingers were always covered in CA. Tried those Vinyl Gloves, but they do seem a bit bulky and tend to transfer the CA to the face of the Copper Plates. I did look at the copper foil, my Admiral has rolls of it for her stained glass, it sure would have been a lot cheaper and easier to apply, but stubborn old me liked the copper plates, ENJOY.
Regards Lawrence
A
Aussie048
Guest
Hi Lawrence. Good to see you back all fresh and ready to get stuck into the Golden Hinde.
Yes it is a bit of a messy job but it was either the faux tiles or make them. 1500 tiles but I could not find them in my scale. I probably make up a jig with pin heads to give an imitation nail,
Cheers
Geoff
Yes it is a bit of a messy job but it was either the faux tiles or make them. 1500 tiles but I could not find them in my scale. I probably make up a jig with pin heads to give an imitation nail,
Cheers
Geoff
Planking looks great,now you are going to have fun making all those copper tiles.
A
Aussie048
Guest
Not yet Zoltan. The copper is in the mail.
I have to put a layer of walnut second planking on yet. I think it goes over the complete hull. I will check the plans before I start.
I've had a bit of a play around with the main deck grating frame
The grates still need some walnut wrapped around them so they will be a snug fit inside the frames.
Cheers
Geoff

Hi Geoff,
I am finishing up on my Bounty so I can get started on my Connie. I have been watching you build closely in hopes that I might learn something. I did buy a milling table that may work with my dermal set up.
:music-rockout: :handgestures-salute:
I am finishing up on my Bounty so I can get started on my Connie. I have been watching you build closely in hopes that I might learn something. I did buy a milling table that may work with my dermal set up.
:music-rockout: :handgestures-salute:
A
Aussie048
Guest
Mike
A mill is a handy machine to have, Make building some parts a lot easier
A mill is a handy machine to have, Make building some parts a lot easier
A
Aussie048
Guest
Well the Postie turned up today with a used DVD drive from the USA for my laptop that is going to run my CNC engraving/Router machine. That sounds better than doing the milling work on my computer desk. I now have to upgrade the Laptop from XP to windows 7
Also the second Postie turned up with 2 meters of 0.2mm copper from China. I think I have my work cut out for me for quite a few months in finishing the first planking under the Forecastle deck, doing the second planking, making a jig to mark and cut 1500 copper tiles and finally fit 1500 copper tiles.
Cheers
Geoff

Hi Geoff,
My shop is getting larger I just bought a Proxxon MF70. Should be here in a couple of days.
I'm excited to get started.
:music-rockout: :handgestures-salute:
My shop is getting larger I just bought a Proxxon MF70. Should be here in a couple of days.
I'm excited to get started.
:music-rockout: :handgestures-salute:
Hi Geoff, re your laptop, what software will you be using to 'drive' your mill?** and would it not have been easier to get self adhesive copper strip to do your tiling? How are you going to simulate the rivets, there is a tool that can do that, I forget what it is called.
With all these questions, you can take the weekend off to answer them.
Regards
Eric
** The reason I ask is that certain software runs better in XP than Win7.
With all these questions, you can take the weekend off to answer them.
Regards
Eric
** The reason I ask is that certain software runs better in XP than Win7.


