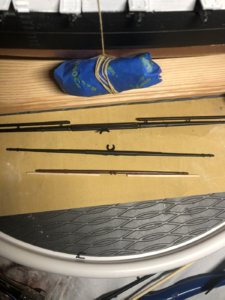
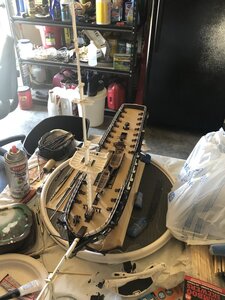
Yes, I’m past the point of no return for the studsail booms and yards. I’m making my own with bamboo skewers. Think I will take your advice about import positions though. Thank you for the reference. You’re right. I have a lot to learn especially with terminology. Thanks again for the help.I've been looking at your pics and you haven't progressed to the point of no return with the studsail booms and yards. IF you haven't glued the boats in position, you could cut the lines, remove the boats and use a #11 Exacto knife to cut the SS booms and yards lashings. And, IF you haven't glued the booms and yards together, you can fish them out with tweezers. Then put the boats back in place. However, if you can't retrieve them then I would suggest that you rig the yards in the "inport" or "lowered" position with the yards square and no sails. It will still look nice when you finish. Trying to rig those plastic sails is very tricky. Especially the stunsails. Trying to make the booms and yards would be very time consuming. Save the sails for the next model. Use this one to learn the terminology and the standing and running rigging techniques. That will be hard enough. Note that the booms are indicated by dotted lines.View attachment 137828
-

Win a Free Custom Engraved Brass Coin!!!
As a way to introduce our brass coins to the community, we will raffle off a free coin during the month of August. Follow link ABOVE for instructions for entering.
-

PRE-ORDER SHIPS IN SCALE TODAY!
The beloved Ships in Scale Magazine is back and charting a new course for 2026!
Discover new skills, new techniques, and new inspirations in every issue.
NOTE THAT OUR FIRST ISSUE WILL BE JAN/FEB 2026
You are using an out of date browser. It may not display this or other websites correctly.
You should upgrade or use an alternative browser.
You should upgrade or use an alternative browser.
USS CONSTITUTION REVELL 1/96 scale
- Thread starter pbryan
- Start date
- Watchers 32
-
- Tags
- constitution revell
I saw others paint it like that and I liked it. I know it’s probably not historically accurate but from what I’ve read and seen, there were numerous color schemes through different Admirals.If they are the same scale, 1/96. they should be the same size. Did your instructions call for the interior upper bulwarks to be painted green, or was that your decision? Just curious.
The inside bulwarks were painted green.
After 1809, the inner bulkhead and waterway were dark green matt (about that of Humbrol #149, which needs to be scaled and weathered. Model Shipways paint calls for MS4801 Dark Green for bulwarks. The Hull model in the Peabody Essex Museum, built by the crew and given to Isaac Hull, shows a dark green for the bulwarks. When it comes to articles on exact colors used for the Connie, it's a wide open field and some articles almost get hostile over the issue. I used a flat dark green for my inside bulwarks. Your Connie is looking good and don't rush your progress!
After 1809, the inner bulkhead and waterway were dark green matt (about that of Humbrol #149, which needs to be scaled and weathered. Model Shipways paint calls for MS4801 Dark Green for bulwarks. The Hull model in the Peabody Essex Museum, built by the crew and given to Isaac Hull, shows a dark green for the bulwarks. When it comes to articles on exact colors used for the Connie, it's a wide open field and some articles almost get hostile over the issue. I used a flat dark green for my inside bulwarks. Your Connie is looking good and don't rush your progress!
Last edited:
Speaking of which, I’ve seen some masts painted all white and some with brown and white. Same with the rigging blocks, some black and some brown. Not sure which is accurate but I might just do personal preference. I like a little difference among the colors.
pbryan - here is an interesting article on color scheme(s) used for the USS Constitution. A little long but I think you would enjoy reading it. (if you haven't already!
USS Constitution colors- CAUTION- LONG DISCUSSION!! - FineScale Modeler - Essential magazine for scale model builders, model kit reviews, how-to scale modeling, and scale modeling products
FineScale Modeler magazine - Essential magazine for scale model builders, model kit reviews, how-to scale modeling, and scale modeling products.
cs.finescale.com
Hi,how is this build progressing ,any updates?
- Joined
- Feb 11, 2019
- Messages
- 130
- Points
- 113

I was an avid builder of plastic kits from about 6-13. The great Constitution was my last build of a sailing ship. I loved it dearly. The rigging took forever! But, it was the best one I ever built. Sadly, the wheels of time ground it to dust long ago. I have one in the basement- one day...Very best of luck to you, and Go Navy!
I am really sorry to hear that,hopefully you will get back to herUnfortunately, this is the latest as I broke some of the yardarms and am waiting for parts from Revell.
In my experience Testors Dullcote is dead flat, Tamiya has a little more sheen but still flat.I always used Testor's matt spray finish - called dull coat - when they made it. I don't see why the Tamiya equivalent wouldn't work just as well.
- Joined
- Jul 14, 2020
- Messages
- 23
- Points
- 68

Good build. Not sure if you said this and I missed it. What have you used for a display base.
Try styrene rigging. It's awesome! No memory in it, and prewaxed!Thanks. I’m a little nervous about the rigging though. That will take some time
Do the rigging step by step, make each section a separate project and take your time. Standing rigging first, one lower mast at a time, don't go cross eyed doing those blocks, just take a break.Thanks. I’m a little nervous about the rigging though. That will take some time
Rigging isn't so bad. It can get tedious if you try to do it quickly and rush things. Just break it up into sectors and make each sector a separate project. Use Syrene rope, it's great. And it comes prewaxed!
Some things are really repetitive, like gun barrels and carriages. Good grief.
I started my guns but did not try to do them all at once, did a few, worked on a mast, little projects that helped prevent monotony. It looks good too.
Some things are really repetitive, like gun barrels and carriages. Good grief.
I started my guns but did not try to do them all at once, did a few, worked on a mast, little projects that helped prevent monotony. It looks good too.
Syrene thread looks like rope and comes prewaxed. Check it out. You'll need a few empty thread spools to wrap it on as it comes in little bags unspooled and can get tangled up. Good stuff. Much better than what you get from the kit.Thanks. I’m a little nervous about the rigging though. That will take some time
Break your rigging up into sections and relax, If you do a few guns, then work on a mast, breaking it up into different little projects, it will go easier and break the tedium.
And keep the kids, wifey, cats and dogs away from it!!! (voice of experience!)
Last edited:
Look at the instruction diagrams closely. I had the same problem. Discovered that when I painted the inside bulwarks the paint partially filled a couple of the mounting holes/slots making them hard to see. Check near the stern. They don't provide any "extra" parts in the kit. You're doing very well. My big mistake was when I glued the stern components to the hull sides they didn't line up and I have a good sized gap at the starboard corner. Oh well. It's too late to make a correction, but I believe the bunks in the cabin belong in the side cabins, not the dayroom. Edit: Disregard the above. It's all been asked and answered earlier this year. I didn't realize I had responded and commented in this post back in March. Has the progress stalled?Ok fellow modelers. I am at an impasse. Can someone please explain why the instructions call out 15 cleats for the quarterdeck rails and there are 17 slots for them? I have gone through the instructions to ensure that i will not need the extra 4 for future endeavors. Cannot see anything else, and as obvious as it may seem, I want to be sure.
Last edited:


