Vasa - 1:65 DeAgostini [COMPLETED BUILD]

Its been about a week since my last post. The shipyard has been closed... Well, maybe the yard was open but the builder was AWOL. In any case, there was nothing to show.

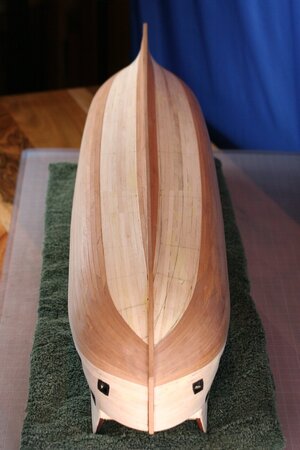
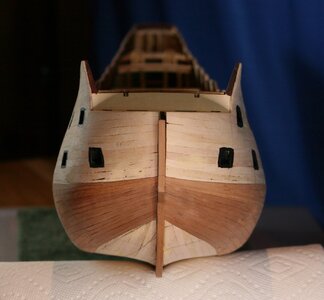
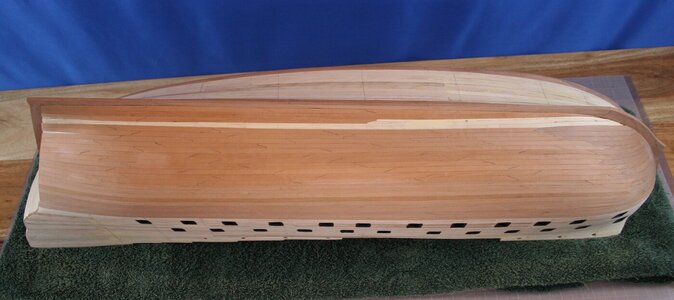
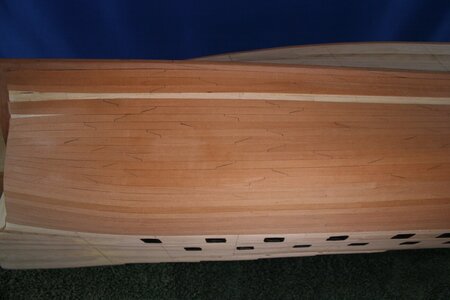
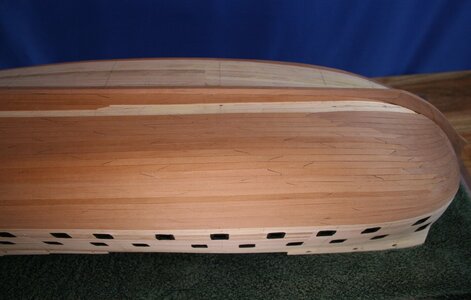
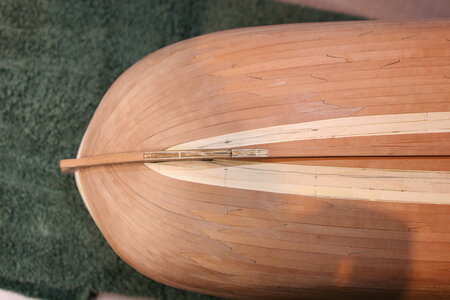
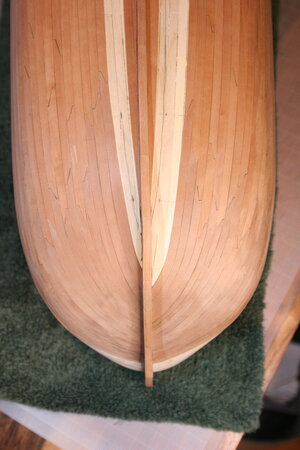
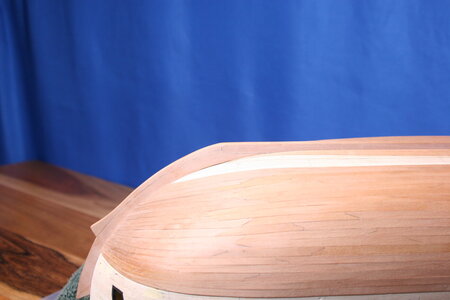
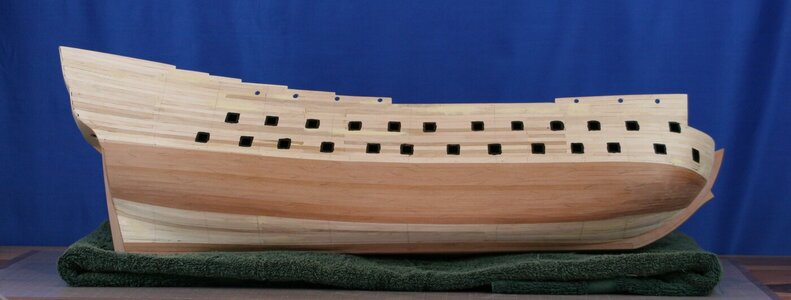
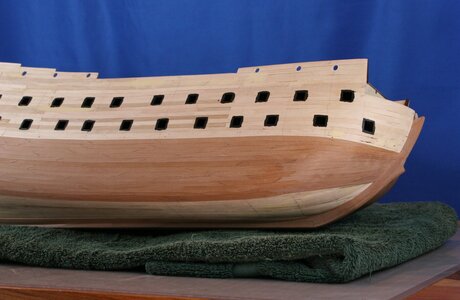
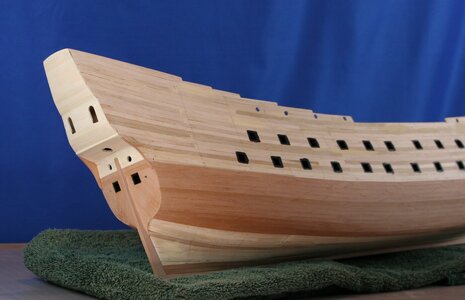
Until today. I was able to spend several hours this afternoon working on hull planking. I'm getting pretty efficient at cutting scarf joints but my spiling skills need some work. I'll probably get it down about the time I wrap up the hull. That bodes well for my next build. This one will need to be classified under: he was still learning.

So, here is what I have to show:
IMG_5720 (2).JPG

IMG_5721 (2).JPG
IMG_5722 (2).JPG
IMG_5724 (2).JPG
IMG_5726 (2).JPG

Looking at what I have completed I think I should have added a few drop planks - that would have helped avoid the tapering to 50% that you see. I would have also spent more time on my planking layout. I have some wider planks as I have worked toward the keel (inboard) and I could have distributed that width onto the narrower planks further up. Finally, despite my best efforts, I have been unable to preserve symmetry but I'm close (there's one more row completed on the port side so it looks more off than it really is).

Thanks for checking in! This planking job is going to take a while but I'll keep plodding along as time permits.
 
Its been about a week since my last post. The shipyard has been closed... Well, maybe the yard was open but the builder was AWOL. In any case, there was nothing to show.

Until today. I was able to spend several hours this afternoon working on hull planking. I'm getting pretty efficient at cutting scarf joints but my spiling skills need some work. I'll probably get it down about the time I wrap up the hull. That bodes well for my next build. This one will need to be classified under: he was still learning.

So, here is what I have to show:
View attachment 197205

View attachment 197201
View attachment 197202
View attachment 197203
View attachment 197204

Looking at what I have completed I think I should have added a few drop planks - that would have helped avoid the tapering to 50% that you see. I would have also spent more time on my planking layout. I have some wider planks as I have worked toward the keel (inboard) and I could have distributed that width onto the narrower planks further up. Finally, despite my best efforts, I have been unable to preserve symmetry but I'm close (there's one more row completed on the port side so it looks more off than it really is).

Thanks for checking in! This planking job is going to take a while but I'll keep plodding along as time permits.
I think you’re doing a fantastic job! But I know we tend to be our own worst critic. Once it is completely covered it will look awesome.
The reality is, once all the decorations go on, people don’t pay that much attention to the hull. That is except those who build ships! We tend to notice more than your average person. So don’t agonize over perfection, even the real ship wasn’t perfect. Adding the scarf joints is more than most would have done. With that kind of dedication and work ethic, I predict you are going to surprise yourself before this ship is completed. Keep up the good work!
 
Last edited:
Paul that looks great and I think you have made excellent progress. Thumbs-Up There really is no need to rush anything.
Thank you, Heinrich! I appreciate the encouragement.
You have been holding back - I just discovered your Batavia build (excuse me, Haarlem build). I've only reviewed the first portion and I am looking forward to studying more since our ships are of a similar era and origin (both Dutch built in the early 1600's). What I have seen is most impressive!
 
Last edited:
I think you’re doing a fantastic job! But I know we tend to be our own worst critic. Once it is completely covered it will look awesome.
The reality is, once all the decorations go on, people don’t pay that much attention to the hull. That is except those who build ships! We tend to notice more than your average person. So don’t agonize over perfection, even the real ship wasn’t perfect. Adding the scarf joints is more than most would have done. With that kind of dedication and work ethic, I predict you are going to surprise yourself before this ship is completed. Keep up the good work!
Thank you, Dean. I'm sure you're right about what the average person sees. But I still have plans for the hull (well, maybe hopes and dreams) so if someone does look...
I had a funny thought yesterday as I was cutting scarf joint on planks in a place NO ONE will ever see once the ship is displayed: Why am I doing these? Answer: because a bunch of people on a forum that I will never meet will see that I "cheated". Curious isn't it?
 
Its been about a week since my last post. The shipyard has been closed... Well, maybe the yard was open but the builder was AWOL. In any case, there was nothing to show.

Until today. I was able to spend several hours this afternoon working on hull planking. I'm getting pretty efficient at cutting scarf joints but my spiling skills need some work. I'll probably get it down about the time I wrap up the hull. That bodes well for my next build. This one will need to be classified under: he was still learning.

So, here is what I have to show:
View attachment 197205

View attachment 197201
View attachment 197202
View attachment 197203
View attachment 197204

Looking at what I have completed I think I should have added a few drop planks - that would have helped avoid the tapering to 50% that you see. I would have also spent more time on my planking layout. I have some wider planks as I have worked toward the keel (inboard) and I could have distributed that width onto the narrower planks further up. Finally, despite my best efforts, I have been unable to preserve symmetry but I'm close (there's one more row completed on the port side so it looks more off than it really is).

Thanks for checking in! This planking job is going to take a while but I'll keep plodding along as time permits.
Well done, glad to see you progress.
 
I think you're doing a great job. Nice work getting scarphs aligned. You're really developing some excellent spiling skills.
 
Just couldn't push it across the finish line tonight...

View attachment 197424

Scarf joint porn if that's your thing:

View attachment 197425
View attachment 197426

I frankly have no idea if I am doing this right - but the pear is going on regardless!
Thanks for visiting - I have checked out many of your builds if you include a link with your signature - you are a talented bunch!
Obviously your doing better than you know! I would be happy with that all day long! It’s looking great!
 
Obviously your doing better than you know! I would be happy with that all day long! It’s looking great!
Seeing your scarf joints makes me wonder why I followed my MS2130 Bluenose plans and instructions for straight butted joints except those may have been the actual manner for the schooner when built. I don't know but your desire for joinery takes my compliments for well done as you continue. Rich (PT-2)
 
@Heinrich: thanks - and if I recall you were an early endorser of the pear tree
@Brewbrarian: appreciate the encouragement Eric - yes, spiling is a learned skill - it's very satisfying when it works right - frustrating when it doesn't
@Dean62: all I know is I aspire to your woodworking chops
@PT-2: I have the advantage of being able to look at the actual ship for guidance - scarf joints everywhere (and every which way) - they were something I simply couldn't ignore - I am grateful for your kind words!
 
Well, it happened. I would say inevitably, but of course, that's not entirely true...

That crash you heard around 7:30 pm central standard time (US) last night was the hull of my Vasa crashing into the hardwood floor beneath my work table.

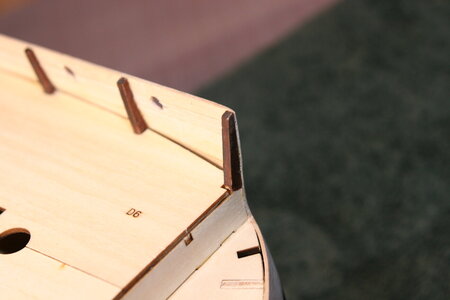
The damage was minor considering what might have happened. Like a good cat she managed to roll herself upright before hitting the floor on the forward portion of the keel as it joins the stem. The ply keel basically ruptured absorbing the force of the impact. I think she also hit the wall and the portside forward frame snapped off along with the bulwark planking.

The saddest news of all is that I did not take pictures to share with all of you. Instead, in my frustration, I immediately set about to the repair. I sorted out the layers of plywood keel and with plenty of clamp pressure forced everything back together.

Here you see the repair in progress the next morning (it looked far worse - trust me):

IMG_5767.JPG

I also managed to rebuild the bulwark and frame (a little more touchup is needed but I'm happy all things considered):

IMG_5768.JPG

I repaired the veneer on the keel as well. I'm not entirely satisfied and may go back and work on this area again but this patch job will do for the time being. We'll see if I keep noticing it over and over and over again. That will determine whether more work will be required. As they say: perfect is the enemy of good...

IMG_5770.JPG

A critical eye on the above image will notice some lateral 'movement' in the line of the keel. The damage was quite extensive and this is as good as I could get things without replacing the entire keel...

IMG_5771.JPG

In my disappointment and frustration last night I comforted myself by playing with this little guy and everything seemed to get better...

IMG_5763.JPG

Onward!
 
Last edited:
Thank you, Dean. I'm sure you're right about what the average person sees. But I still have plans for the hull (well, maybe hopes and dreams) so if someone does look...
I had a funny thought yesterday as I was cutting scarf joint on planks in a place NO ONE will ever see once the ship is displayed: Why am I doing these? Answer: because a bunch of people on a forum that I will never meet will see that I "cheated". Curious isn't it?
Dockattner, the bottom line is that YOU will see them, and if you add historic details, you will appreciate the fact that you took the time to go that extra step on the road to awesomeness. If other ship enthusiasts mention that they took notice of that detail, that's a reward for your effort. I can tell you that after seeing your planking, I will be adding more detail to my planking on HMS Sovereign of the Seas as a result. Add that to the influence your work has on others. You're doing a splendid job! I'm trying to catch up to you... :) (not gonna happen though)
 
Dockattner, the bottom line is that YOU will see them, and if you add historic details, you will appreciate the fact that you took the time to go that extra step on the road to awesomeness. If other ship enthusiasts mention that they took notice of that detail, that's a reward for your effort. I can tell you that after seeing your planking, I will be adding more detail to my planking on HMS Sovereign of the Seas as a result. Add that to the influence your work has on others. You're doing a splendid job! I'm trying to catch up to you... :) (not gonna happen though)
Hey Kurt, thank you for the motivational speech! You are kind to share this encouragement. The very thought that you might be inspired by something you see on my build log is humbling considering what you accomplished with La Couronne.
 
Well, it happened. I would say inevitably, but of course, that's not entirely true...

That crash you heard around 7:30 pm central standard time (US) last night was the hull of my Vasa crashing into the hardwood floor beneath my work table.

The damage was minor considering what might have happened. Like a good cat she managed to roll herself upright before hitting the floor on the forward portion of the keel as it joins the stem. The ply keel basically ruptured absorbing the force of the impact. I think she also hit the wall and the portside forward frame snapped off along with the bulwark planking.

The saddest news of all is that I did not take pictures to share with all of you. Instead, in my frustration, I immediately set about to the repair. I sorted out the layers of plywood keel and with plenty of clamp pressure forced everything back together.

Here you see the repair in progress the next morning (it looked far worse - trust me):

I also managed to rebuild the bulwark and frame (a little more touchup is needed but I'm happy all things considered):


I repaired the veneer on the keel as well. I'm not entirely satisfied and may go back and work on this area again but this patch job will do for the time being. We'll see if I keep noticing it over and over and over again. That will determine whether more work will be required. As they say: perfect is the enemy of good...

A critical eye on the above image will notice some lateral 'movement' in the line of the keel. The damage was quite extensive and this is as good as I could get things without replacing the entire keel...

In my disappointment and frustration last night I comforted myself by playing with this little guy and everything seemed to get better...


Onward!
These tweaks and corrections afflict us all. Many you can fix, others you can't. The keel may be too stiff to bend into place by wetting and applying hot air gun to steam it into position without damaging the surface of the veneer. You might have to live with it. Alternatively, the concave side could be built up with more veneer and blended in fore and aft, and the other convex side sanded down right through the veneer into the plywood, and more veneer added. This mechanical correction is work intensive and runs the risk of not being able to blend in easily with the rest of the keel with regard to wood color result, or plank seam appearance. It's your call. The bulwark repair looks 100% good. All the other parts you add to that area will reinforce it and the broken part will become invisible later in the build. You were right... those frame parts at the top are flimsy, much more so than on HMS SotS.
 
Hey Kurt, thank you for the motivational speech! You are kind to share this encouragement. The very thought that you might be inspired by something you see on my build log is humbling considering what you accomplished with La Couronne.
Dood. We help each other in all sorts of ways with these build logs. I can't tell you mow many details were borrowed for others while building La Couronne. Your log will help many others, mostly those building the Wasa. I'd like to see what tools you used to make the scarf joint cuts. Borrowing these details and using them makes your model go from the mundane to the extravagant. You can't be satisfied to build the kit as-is per the instructions only, if you're the kind of person who has the dedication to build this type of ship model in the first place.
 
Last edited:
Hi Dockattner!
A wrong movement that shifts the model ist almost natural. A crash is more serious. But it is not on the bottom of the port. I always do not go to the workshop for two days for such matters and then start the repair. With the models you can repair anything! Your damage is painful, but small!
Continue to model well!

With best regards
Thomas
 
Well, it happened. I would say inevitably, but of course, that's not entirely true...

That crash you heard around 7:30 pm central standard time (US) last night was the hull of my Vasa crashing into the hardwood floor beneath my work table.

The damage was minor considering what might have happened. Like a good cat she managed to roll herself upright before hitting the floor on the forward portion of the keel as it joins the stem. The ply keel basically ruptured absorbing the force of the impact. I think she also hit the wall and the portside forward frame snapped off along with the bulwark planking.

The saddest news of all is that I did not take pictures to share with all of you. Instead, in my frustration, I immediately set about to the repair. I sorted out the layers of plywood keel and with plenty of clamp pressure forced everything back together.

Here you see the repair in progress the next morning (it looked far worse - trust me):

View attachment 198061

I also managed to rebuild the bulwark and frame (a little more touchup is needed but I'm happy all things considered):

View attachment 198062

I repaired the veneer on the keel as well. I'm not entirely satisfied and may go back and work on this area again but this patch job will do for the time being. We'll see if I keep noticing it over and over and over again. That will determine whether more work will be required. As they say: perfect is the enemy of good...

View attachment 198064

A critical eye on the above image will notice some lateral 'movement' in the line of the keel. The damage was quite extensive and this is as good as I could get things without replacing the entire keel...

View attachment 198065

In my disappointment and frustration last night I comforted myself by playing with this little guy and everything seemed to get better...

View attachment 198060

Onward!
Paul,
Accidents do happen, luckily you were able to recover from it nicely. On my first ship (Norske Love), after 2 years of work it was destroyed in a recent move! Instead of making a separate trip for the ship by itself, or taking some better preventative measure against possible damage, I ignorantly rushed and put it in the moving truck with furniture. What could go wrong there? I was tired (after moving all day from an apartment and two storage units) and wanting to get done, so I could start unpacking and setting up appliances in our new home. Somehow the ship didn't seem that important in the moment, and now I have to live with that. It was destroyed to the point I didn't think it could ever look good again. So I ended up throwing 2 years of work into a dumpster. Not a good feeling.
So keep her on a stand and out of reach of children and pets! And never move unless in a case and properly protected, ie. not in the back of a moving truck!
 
Back
Top