Thanks for getting that one Eric! I was starting to think it was going to get me kicked off the forum...Bwahahaha
-

Win a Free Custom Engraved Brass Coin!!!
As a way to introduce our brass coins to the community, we will raffle off a free coin during the month of August. Follow link ABOVE for instructions for entering.
-

PRE-ORDER SHIPS IN SCALE TODAY!
The beloved Ships in Scale Magazine is back and charting a new course for 2026!
Discover new skills, new techniques, and new inspirations in every issue.
NOTE THAT OUR FIRST ISSUE WILL BE JAN/FEB 2026
You are using an out of date browser. It may not display this or other websites correctly.
You should upgrade or use an alternative browser.
You should upgrade or use an alternative browser.
Vasa - 1:65 DeAgostini [COMPLETED BUILD]
- Thread starter dockattner
- Start date
- Watchers 147
And just when you thought all hope was lost... BOOM! The lower portion of the hull has been planked!
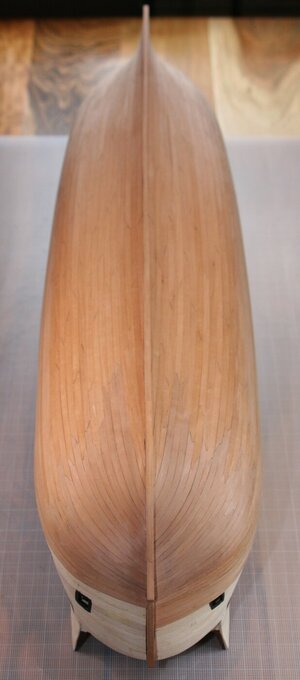
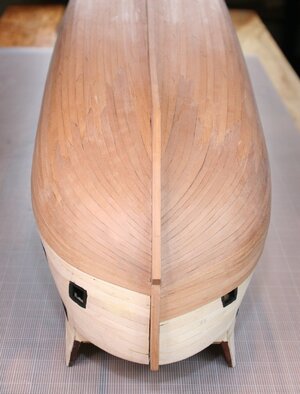
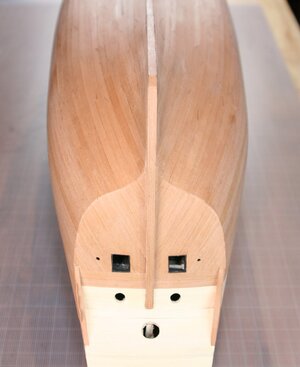
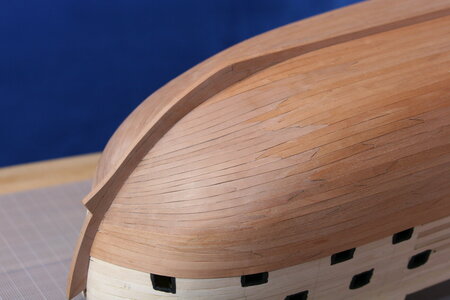
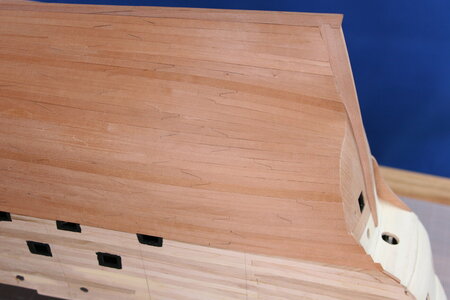
Yes, I too am troubled by the color difference between the strips of pear veneer and the sheet veneer used during spiling (it is more noticeable in these photos than it is in real life but...).
The sheet veneer is much smoother/shinier/finished than the strip veneer and I hope that is contributing to the mismatch. Perhaps some sanding will blend away the differences? I intend to mock up a sample and see what impact the oil finish will have as well (I'm guessing it will make it worse...). I might be forced to tint the oil??? I am open to suggestions!
 The lower portion of the hull has been planked!


Yes, I too am troubled by the color difference between the strips of pear veneer and the sheet veneer used during spiling (it is more noticeable in these photos than it is in real life but...).
The sheet veneer is much smoother/shinier/finished than the strip veneer and I hope that is contributing to the mismatch. Perhaps some sanding will blend away the differences? I intend to mock up a sample and see what impact the oil finish will have as well (I'm guessing it will make it worse...). I might be forced to tint the oil??? I am open to suggestions!
The difference in shading are desirable. When the planking is either oiled or lacquered, the wood will get darker and the planks tend to blend together, so the shade differences will show off your sexy spiling. If you need to darken the bow a bit more to blend in that area, you could stain it a tad darker.And just when you thought all hope was lost... BOOM!The lower portion of the hull has been planked!
View attachment 198274View attachment 198275View attachment 198276
View attachment 198277
View attachment 198278
Yes, I too am troubled by the color difference between the strips of pear veneer and the sheet veneer used during spiling (it is more noticeable in these photos than it is in real life but...).
The sheet veneer is much smoother/shinier/finished than the strip veneer and I hope that is contributing to the mismatch. Perhaps some sanding will blend away the differences? I intend to mock up a sample and see what impact the oil finish will have as well (I'm guessing it will make it worse...). I might be forced to tint the oil??? I am open to suggestions!
- Joined
- Jul 9, 2019
- Messages
- 497
- Points
- 323

Looks terrific doc, now where's that whiskey! Cheers.
When I do the whiskey plank you will be invited!Looks terrific doc, now where's that whiskey! Cheers.
Those mating scarf joints are very impressive. Did you have a template guide of some sort or just mark and file to fit? Your work is a goal that I will have to try to follow in the future. Well done joints and scarfing widths. Rich (PT-2)When I do the whiskey plank you will be invited!
That is fantastic Paul. It looks awesome! I knew you were going to knock it out of the park, because you refuse to fail...lol. And you refuse to do an average job, which is why you chose to do all those scarf joints! That’s the best first ship planking I’ve ever seen!
And I think the difference in color is nice, it shows off the scarf joints. On the bow it almost looks like a birds feather, like you were showing off and made a design in the planking...
And I think the difference in color is nice, it shows off the scarf joints. On the bow it almost looks like a birds feather, like you were showing off and made a design in the planking...
Thank you so much for your kind words, Dean. I wish I could claim to have been showing off! But you all know I was simply trying to survive. You and others on the forum saved me.That is fantastic Paul. It looks awesome! I knew you were going to knock it out of the park, because you refuse to fail...lol. And you refuse to do an average job, which is why you chose to do all those scarf joints! That’s the best first ship planking I’ve ever seen!
And I think the difference in color is nice, it shows off the scarf joints. On the bow it almost looks like a birds feather, like you were showing off and made a design in the planking...
Still lots and lots of planking to do and once again I find myself struggling to not begin sanding. The much-heralded scarf joints will all need to be cleaned after sanding or they will disappear so I want to only sand once and be done.
But first I need to figure out if I'm going to add treenails. The hull had both treenails and iron nails and I am uncertain at this point if attempting treenails at 1:65 is laudable or foolish. I have a test panel but never seem to get around to trying out options.
Last edited:
Hey Rich,Those mating scarf joints are very impressive. Did you have a template guide of some sort or just mark and file to fit? Your work is a goal that I will have to try to follow in the future. Well done joints and scarfing widths. Rich (PT-2)
You and several others have asked about the scarf joints but my technique isn't impressive in any way.
The Vasa offered me the advantage of a total lack of uniformity in the dimensions of the joinery. Some scarf joints were long - some were short - some faced aft - some faced fore. I used this to my advantage. I am simply cutting them by hand with an X-Acto knife and a No 1 blade. From a single strake I cut in the two short vertical arms first and then cut the longer diagonal using a thin straight edge as a guide. I separate the pieces, sand/file as needed, darken the edge with a pencil and voila - both sides of the joint perfectly fit together.
Of course that strategy falls apart when the strip comes to an end or if I need to join a strip to a spiled plank. Now its just trial and error. I cut in one end by hand (always the valuable spiled piece first) and then match up the joinery on the other piece. I have gotten pretty good at looking at the 'already cut' end and matching it. And if I'm not close with the first try I never try to work the joint - I cut off the failure (on the second joining piece) and give it another shot. If I'm close I'll fuss with it to make it 'perfect' using either the X-Acto as a shaving tool or an emery board or sanding stick. You would be surprised how often the original cut fits fine and little sanding/shaping is needed.
For the record I spent a day trying to fabricate a jig - or a cutting tool I could use as a stamp - and my only reward for those efforts was cuts on my fingers and countless fragments of hobby knife blades and razor blades strewn across my workbench.
And while I have intentionally allowed the geometry of the joints to vary - I can tell you that given enough practice it is entirely possible to cut 10 joints in a row that would match close enough that a casual observer would think they were jig/machine cut.
Anyway, I hope this encourages others and gives them a simple game plan if scarf joints are indicated on one of their future builds. It's simple and quick (well, at a plodding pace of model ship building sort of quick)...
Last edited:
Incredible work on the planking. I admire your patience and tenacity to complete that part of your build. Well done Sir!
Jan
Jan
I would probably go for the iron nails, if any, and save tree nails for your next ship. Although I would opt to use a smaller nail to be more subtle. Opt for larger nails on your Wales!Thank you so much for your kind words, Dean. I wish I could claim to have been showing off! But you all know I was simply trying to survive. You and others on the forum saved me.
Still lots and lots of planking to do and once again I find myself struggling to not begin sanding. The much-heralded scarf joints will all need to be cleaned after sanding or they will disappear so I want to only sand once and be done.
But first I need to figure out if I'm going to add treenails. The hull had both treenails and iron nails and I am uncertain at this point if attempting treenails at 1:65 is laudable or foolish. I have a test panel but never seem to get around to trying out options.
Tree nails can be very subtle, but they are far more work. Again it’s your ship and your choice. It really depends on the look you are after. The hull is beautiful and I wouldn’t want to take away from that with a bunch of nails looking like a rash ...lol. People obviously do it to simulate shipwrights practice. But if you do the hull, you’re committed to doing it on the rest of the ship. Then you have to decide to what degree. Just enough to give the impression there are nails, or add where there would have been frames (which would be a lot of nails)!
In conclusion it’s a choice you have to be careful with, because once it’s done, there’s no going back!
Oh yeah, on the scarf joints...anytime I have to join two pieces with an abnormal joint like that, I cut one side first and then trace that profile onto the second piece to guarantee an exact match. But the way you did it guaranteed an exact fit as well, using one piece. Once again good job.
Last edited:
These are the sorts of explanations that REALLY help out a newbie ship modeler like myself. I appreciate the detailed instructions that you’ve provided. I stayed away from any scarf joints as they looked very difficult to pull off properly. Now I feel like I will be able to follow this. Thanks for the info.Hey Rich,
You and several others have asked about the scarf joints but my technique isn't impressive in any way.
The Vasa offered me the advantage of a total lack of uniformity in the dimensions of the joinery. Some scarf joints were long - some were short - some faced aft - some faced fore. I used this to my advantage. I am simply cutting them by hand with an X-Acto knife and a No 1 blade. From a single strake I cut in the two short vertical arms first and then cut the longer diagonal using a thin straight edge as a guide. I separate the pieces, sand/file as needed, darken the edge with a pencil and voila - both sides of the joint perfectly fit together.
Of course that strategy falls apart when the strip comes to an end or if I need to join a strip to a spiled plank. Now its just trial and error. I cut in one end by hand (always the valuable spiled piece first) and then match up the joinery on the other piece. I have gotten pretty good at looking at the 'already cut' end and matching it. And if I'm not close with the first try I never try to work the joint - I cut off the failure (on the second joining piece) and give it another shot. If I'm close I'll fuss with it to make it 'perfect' using either the X-Acto as a shaving tool or an emery board or sanding stick. You would be surprised how often the original cut fits fine and little sanding/shaping is needed.
For the record I spent a day trying to fabricate a jig - or a cutting tool I could use as a stamp - and my only reward for those efforts was cuts on my fingers and countless fragments of hobby knife blades and razor blades strewn across my workbench.
And while I have intentionally allowed the geometry of the joints to vary - I can tell you that given enough practice it is entirely possible to cut 10 joints in a row that would match close enough that a casual observer would think they were jig/machine cut.
Anyway, I hope this encourages others and gives them a simple game plan if scarf joints are indicated on one of their future builds. It's simple and quick (well, at a plodding pace of model ship building sort of quick)...
Thanks for your detailed explanation. From your experience and practice, could this be done on very narrow planks. My MS2130 Bluenose planking is 1/8" wide before any tapering down. That is why I cheated with only butt joints per plan instructions. Do you think it realistic for 1/8"? Rich (PT-2)Hey Rich,
You and several others have asked about the scarf joints but my technique isn't impressive in any way.
The Vasa offered me the advantage of a total lack of uniformity in the dimensions of the joinery. Some scarf joints were long - some were short - some faced aft - some faced fore. I used this to my advantage. I am simply cutting them by hand with an X-Acto knife and a No 1 blade. From a single strake I cut in the two short vertical arms first and then cut the longer diagonal using a thin straight edge as a guide. I separate the pieces, sand/file as needed, darken the edge with a pencil and voila - both sides of the joint perfectly fit together.
Of course that strategy falls apart when the strip comes to an end or if I need to join a strip to a spiled plank. Now its just trial and error. I cut in one end by hand (always the valuable spiled piece first) and then match up the joinery on the other piece. I have gotten pretty good at looking at the 'already cut' end and matching it. And if I'm not close with the first try I never try to work the joint - I cut off the failure (on the second joining piece) and give it another shot. If I'm close I'll fuss with it to make it 'perfect' using either the X-Acto as a shaving tool or an emery board or sanding stick. You would be surprised how often the original cut fits fine and little sanding/shaping is needed.
For the record I spent a day trying to fabricate a jig - or a cutting tool I could use as a stamp - and my only reward for those efforts was cuts on my fingers and countless fragments of hobby knife blades and razor blades strewn across my workbench.
And while I have intentionally allowed the geometry of the joints to vary - I can tell you that given enough practice it is entirely possible to cut 10 joints in a row that would match close enough that a casual observer would think they were jig/machine cut.
Anyway, I hope this encourages others and gives them a simple game plan if scarf joints are indicated on one of their future builds. It's simple and quick (well, at a plodding pace of model ship building sort of quick)…
Hi Rich, I am far from an expert on this sort of thing but in my opinion the answer would be 'no'. There is a certain amount of crushing and tearing of the wood even with the newest blade and I believe a pair of 1 mm vertical cuts with a joining diagonal cut would not turn out the way you would want it to on a 3 mm plank. Of course the better answer would be to try it out!Thanks for your detailed explanation. From your experience and practice, could this be done on very narrow planks. My MS2130 Bluenose planking is 1/8" wide before any tapering down. That is why I cheated with only butt joints per plan instructions. Do you think it realistic for 1/8"? Rich (PT-2)
With all that said, is there reason to believe the Bluenose would even have scarf joints? Not that we are beholden to historical accuracy but the Bluenose was built for speed so I'm picturing a highly finished smooth surface on your hull... I'm confident you were able to achieve that beautifully with butt joints! Thanks for your interest in my build and for following my log!
Thank you everyone for sharing your positive comments about my work on the hull and all the likes. The encouragement means a lot to me!
Last edited:
I have nothing showing how those hull planking joints were made but I doubt that they would have been a scarf joint. That is based upon seeing some YouTube current day planking on long hulls, maybe even the Bluenose II construction one. I'll search back to find that. You may be right about a smooth hull for speed but I am seeing definite plank edges in photos but need to go back looking again for the plank ends. Rich (PT-2)Hi Rich, I am far from an expert on this sort of thing but in my opinion the answer would be 'no'. There is a certain amount of crushing and tearing of the wood even with the newest blade and I believe a pair of 1 mm vertical cuts with a joining diagonal cut would not turn out the way you would want it to on a 3 mm plank. Of course the better answer would be to try it out!
With all that said, is there reason to believe the Bluenose would even have scarf joints? Not that we are beholden to historical accuracy but the Bluenose was built for speed so I'm picturing a highly finished smooth surface on your hull... I'm confident you were able to achieve that beautifully with butt joints! Thanks for your interest in my build and for following my log!
This is the YouTube for Bluenose II planking with large planks butt end joinery. Lots of heave lifting and bending to get them into place.I have nothing showing how those hull planking joints were made but I doubt that they would have been a scarf joint. That is based upon seeing some YouTube current day planking on long hulls, maybe even the Bluenose II construction one. I'll search back to find that. You may be right about a smooth hull for speed but I am seeing definite plank edges in photos but need to go back looking again for the plank ends. Rich (PT-2)
Nothing scarfed there. Rich (PT-2)


