Vasa - 1:65 DeAgostini [COMPLETED BUILD]

A rare Friday posting from the Kattner Shipyard...

Over the past week or so I tweaked the sprit sail and completed the remedial work (translation: do-over) on the sprit topmast sail...and then 'installed' the topmast sail on my ship. Honestly, I'm just not super excited about my sails. I have come to the conclusion (a conclusion, perhaps, shared by others) that fabric sails just can't work at this scale. They certainly don't in my hands. I had a passing thought about starting over with silkspan, but the notion of making sails AGAIN just didn't pass the test of common sense. I'm going to do the best I can with what I have and chalk it up to experience.

Other than the pending addition of sheets to the sprit sail the running rigging is complete for these first two sails/yards. Here are some pictures of the overall look:

View attachment 330231

View attachment 330232

View attachment 330233

And now a somewhat random selection of closeup images:

View attachment 330221 View attachment 330222


View attachment 330223 View attachment 330224


View attachment 330225 View attachment 330226

View attachment 330227 View attachment 330229

If you have ever rigged a ship you know how challenging access can be. I like to think I have pretty good hand-eye coordination, and I work with small tools in a precision environment professionally, but I have been tested by the demands of this task. Plus, I am constantly bumping into the yards or snagging myself on lines. I haven't snapped anything off yet or cut the wrong line, but I can see that it is just a matter of time.

It is very satisfying, however, to contemplate running a particular rope and seeing the blocks needed already installed and ready to be included. I'm glad I endured weeks and weeks of tedium to now be at this stage.

Next up: I have to go back and shorten my topgallant sails before those can be installed - but then work will commence on the foremast (going to try working from the top down and see how that works).

I say it all the time, but I do mean it - it is so kind of you to stop by and visit when the opportunity arises. I am grateful that you find this particular build of interest and am encouraged to keep pressing on. My thanks.

View attachment 330234
i like your use of euphroes. my kit did not use any of those. Next time I will. looks better.
 
I think the sails look fine, Paul. You can't expect any feature on a model this small to have the detail of a ship 75 times larger. You used the right amount of cloth to simulated fully sized furled sails. Remember that for a model to look right, you have yo view it at a distance of at least 1m, and your model creates a fantastic impression at that distance. It you tried silkspan, you may not be happy with the texture, even proper painted, and it's very weak, so bolt roping it and rigging it creates many opportunities for tears, repairs, and frustration beyond belief.

Just keep going. Baby Kraken believes in you.
1663983723763.png
 
A rare Friday posting from the Kattner Shipyard...

Over the past week or so I tweaked the sprit sail and completed the remedial work (translation: do-over) on the sprit topmast sail...and then 'installed' the topmast sail on my ship. Honestly, I'm just not super excited about my sails. I have come to the conclusion (a conclusion, perhaps, shared by others) that fabric sails just can't work at this scale. They certainly don't in my hands. I had a passing thought about starting over with silkspan, but the notion of making sails AGAIN just didn't pass the test of common sense. I'm going to do the best I can with what I have and chalk it up to experience.

Other than the pending addition of sheets to the sprit sail the running rigging is complete for these first two sails/yards. Here are some pictures of the overall look:

View attachment 330231

View attachment 330232

View attachment 330233

And now a somewhat random selection of closeup images:

View attachment 330221 View attachment 330222


View attachment 330223 View attachment 330224

View attachment 330225 View attachment 330226

View attachment 330227 View attachment 330229

If you have ever rigged a ship you know how challenging access can be. I like to think I have pretty good hand-eye coordination, and I work with small tools in a precision environment professionally, but I have been tested by the demands of this task. Plus, I am constantly bumping into the yards or snagging myself on lines. I haven't snapped anything off yet or cut the wrong line, but I can see that it is just a matter of time.

It is very satisfying, however, to contemplate running a particular rope and seeing the blocks needed already installed and ready to be included. I'm glad I endured weeks and weeks of tedium to now be at this stage.

Next up: I have to go back and shorten my topgallant sails before those can be installed - but then work will commence on the foremast (going to try working from the top down and see how that works).

I say it all the time, but I do mean it - it is so kind of you to stop by and visit when the opportunity arises. I am grateful that you find this particular build of interest and am encouraged to keep pressing on. My thanks.

View attachment 330234
Good morning Paul. Ditto to all the comments above. Nigel in particular hit the nail on the head. Your furled sails are brilliant for sure and certainly make significant contribution to your Vasa. I thinks once your unfurled sails are added the true impact of it all will come through. Hey you can now sympathize with use none precision chaps when we attempt those awkward little rigging processes- no precision required in my profession ;) Cheers Grant
 
I don’t know if I missed it but do you furl the whole sail or do you cut in half horizontally. I really like the look.
Hi Jan,

I started with 2/3rds length - then tried 1/2 length - and ended up with 1/3rd length (just as Nigel had suggested).

I'm not sure I've landed on a formula for others to use, however. I think it all depends on the look you are attempting to create - and, of course, the characteristics of the fabric being used (my fabric is see-through thin, but it doesn't look that way on the ship or in the photos - if your daughter was wearing a shirt made from it, you'd tell her to put on a sweater). Wetting down the fabric (just as Maarten had suggested) is helpful if you want to create a tighter 'bunching' of the sail so I used that a bit on the ends of the yards but not at all in the center.

I hope this helps...
Yup, that answers my question. No daughters, three sons, all self propelled with families of their own. Worst case scenario with them was the pants crotch headed for the ankles and the skewed baseball caps.
 
Hi Paul. I agree whit a lot if the other: don’t be to hard for yourself. Perhaps the sails looks better on the pictures then in real life? Usually it's the other way around.
No, just kidding, the look great.
For some adjustments, perhaps after furling some more, a bit of hairspray?
I used that on the sails of my Mirage, many years ago (+35) and almost still in shape.
Regards, Peter
 
Honestly, I'm just not super excited about my sails. I have come to the conclusion (a conclusion, perhaps, shared by others) that fabric sails just can't work at this scale. They certainly don't in my hands. I had a passing thought about starting over with silkspan, but the notion of making sails AGAIN just didn't pass the test of common sense. I'm going to do the best I can with what I have and chalk it up to experience.
I tend to agree with your conclusion; even the thinner fabrics are, when scaled back to real life, still too thick and especially when furling your sails, all too soon they look like toy sails instead of model sails.
Still your efforts do look good and, if you go for the more informal look, very convincing.
 
Paul, were you planning on making all the sails furled to the yard to maximize visibility of the hull? Your furled sails look a lot better to me than bare yards.
Hi Kurt,

I'm going to have a combination. Some loosely furled - some fully open - some just lifted (as if they were being dried). There will be sails on every yard. At least that's the plan right now.
 
A rare Friday posting from the Kattner Shipyard...

Over the past week or so I tweaked the sprit sail and completed the remedial work (translation: do-over) on the sprit topmast sail...and then 'installed' the topmast sail on my ship. Honestly, I'm just not super excited about my sails. I have come to the conclusion (a conclusion, perhaps, shared by others) that fabric sails just can't work at this scale. They certainly don't in my hands. I had a passing thought about starting over with silkspan, but the notion of making sails AGAIN just didn't pass the test of common sense. I'm going to do the best I can with what I have and chalk it up to experience.

If you have ever rigged a ship you know how challenging access can be. I like to think I have pretty good hand-eye coordination, and I work with small tools in a precision environment professionally, but I have been tested by the demands of this task. Plus, I am constantly bumping into the yards or snagging myself on lines. I haven't snapped anything off yet or cut the wrong line, but I can see that it is just a matter of time.

It is very satisfying, however, to contemplate running a particular rope and seeing the blocks needed already installed and ready to be included. I'm glad I endured weeks and weeks of tedium to now be at this stage.

Next up: I have to go back and shorten my topgallant sails before those can be installed - but then work will commence on the foremast (going to try working from the top down and see how that works).

I say it all the time, but I do mean it - it is so kind of you to stop by and visit when the opportunity arises. I am grateful that you find this particular build of interest and am encouraged to keep pressing on. My thanks.
Paul, without fail, it is a continuous pleasure to view pictures of your ship and observe your progress with the Vasa. Your skill in close-up photography is at least equal to your skills in model ship building and all its demands in precision and patience. A joy to follow Thumbsup
 
Paul,

Again your work is exemplary. Although sails and getting them right is frustrating, you are making wonderful progress. In my experience you might want to rethink starting at the upper sails and working down when moving back to the fore mast. I would suggest starting at the main course and working up. I found this an easier approach than top to bottom with less line interference as you move up.

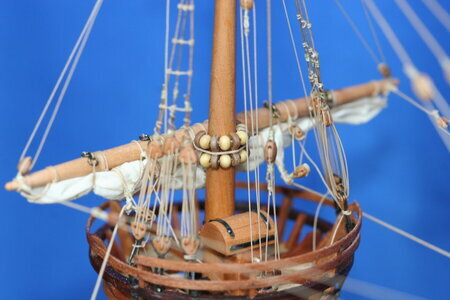
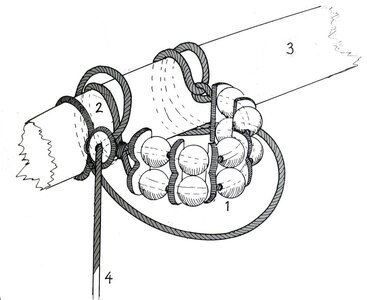
I like the way you have rigged your parels.

It appears you have upper and lower ropes through the beads and through the vertical trucks, but how have you rigged the lines around the yards and then run the control lines to the decking?

1664423921739.jpeg

You also have an external line running around the parel. What is its purpose?

The parel rigging also gets more complicated on the larger courses where groupings of three beads and trucks are used. I remember having a lot of trouble working out the correct scale of the various parel beads as they change in diameter with the different yards and sails. There are references to these with pictures in the Vasa digital library as some of them were recovered from the harbour floor when the ship was raised.

Also, there is some discussion in Anderson about the sizes and rigging of the parels.

Regards,

PeterG
 
Paul,

Again your work is exemplary. Although sails and getting them right is frustrating, you are making wonderful progress. In my experience you might want to rethink starting at the upper sails and working down when moving back to the fore mast. I would suggest starting at the main course and working up. I found this an easier approach than top to bottom with less line interference as you move up.

I like the way you have rigged your parels.

It appears you have upper and lower ropes through the beads and through the vertical trucks, but how have you rigged the lines around the yards and then run the control lines to the decking?

View attachment 331158

You also have an external line running around the parel. What is its purpose?

The parel rigging also gets more complicated on the larger courses where groupings of three beads and trucks are used. I remember having a lot of trouble working out the correct scale of the various parel beads as they change in diameter with the different yards and sails. There are references to these with pictures in the Vasa digital library as some of them were recovered from the harbour floor when the ship was raised.

Also, there is some discussion in Anderson about the sizes and rigging of the parels.

Regards,

PeterG
Thanks for visiting Peter! I cannot tell you how many hours I wasted researched how to tie parrels... :rolleyes:. The net result was more confusion than clarity. So much of what has been written fails to account for epoch and vessel origin. Everyone speaks with authority but the authorities disagree with one another. In the end I just made a decision and went with something I could visualize.

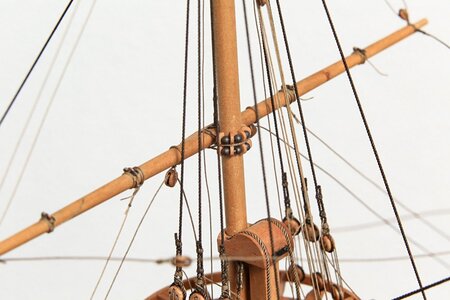
Here is how I did the small parrels (double row) relative to the yard:

TopIMG_1619.JPG.a70b3eec2010846495f9a2cea56c2d12.jpg

And here is how Matt did his (and no, I am not comparing my work to Matt's, just saying his style of parrel is what I was shooting for):

Top5DM34755.thumb.JPG.c60db4c43fbfd7afb9458c8ceaebee5a.jpg

On the sprit topsail I ran the truss-tackle to the crosstree. I'll probably do something similar on the topgallants. Not sure what I'll do yet on the topsails. Maybe run to the lower top? Maybe run to a cleat? Maybe run to the deck? The course sail truss-tackle will certainly be run to the deck (or a cleat). I have found very little information on where to take the functional part of this line and what I have found disagrees. It may simply be that I don't know where to look.

I have spent some time sorting out the triple parrels but haven't tried my hand at anything yet. As you know, access is difficult and what makes sense on paper is challenging in 3D. I'll almost certainly make some concessions to build-ability. Maybe something like this is do-able?

Zrzut ekranu 2021-05-9 o 12.48.53 (1).png

And then something different will be needed on the mizzen lateen yard...

Oh, and looking at my picture again, I think my scale is off but I'm not doing do-overs anymore ;).

Thank you for your advice about where to start on the three sail masts. I already started on the top of the foremast so I'll experience what you are warning me about in due time ROTF. I'll have another tall mast to do after that and I'll start at the bottom and see which was better for me.

Onward!
 
Thanks for visiting Peter! I cannot tell you how many hours I wasted researched how to tie parrels... :rolleyes:. The net result was more confusion than clarity. So much of what has been written fails to account for epoch and vessel origin. Everyone speaks with authority but the authorities disagree with one another. In the end I just made a decision and went with something I could visualize.

Here is how I did the small parrels (double row) relative to the yard:

View attachment 331216

And here is how Matt did his (and no, I am not comparing my work to Matt's, just saying his style of parrel is what I was shooting for):

View attachment 331215

On the sprit topsail I ran the truss-tackle to the crosstree. I'll probably do something similar on the topgallants. Not sure what I'll do yet on the topsails. Maybe run to the lower top? Maybe run to a cleat? Maybe run to the deck? The course sail truss-tackle will certainly be run to the deck (or a cleat). I have found very little information on where to take the functional part of this line and what I have found disagrees. It may simply be that I don't know where to look.

I have spent some time sorting out the triple parrels but haven't tried my hand at anything yet. As you know, access is difficult and what makes sense on paper is challenging in 3D. I'll almost certainly make some concessions to build-ability. Maybe something like this is do-able?

View attachment 331218

And then something different will be needed on the mizzen lateen yard...

Oh, and looking at my picture again, I think my scale is off but I'm not doing do-overs anymore ;).

Thank you for your advice about where to start on the three sail masts. I already started on the top of the foremast so I'll experience what you are warning me about in due time ROTF. I'll have another tall mast to do after that and I'll start at the bottom and see which was better for me.

Onward!
Hello Paul. where are you with the equipment of the model yet to be done?
 
I think I understand now. Since my last post I have installed and rigged the fore topgallant and started the fore topsail. I have made all the remaining sails and have them installed on their respective yards but have not installed them on the masts. Once all the yards and sails are installed I have many details remaining: anchors, anchor floats, rudder safety rope, etcetera. I also need to make a base (stand).

Did you have a suggestion for me? I would be happy to learn from you.
we almost understood each other (because of the translations), I see a bit in my documents if I find something for you
 
Back
Top