Wonderfull work again Paul.
If I were you I would quickly reduce sail, you know what happened to Vasa .
.
If I were you I would quickly reduce sail, you know what happened to Vasa
 |
As a way to introduce our brass coins to the community, we will raffle off a free coin during the month of August. Follow link ABOVE for instructions for entering. |
 |
 |
The beloved Ships in Scale Magazine is back and charting a new course for 2026! Discover new skills, new techniques, and new inspirations in every issue. NOTE THAT OUR FIRST ISSUE WILL BE JAN/FEB 2026 |
 |


Good morning Paul. Standing ovation!!!!! Truely majestic. Cheers GrantSails installed...
View attachment 336150
View attachment 336151
View attachment 336152
Now I need to go back and install the running rigging that I skipped - and many, many more rope hanks...
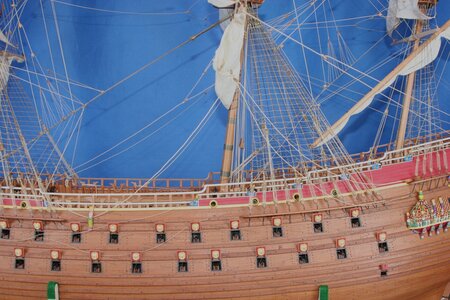
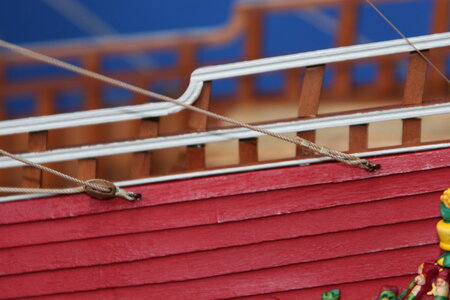
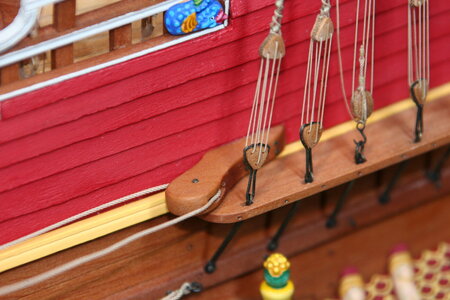
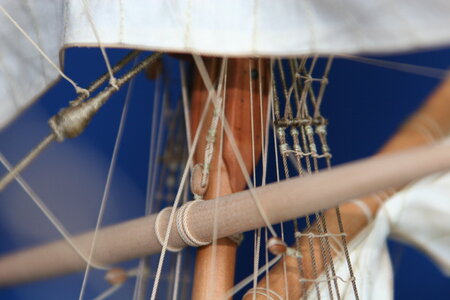

Good morning Paul. Stunning. Your rope work detail is immaculate. It is not often I see the slack tack and sheet lines hanging in the correct manner due to the lightness of the scale rope. Did you add anything to the thread or perhaps your hand made rope carries more weight? I would guess that is around a 0.3mm - 0.4mm thread? Stunning floats BTW- now I know how to make these when I get there - Thanks. Cheers GrantHello friends,
Work on the rigging continues. Just by way of example, here are the tack and sheet lines on the main course (the slack lines running from the end of the yard to the fore and aft):
View attachment 337230
And a few random images...
View attachment 337231 View attachment 337232
View attachment 337234
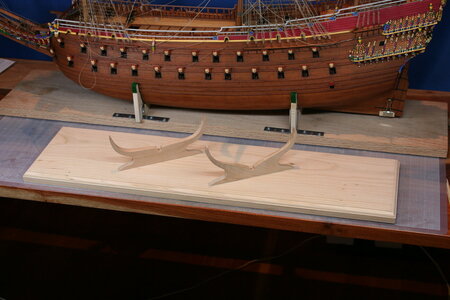
I also spent some time this past week making a base. I know it's customary to mount the ship on 'pedestals', but I never prepared the keel to receive a connector for a pedestal base, so I opted, instead, to just create a saddle. I'm not much of a woodworker but I did manage to profile the edge of a piece of cherry and cut out saddles to support the ship fore and aft. Here is where I am as of today:
View attachment 337229
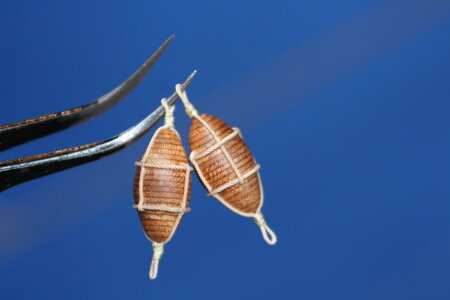
Finally, I also wanted to make some floats (buoys) for the anchors. My research suggests they were often made in the same way a wooden barrel was with staves (and then covered in tar-soaked canvas). But they were also made from stacked layers of cork. I thought that might look more interesting, so this is what I ended up with:
View attachment 337236
Thank you for your continued interest in my build. I feel blessed to share my work with such a kind and encouraging group of fellow modelers.

Beautiful work, Paul.Hello friends,
Work on the rigging continues. Just by way of example, here are the tack and sheet lines on the main course (the slack lines running from the end of the yard to the fore and aft):
View attachment 337230
And a few random images...
View attachment 337231 View attachment 337232
View attachment 337234
I also spent some time this past week making a base. I know it's customary to mount the ship on 'pedestals', but I never prepared the keel to receive a connector for a pedestal base, so I opted, instead, to just create a saddle. I'm not much of a woodworker but I did manage to profile the edge of a piece of cherry and cut out saddles to support the ship fore and aft. Here is where I am as of today:
View attachment 337229
Finally, I also wanted to make some floats (buoys) for the anchors. My research suggests they were often made in the same way a wooden barrel was with staves (and then covered in tar-soaked canvas). But they were also made from stacked layers of cork. I thought that might look more interesting, so this is what I ended up with:
View attachment 337236
Thank you for your continued interest in my build. I feel blessed to share my work with such a kind and encouraging group of fellow modelers.
Hi Paul,Hello friends,
Work on the rigging continues. Just by way of example, here are the tack and sheet lines on the main course (the slack lines running from the end of the yard to the fore and aft):
View attachment 337230
And a few random images...
View attachment 337231 View attachment 337232
View attachment 337234
I also spent some time this past week making a base. I know it's customary to mount the ship on 'pedestals', but I never prepared the keel to receive a connector for a pedestal base, so I opted, instead, to just create a saddle. I'm not much of a woodworker but I did manage to profile the edge of a piece of cherry and cut out saddles to support the ship fore and aft. Here is where I am as of today:
View attachment 337229
Finally, I also wanted to make some floats (buoys) for the anchors. My research suggests they were often made in the same way a wooden barrel was with staves (and then covered in tar-soaked canvas). But they were also made from stacked layers of cork. I thought that might look more interesting, so this is what I ended up with:
View attachment 337236
Thank you for your continued interest in my build. I feel blessed to share my work with such a kind and encouraging group of fellow modelers.
Wow Paul. These are simply beautiful photographs of the most beautiful ship. Your rigging work is - as always - exemplary in its cleanliness and perfection in execution. I cannot imagine that you can get buoys to look better than those - I love the stacked-look of the cork - it makes me think of the leather-stacked handle of my MACVSOG Bowie knife. Beautiful!
Your eye for detail is great. Love the buoy
Gentlemen, thank you for your kind review of the buoy. It's rare that I look at something and think: that's pretty good. In this case I believe I actually pulled off a realistic looking stacked cork float. And yes, Kurt, the harnesses are a real challenge (made easier by my larger scale). Those two little guys only took a FULL dayThose buoys aren't much bigger than the ones I made for La Couronne. Making the harness around the buoy wood is a real pain. Nice trick you did inserting the ends of the harness lines into the wood of the buoy.
 .
.Good morning Paul. Stunning. Your rope work detail is immaculate. It is not often I see the slack tack and sheet lines hanging in the correct manner due to the lightness of the scale rope. Did you add anything to the thread or perhaps your hand made rope carries more weight? I would guess that is around a 0.3mm - 0.4mm thread? Stunning floats BTW- now I know how to make these when I get there - Thanks. Cheers Grant
Beautiful work, Paul.
I particularly like the diameters of the rigging being in relationship with the other parts of your build and especially, like @GrantTyler already mentioned, the slack lines, very well executed.
Thanks guys! RE: the slack lines. That was no easy trick and is something I'll be going back to tweak at the end. The problem with poly ropes (at least my poly ropes) is that you cannot use diluted PVA to stiffen or shape them. Water-based anything just beads up on the surface. You can treat them with CA but that creates quite a mess. The good thing is baked poly ropes want to be 'straight' (that is: not kinky and irregular) so taking advantage of that trait at least gets you started. All that needs to be done is to get the 'hang' right.I totally agree with before mentoned comments. Beautiful workmanship. Even the slack lines look to be carrying weight. Very nice details on your anchor floats.
You made me smile, Stephen. Because of my lack of experience with power tools I also lack a reasonable level of comfort with them (never mind the fact that I make a living using my hands). When the real boys/men were taking woodworking, metalworking, mechanical classes, I was memorizing the Krebs Cycle and dissecting out the Trigeminal Nerve... The poly finish is drying in the basement right now and I'll post the final result later today.Hi Paul,
Cannot really add to what has already been said, except wow.
By the way pretty good woodwork on the model and stands for someone who is not much of a woodworker.
Cheers,
Stephen.
Thanks, Daniel. Yes, closer than I was a year ago, but there is still quite a long list of details to add. Plus, I haven't been able to source a custom case manufacturer here in the US...and that's a problem.I'm playing a little catch up here Paul, you have beautiful work as usual. I really like the buoys you fashioned, and the cradle bases will be perfect for your ship.
You're really getting close to the finish line now.
Yes I have been doing some research on cases myself. I,ve found some plain vanilla plexiglass cases that can be custom made but are almost as expensive as the model was. I would think in your neck of the woods you would be able find some custom cabinet maker who could put together a nice frame and table arrangement.Thanks, Daniel. Yes, closer than I was a year ago, but there is still quite a long list of details to add. Plus, I haven't been able to source a custom case manufacturer here in the US...and that's a problem.
See Doc, if you’d taken that woodworking class in high school you could construct one.Thanks, Daniel. Yes, closer than I was a year ago, but there is still quite a long list of details to add. Plus, I haven't been able to source a custom case manufacturer here in the US...and that's a problem.
Yes I have been doing some research on cases myself. I,ve found some plain vanilla plexiglass cases that can be custom made but are almost as expensive as the model was. I would think in your neck of the woods you would be able find some custom cabinet maker who could put together a nice frame and table arrangement.
Getting a case made is expensive here is an alternative from a YouTube, gives some ideas.Thanks, Daniel. Yes, closer than I was a year ago, but there is still quite a long list of details to add. Plus, I haven't been able to source a custom case manufacturer here in the US...and that's a problem.
