I thought you would wish me to breathe, first. BTW, they have a special ointment to treat glasses, so it doesn't fog.Good luck seeing what your working on!
-

Win a Free Custom Engraved Brass Coin!!!
As a way to introduce our brass coins to the community, we will raffle off a free coin during the month of August. Follow link ABOVE for instructions for entering.
-

PRE-ORDER SHIPS IN SCALE TODAY!
The beloved Ships in Scale Magazine is back and charting a new course for 2026!
Discover new skills, new techniques, and new inspirations in every issue.
NOTE THAT OUR FIRST ISSUE WILL BE JAN/FEB 2026
You are using an out of date browser. It may not display this or other websites correctly.
You should upgrade or use an alternative browser.
You should upgrade or use an alternative browser.
Vasa - 1:65 DeAgostini [COMPLETED BUILD]
- Thread starter dockattner
- Start date
- Watchers 147
Breathing is always nice! If you made the lenses magnified, it could be perfect!I thought you would wish me to breathe, first. BTW, they have a special ointment to treat glasses, so it doesn't fog.
Just exactly how do I start a build log. I am more than happy do to so. Pictures will have to wait but I can refer to the online DeAgostini Vasa build instructions as a guide.
Hello Friends,
I have mentioned in the past that I started out this project fully intending to build the ship according to the instructions. Well, as I got into it my goals shifted and I began to move more in the direction of seeing if I could come a bit closer to the real ship. I have always known that my bulwarks were not correct - but as I looked more closely at photos from the Vasamuseet I began to realize just how 'not correct' they were. While it was not possible to walk back all my mistakes I set about to correct what I could.
First step - take some parts off - ugh. Here is where we were a week ago:
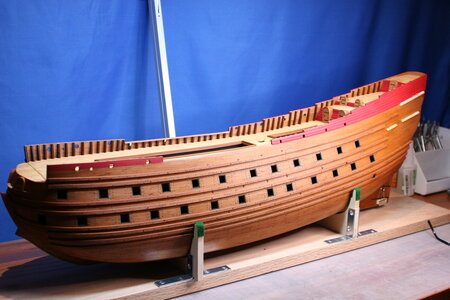
And here is where we were one hour less than a week ago:
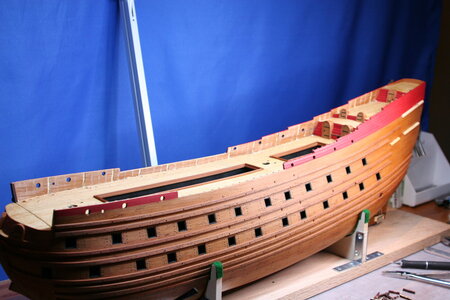
Here are two images from the mother ship. Notice, first, that the waterway is formed as a box of sorts. Also, notice that the frames extend above the hull of the ship and are capped by a handrail. On top of that is another (more delicate) handrail.
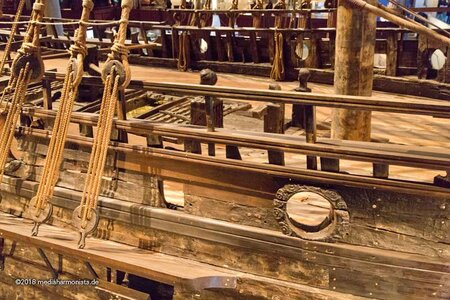
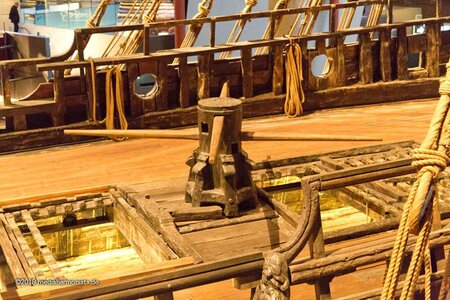
So, my first step was to build the box at the junction of the deck and bulwark.
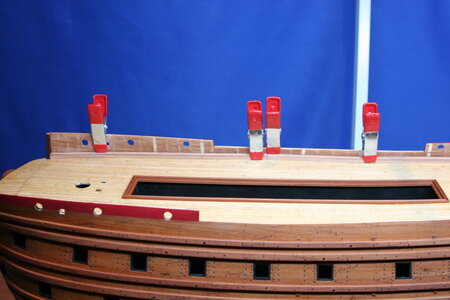
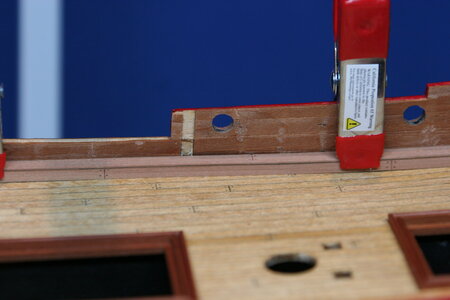
Next, I relined the bulwarks:
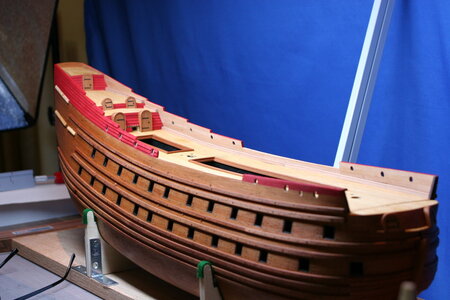
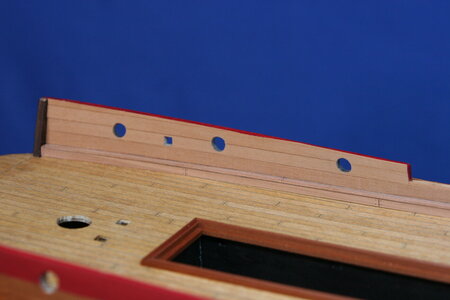
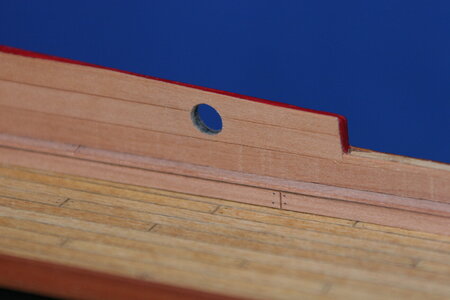
Next (and this is technically incorrect), I wanted to hide the visible layers at the top edge of the hull planking so I added a cover of sorts. On the real ship there is a piece of trim along the upper edge of the hull - but on the exterior surface not on the top. My solution was to paint the edge of my cover (the cover that doesn't belong there on the model ship that shouldn't depict a layered hull in the first place) to simulate that trim piece.
I'm a bit thin here but I didn't like the thicker trim piece as it called too much attention to itself.
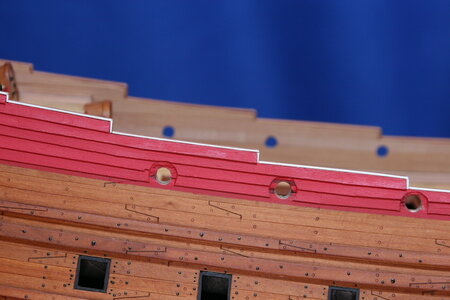
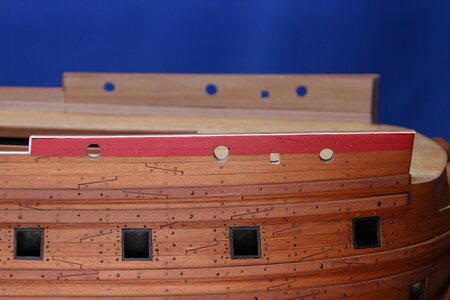
Finally, I added back in the frame tops and capped them off. This was harder than it should have been but I have macro discrepancies in the ship that are hard to deal with when adding micro details. I also would have been well-served by a mini-miter saw for this step.
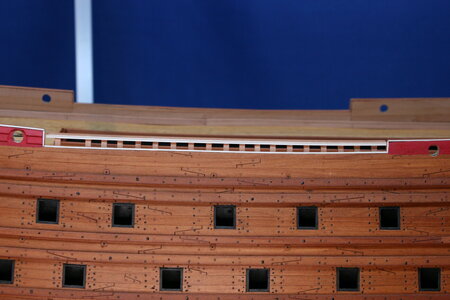
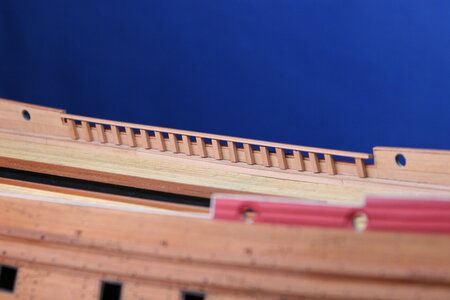
Vasa experts know that I still don't have it right - but it is closer than it was a week ago. The more delicate handrail will be added as well.
Of course, this correction is the gift that keeps on giving because I now need to repeat these steps everywhere else. I'll see you in a month...
Thanks for stopping by! And thanks for inspiring me with your beautiful builds!
I have mentioned in the past that I started out this project fully intending to build the ship according to the instructions. Well, as I got into it my goals shifted and I began to move more in the direction of seeing if I could come a bit closer to the real ship. I have always known that my bulwarks were not correct - but as I looked more closely at photos from the Vasamuseet I began to realize just how 'not correct' they were. While it was not possible to walk back all my mistakes I set about to correct what I could.
First step - take some parts off - ugh. Here is where we were a week ago:

And here is where we were one hour less than a week ago:

Here are two images from the mother ship. Notice, first, that the waterway is formed as a box of sorts. Also, notice that the frames extend above the hull of the ship and are capped by a handrail. On top of that is another (more delicate) handrail.


So, my first step was to build the box at the junction of the deck and bulwark.


Next, I relined the bulwarks:


Next (and this is technically incorrect), I wanted to hide the visible layers at the top edge of the hull planking so I added a cover of sorts. On the real ship there is a piece of trim along the upper edge of the hull - but on the exterior surface not on the top. My solution was to paint the edge of my cover (the cover that doesn't belong there on the model ship that shouldn't depict a layered hull in the first place) to simulate that trim piece.
I'm a bit thin here but I didn't like the thicker trim piece as it called too much attention to itself.


Finally, I added back in the frame tops and capped them off. This was harder than it should have been but I have macro discrepancies in the ship that are hard to deal with when adding micro details. I also would have been well-served by a mini-miter saw for this step.


Vasa experts know that I still don't have it right - but it is closer than it was a week ago. The more delicate handrail will be added as well.
Of course, this correction is the gift that keeps on giving because I now need to repeat these steps everywhere else. I'll see you in a month...
Thanks for stopping by! And thanks for inspiring me with your beautiful builds!
Last edited:
I think you made a great decision Paul. That is my ultimate intention when I get there. I'm wondering if I can hold the bulwark in its proper shape once I remove the rest of my bulkhead extensions. I've soaked and shaped once already and I plan on resoaking and wet warping before I glue them in place. We shall see.
Paul,
Always a pleasure going over your work - excellent decision to "fix" looks much better indeed. Your ship will be a beauty indeed.
After reading you notes it brought back memories of when I was working on the Corel version and, as you are doing, I also decided to fix issues after the work had already been done.
It reminded me of somewhere much below purgatory haha -- I will NOT hijack your log - but just in this instance here is one of the fixes that needed to be done working with the Corel kit - The stern was just made up by Corel - going forward, along with your updated point-of-view for this build you won't have any further issues. AND luckily you chose a very good kit... Nice work.....
Regards,
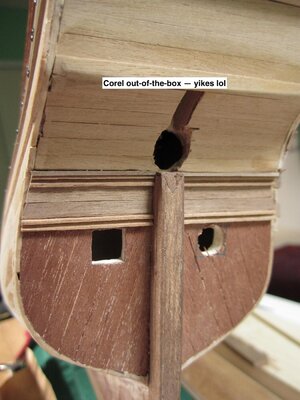
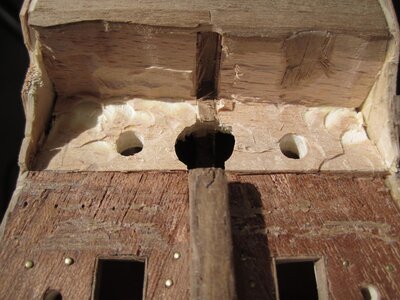
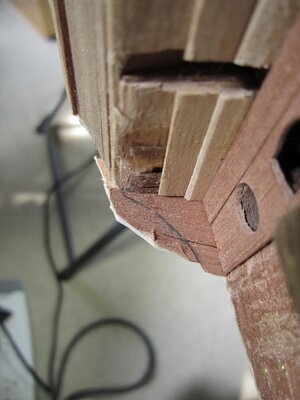


Every time a modeler made a decision to re-do, I tribute him\her. It is not an easy decision for sure, and some time can make it worse. But the idea of re-do very simple, something a modeler doesn't like in the model. This is what I call an Acceptance Level. Everyone has his\her own, IMHO.
I like your plan Daniel. If memory serves, Billings handles this detail the best of the various kits. The bulwark comes with teeth already cut in doesn't it? You have the option of adding false ribs on the inboard side like @PeterG did... His result in this area was fantastic.I think you made a great decision Paul. That is my ultimate intention when I get there. I'm wondering if I can hold the bulwark in its proper shape once I remove the rest of my bulkhead extensions. I've soaked and shaped once already and I plan on resoaking and wet warping before I glue them in place. We shall see.
Hey John, your willingness/courage/fanaticism on the redo is legendary in my book. If I recall correctly, doesn't your Vasa log (which you pick up already in progress) begin with a list of things that you are going to do over? Epic!Paul,
Always a pleasure going over your work - excellent decision to "fix" looks much better indeed. Your ship will be a beauty indeed.
After reading you notes it brought back memories of when I was working on the Corel version and, as you are doing, I also decided to fix issues after the work had already been done.
It reminded me of somewhere much below purgatory haha -- I will NOT hijack your log - but just in this instance here is one of the fixes that needed to be done working with the Corel kit - The stern was just made up by Corel - going forward, along with your updated point-of-view for this build you won't have any further issues. AND luckily you chose a very good kit... Nice work.....
Regards,
View attachment 236513View attachment 236514View attachment 236515
Last edited:
Yes. But still painful. In my limited experience the redo is always a factor of 4 with regard to how much time it will take. In my case, the suspended rail was too noticeable of a feature to shrug off. We will see in the end how it looks and if it was really "worth it"...Every time a modeler made a decision to re-do, I tribute him\her. It is not an easy decision for sure, and some time can make it worse. But the idea of re-do very simple, something a modeler doesn't like in the model. This is what I call an Acceptance Level. Everyone has his\her own, IMHO.
Hello Friends,
I have mentioned in the past that I started out this project fully intending to build the ship according to the instructions. Well, as I got into it my goals shifted and I began to move more in the direction of seeing if I could come a bit closer to the real ship. I have always known that my bulwarks were not correct - but as I looked more closely at photos from the Vasamuseet I began to realize just how 'not correct' they were. While it was not possible to walk back all my mistakes I set about to correct what I could.
First step - take some parts off - ugh. Here is where we were a week ago:
View attachment 236478
And here is where we were one hour less than a week ago:
View attachment 236479
Here are two images from the mother ship. Notice, first, that the waterway is formed as a box of sorts. Also, notice that the frames extend above the hull of the ship and are capped by a handrail. On top of that is another (more delicate) handrail.
View attachment 236476
View attachment 236477
So, my first step was to build the box at the junction of the deck and bulwark.
View attachment 236481
View attachment 236482
Next, I relined the bulwarks:
View attachment 236483
View attachment 236484
View attachment 236485
Next (and this is technically incorrect), I wanted to hide the visible layers at the top edge of the hull planking so I added a cover of sorts. On the real ship there is a piece of layered trim along the upper edge of the hull - but on the exterior surface not on the top. My solution was to paint the edge of my cover (the cover that doesn't belong there on the model ship that shouldn't depict a layered hull in the first place) to simulate that trim piece.
I'm a bit thin here but I didn't like the thicker trim piece as it called too much attention to itself.
View attachment 236486
View attachment 236487
Finally, I added back in the frame tops and capped them off. This was harder than it should have been but I have macro discrepancies in the ship that are hard to deal with when adding micro details. I also would have been well-served by a mini-miter saw for this step.
View attachment 236489
View attachment 236490
Vasa experts know that I still don't have it right - but it is closer than it was a week ago. The more delicate handrail will be added as well.
Of course, this correction is the gift that keeps on giving because I now need to repeat these steps everywhere else. I'll see you in a month...
Thanks for stopping by! And thanks for inspiring me with your beautiful builds!
THANX! The pictures are a classroom in construction. This is my first large vessel. Its the details which tells the story. As a retires I can spend as much time as I chose, subject to my handicapped son's limitations.
It is certainly worth it!!!!!We will see in the end how it looks and if it was really "worth it"...
Paul,Hey John, your willingness/courage/fanaticism on the redo is legendary in my book. If I recall correctly, doesn't your Vasa log (which you pick up already in progress) begin with a list of things that you are going to do over? Epic!
Yes it did indeed. When I started it I knew almost nothing about the ship (so I purchased the Corel hahaha), nor ship modeling in general. Then became obsessed for learning, and about Vasa specifically - so in retrospect needed to make huge fixes.
As was mentioned in deference to Corel - when the kit came out it was early after the 1:1's resurrection - But Corel still after so many decades not improved or updated the accuracy of that product. Hmmm??
Here you can see the initial results of soaking and forming. These are plywood so they are difficult to bend.I like your plan Daniel. If memory serves, Billings handles this detail the best of the various kits. The bulwark comes with teeth already cut in doesn't it? You have the option of adding false ribs on the inboard side like @PeterG did... His result in this area was fantastic.
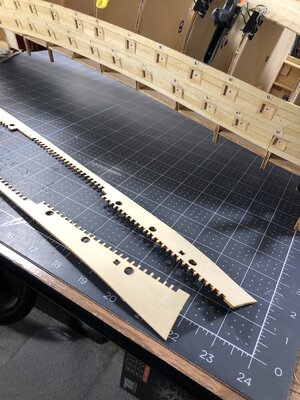
Well, I can tell you that plywood and I are not friends... Best of luck!Here you can see the initial results of soaking and forming. These are plywood so they are difficult to bend.
View attachment 236642
First of all, I am impressed. My self has a complete kit Vasa from Edition Atlas, (same as DeAgostini ) since 2016, start building the hull after I get the first 100 pack. It was finished 2 years ago with first layer. After that I wait to sort out the painting, and still do. I think so far that golden paint will bee my choice. All tips by reading forums will take in later.This is my change on the deck 2nd layer.![100_5219[1].JPG 100_5219[1].JPG](https://shipsofscale.com/sosforums/data/attachments/221/221003-aad1b8ad879a1fdee9a8f65750d2b577.jpg?hash=qtG4rYeaH9)
![100_5219[1].JPG 100_5219[1].JPG](https://shipsofscale.com/sosforums/data/attachments/221/221003-aad1b8ad879a1fdee9a8f65750d2b577.jpg?hash=qtG4rYeaH9)
- Joined
- Jan 9, 2020
- Messages
- 10,565
- Points
- 938

Paul, remember - a redo does not mean that a mistake has been made. A less than satisfactory first attempt is simply part of the process of gaining experience. The bulwarks look much more realistic with the box that you have added.. Once the top box has been completed (at least on the Haarlem it was the case), it provides a certain "cohesion" to the bulwarks that makes it much more of an integrated part of the overall build.
Hi Paul I admire your courage to remove those parts and risk doing damage to the other parts is a credit to you. After seeing the end result I think it's well worth it.
I will do the sameThanks for checking out this update!
I achieved a milestone (or maybe a milestone and a half last week). I completed the sanding and shaping of the primary hull (a full milestone) - and, as you can see in the images that follow, I completed the gun ports (half a milestone).
I learned a few things along the way:
1. I failed to place a high enough value on selecting wood strips of consistent thickness while planking. Most of my sanding/wood filler struggles centered around managing thick or thin wood strips that I should have never placed. Lesson learned.
2. Sanding and shaping is a LOT of work. It took me two days and even though I thought I was being careful and taking my time I accidently sanded the false keel while shaping/tapering the aft portion of the hull. I'll need to address this once I fabricate and fit the true keel.
3. As noted by another builder - cutting in port holes is a tedious job. Even with taking my time I will need to do some refining when I place frames inside the openings and when doing the finish layer of planking.
Check out my work and feel welcome to note shortcomings that I can address before I go any further!
View attachment 185031
View attachment 185032
View attachment 185035
View attachment 185033 View attachment 185034


