Vasa - 1:65 DeAgostini [COMPLETED BUILD]

Paul,

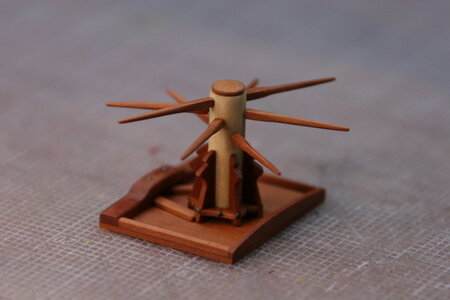
Here is one more from same source - I was thumbing through - I did not go back through your "massive" lol -- log - so don't remember if you had already
made the capstan - anyway ;) FYI

View attachment 235952
IMG_6560.JPG

I intend to add a metal band at the top - if I remember... ;) .

And look who's calling the kettle black (60 pages Redface showing the second half of your build...). Maybe if you had posted the first year of work I'd be making fewer mistakes :mad: :p ROTF!!!
 
Last edited:
Landstrom’s book is a great source of detail and inspiration. There is some licence apparently in his diagrams but in general evidently quite accurate. This applies especially to colours he chose in the printed plates and which sparked a range of models produced in the 1990-2005 era with blue upper cladding rather than the red colour as discussed by Fred Hocker.

The one thing I noticed from the post (#958) diagram of the anchor position (looking from above and especially for Daniel20 and Alexander to note), is the uneven widths of the deck planking. Note particularly too (Alexander), the very thin central plank which you commented on in (I think) Daniel’s log. I had not noticed this before and don’t have any actual images of this part of the deck planking of the ship.

PeterG
PeterG (and all you other Vasa junkies). Attached please find a deck expansion for the ship that I sourced from somewhere. So much for uniformity and standard butt shift patterns...
 

Attachments

  • 31983772_DeckVasa.jpg.5b3c40d825f061f5b64a4047c9430869.jpg
    31983772_DeckVasa.jpg.5b3c40d825f061f5b64a4047c9430869.jpg
    42.5 KB · Views: 47
PeterG (and all you other Vasa junkies). Attached please find a deck expansion for the ship that I sourced from somewhere. So much for uniformity and standard butt shift patterns...
Now that is a fascinating photo Paul. In my case the "skinny" plank in the center of my deck is simply an unintended consequence of choosing to start my planking along the long running sides of the deck hatch comings. Since the hatch frames occupy most of the central deck I did not want to have to rip an adjustment plank the full length on both sides. Normally I would define a deck center line and plank on both sides of it relegating any odd widths adjacent to the bulwarks. In my world symmetry is very important. It was like killing my sole to have to 'randomly' place the butt joints in the decking, Ha! So looking at your photo I may have once again stumbled into something resembling the real decking.
Cheers
Daniel
 
Hello Paul. I am still in the process of catching up with all the build logs - all I can say is WOW! - you have made great progress. Your execution is nothing short of amazing and the Vasa is developing into an absolute show-stopper! Well done Sir!
 
Hello Paul. I am still in the process of catching up with all the build logs - all I can say is WOW! - you have made great progress. Your execution is nothing short of amazing and the Vasa is developing into an absolute show-stopper! Well done Sir!
Much appreciated Heinrich. Every once in a while I visit your Haarlem (ne Batavia) log to see how you resolved various issues that arise when constructing a Dutch built ship. In fact I was just there a few days ago looking to see how you built your bulwarks. Your example has been immeasurably valuable!
 
This is good news. You may consider a build log of yours, perhaps. What do you think? It doesn't have to be from the begging, you can start at any stage of your build progress. We would be happy to see your model as you advance in the kit.
I will have to learn how to do electronic pictures. I am not technically up to speed. I have a cell phone. Been in my dresser two years. Never rings! LoL
Seriously, I found scoring the wood parts to be shaped when they are soaking helps.
 
I will have to learn how to do electronic pictures. I am not technically up to speed. I have a cell phone. Been in my dresser two years. Never rings! LoL
Seriously, I found scoring the wood parts to be shaped when they are soaking helps.
Just exactly how do I start a build log. I am more than happy do to so. Pictures will have to wait but I can refer to the online DeAgostini Vasa build instructions as a guide.
 
Interesting comments regarding deck planking. I also learned that the hull sides don't mirror each other. Apparently different measuring scales were used. Builders came from two diff. countries - one country working on only one side.

Similar to today's technology in many areas, especially aviation. The A380 had some assembly problems when joining two sections of fuselage. Providers (from diff. countries) used different computer softwares --- when mating the two sections wiring did not reach correctly - caused an embarrassing production delay. lol
 
Just exactly how do I start a build log. I am more than happy do to so. Pictures will have to wait but I can refer to the online DeAgostini Vasa build instructions as a guide.
It is a very simple procedure. Visit the wooden kits log page and Post a thread. Give it a meaningful title, and... That's it! Post images, tell us the story behind this build.


Good luck!
 
Dear Younger Me,

Do not build the bulwarks according to the kit instructions. If you do they will be completely wrong and you won't be able to fix it without ripping off everything above the weather deck. Make up your mind to build the ship according to the museum photos on Day 1 rather than Day 60. Do not simply ooh and ahh at the best of the Vasa build logs admiringly while thinking to yourself, "I could never do that." Resolve to "do that" from the get-go. You know you're an obsessive compulsive perfectionist so stop pretending that you're not.

Oh, by the way, you're allergic to CA. Get a **blinkin** gas mask filter thing and wear it.

Affectionately,
Older Me
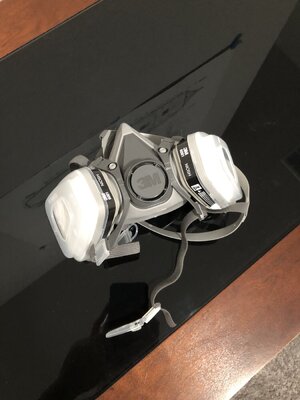
This is hilarious Paul! Love your wit and humor! Due to my allergic reaction to CA, below is my gear of choice when using CA glue.
Also good to wear when working with oil based stains, paint, etc.
I have recently switched to all water based paints and stains. I have been pleasantly surprised thus far, that the water based stains are not raising the grain on my wood. I fear that may not always hold true, depending on the wood type.
000A4472-4147-456D-AC88-E15004C06CC8.jpeg
 
Last edited:
This is hilarious Paul! Love your wit and humor! Due to my allergic reaction to CA, below is my gear of choice when using CA glue.
Also good to wear when working with oil based stains, paint, etc.
I have recently switched to all water based paints and stains. I have been pleasantly surprised thus far, that the water based stains are not raising the grain on my wood. I fear that may not always hold true, depending on the wood type.
View attachment 236372
Ha! Birds of a feather... My most recent purchase:

IMG_6802.JPG
 
This is hilarious Paul! Love your wit and humor! Due to my allergic reaction to CA, below is my gear of choice when using CA glue.
Also good to wear when working with oil based stains, paint, etc.
I have recently switched to all water based paints and stains. I have been pleasantly surprised thus far, that the water based stains are not raising the grain on my wood. I fear that may not always hold true, depending on the wood type.
View attachment 236372
I have the same mask!
 
Back
Top