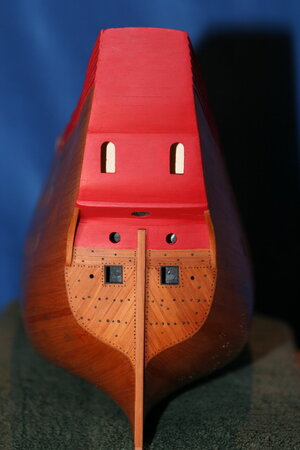
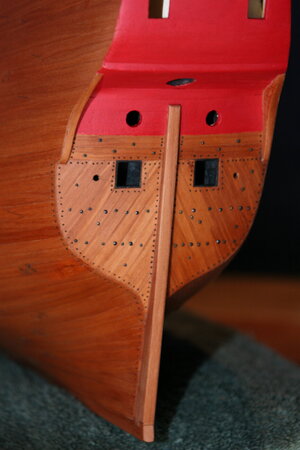
Marteen, is it your opinion that the bolts were replaced in the original locations? Meaning can the locations be trusted from the museum pics?Hi @Dean62 , most Vasa bolts have been replaced after her conservation in the 60 s. The original bolts have rusted away during her 350 years at the see bottom. When she was recovered she was mainly held together by her treenails. The black bolts you see are still the 60 s bolts in the original holes from 1628. The 60 s bolts are now replaced by stainless steel bolts by Sandvik in a joined project with the university and the museum, there is a nice video about this project.

Home
Alleima is a developer and producer of advanced stainless steels, special alloys, titanium and other high-performance materials in a variety of product forms. Examples are tube, strip and wire products.www.materials.sandvik
You are using an out of date browser. It may not display this or other websites correctly.
You should upgrade or use an alternative browser.
You should upgrade or use an alternative browser.
Vasa - 1:65 DeAgostini [COMPLETED BUILD]
- Thread starter dockattner
- Start date
- Watchers 145
What I understood when visiting the museum, yes. The original bolt spots were use to place the new bolts.Marteen, is it your opinion that the bolts were replaced in the original locations? Meaning can the locations be trusted from the museum pics?
Swag.... Ha! this is my contraction of sway and sag. I retired in February of 2020 and was a former field engineer/senior survey manager for a bridge contractor and structural bridge beams always had a degree of sway (horizontal curve) and sag (vertical curve) which had to be dealt with.
In the book Vasa I, Fred Hocker reports precisely what @Maarten has explained. I also used the 1:10 model for guidance (see below).What I understood when visiting the museum, yes. The original bolt spots were use to place the new bolts.
Regarding historical accuracy - my goal is to represent the ship without pretending that I am reproducing the ship. If memory serves there are 3000 bolts and 6000 treenails give or take a 1000. I'm not going to do that!!! Plus, there are aspects of ship architecture that I am completely ignorant of so there is little chance that I am even capable of producing a model that is accurate.
In some ways having the ship at the museum to reference is an incredible advantage - and at the same time it can be a burden. Fortunately, I enjoy the research and reading about the ship.
You know what would be cool? A model of the resurrected ship as it appears in the museum! Sure would save me a lot of time painting!
Here is the 1:10...
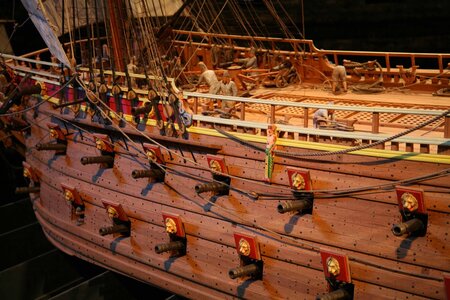
Of course, I can't produce at 1:65 what was done at 1:10. But it sure is nice to look at what can be accomplished!
At present I am adding nails to all the scarf joints. What was I thinking?

Yes the four bolts at the scarf joints would probably be more than enough! But...if you make those larger and use small ones on the frames...I think it would look very good! Of course there is the wales too...In the book Vasa I, Fred Hocker reports precisely what @Maarten has explained. I also used the 1:10 model for guidance (see below).
Regarding historical accuracy - my goal is to represent the ship without pretending that I am reproducing the ship. If memory serves there are 3000 bolts and 6000 treenails give or take a 1000. I'm not going to do that!!! Plus, there are aspects of ship architecture that I am completely ignorant of so there is little chance that I am even capable of producing a model that is accurate.
In some ways having the ship at the museum to reference is an incredible advantage - and at the same time it can be a burden. Fortunately, I enjoy the research and reading about the ship.
You know what would be cool? A model of the resurrected ship as it appears in the museum! Sure would save me a lot of time painting!
Here is the 1:10...
View attachment 202897
Of course, I can't produce at 1:65 what was done at 1:10. But it sure is nice to look at what can be accomplished!
At present I am adding nails to all the scarf joints. What was I thinking? View attachment 202900
Last edited:
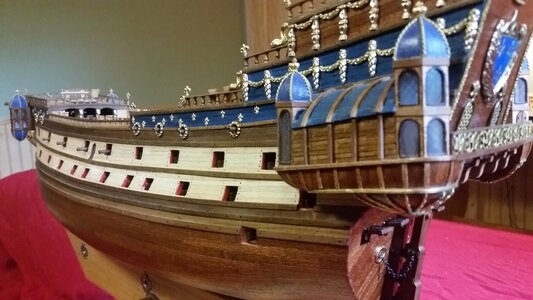
You don't have to reproduce all of them, but a representative sample of the largest ones is the way to go on smaller models. Here are bolts on a 1:100 La Couronne. These were painted on using a thin brass pin on a stick dipped in Testors glassy black enamel paint. The paint was a bit on the thick side because the bottle is 38 years old. I used it on plastic model back in my teens. Amazing that I still have it. Anyhow, you cut the head off the 7mm brass pin used for planking, embed the pointy end in a long wood dowel for a handle similar to a paint brush, file the other end of the pin flat so the end is a perfect circle, dip the pin into the layer of paint on the inside of the bottle cap just to get the end wet, and touch it to the model. You get 2-3 bolt heads painted for every dip of the pin into the paint and the dots are nice and round. They also dry into nice dome heads that you can feel when they are dry. You can very the size of the bolt head with the amount of paint on the pin or choosing a different size pin tool. The results are pretty good as long as you have a steady hand, and you can make hundreds of bolt heads very quickly. I only added a few bolts, but you can go crazy and add thousands if you like. On this model, I used black paint. In my opinion, the bolts would be dark rust brown from exposure to salt water, so they would offer less of a contrast and a distraction if you make many of them against the wood color of the hull. This method would look even more to scale on a larger ship model like your Wasa.


Fantastic Kurt. I'll give that technique a try. Thus far I've been drilling tiny holes (well, more of the start of a hole - like a depression in the wood) and tapping an archival ink pen into the depression. This makes a nice round spot but lacks the dimension your approach achieves. By the way, I have antique Testors paint bottles from my plastic model building days too. Mine probably go back to the mid 70's. Kept the paint but lost the models. Odd.You don't have to reproduce all of them, but a representative sample of the largest ones is the way to go on smaller models. Here are bolts on a 1:100 La Couronne. These were painted on using a thin brass pin on a stick dipped in Testors glassy black enamel paint. The paint was a bit on the thick side because the bottle is 38 years old. I used it on plastic model back in my teens. Amazing that I still have it. Anyhow, you cut the head off the 7mm brass pin used for planking, embed the pointy end in a long wood dowel for a handle similar to a paint brush, file the other end of the pin flat so the end is a perfect circle, dip the pin into the layer of paint on the inside of the bottle cap just to get the end wet, and touch it to the model. You get 2-3 bolt heads painted for every dip of the pin into the paint and the dots are nice and round. They also dry into nice dome heads that you can feel when they are dry. You can very the size of the bolt head with the amount of paint on the pin or choosing a different size pin tool. The results are pretty good as long as you have a steady hand, and you can make hundreds of bolt heads very quickly. I only added a few bolts, but you can go crazy and add thousands if you like. On this model, I used black paint. In my opinion, the bolts would be dark rust brown from exposure to salt water, so they would offer less of a contrast and a distraction if you make many of them against the wood color of the hull. This method would look even more to scale on a larger ship model like your Wasa.
That is a good technique Kurt. I always dipped a straight pin in glue an dabbed it on to get a 3d round head, but then you have to come back and paint afterwards! I like the idea of doing it in one step as you have. I could always color some glue...lol.You don't have to reproduce all of them, but a representative sample of the largest ones is the way to go on smaller models. Here are bolts on a 1:100 La Couronne. These were painted on using a thin brass pin on a stick dipped in Testors glassy black enamel paint. The paint was a bit on the thick side because the bottle is 38 years old. I used it on plastic model back in my teens. Amazing that I still have it. Anyhow, you cut the head off the 7mm brass pin used for planking, embed the pointy end in a long wood dowel for a handle similar to a paint brush, file the other end of the pin flat so the end is a perfect circle, dip the pin into the layer of paint on the inside of the bottle cap just to get the end wet, and touch it to the model. You get 2-3 bolt heads painted for every dip of the pin into the paint and the dots are nice and round. They also dry into nice dome heads that you can feel when they are dry. You can very the size of the bolt head with the amount of paint on the pin or choosing a different size pin tool. The results are pretty good as long as you have a steady hand, and you can make hundreds of bolt heads very quickly. I only added a few bolts, but you can go crazy and add thousands if you like. On this model, I used black paint. In my opinion, the bolts would be dark rust brown from exposure to salt water, so they would offer less of a contrast and a distraction if you make many of them against the wood color of the hull. This method would look even more to scale on a larger ship model like your Wasa.
View attachment 203018
View attachment 203019
View attachment 203020
A bad day at the Kattner Shipyard. I have been adding nails to the scarf joints and I hate the result.
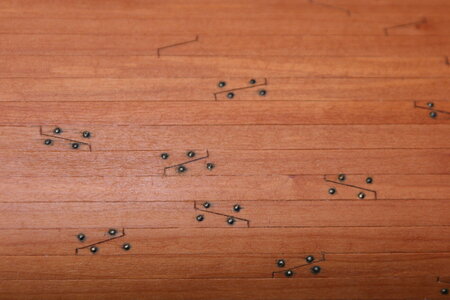
It all started innocently enough. I added brass nails to the lower portion of the hull (below the position of lowest wale which is currently in transit somewhere between Russia and Illinois...).
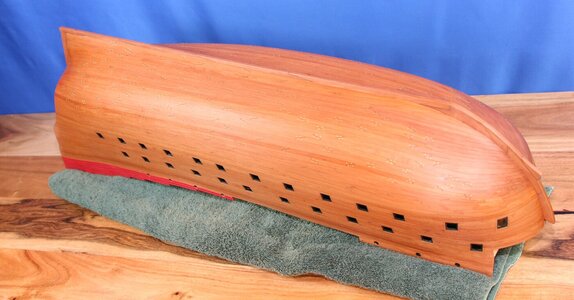
I then blacked the nail heads. Looks terrible...
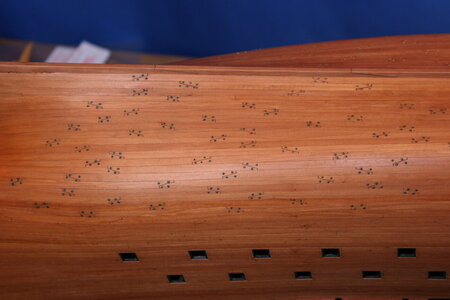
Close up it's not as offensive - but the overall picture just looks blotchy...
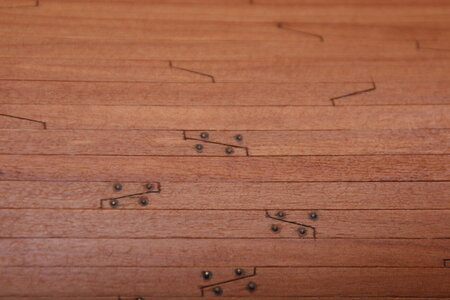
I tried to soften the visual impact by painting the nail heads a wood color...
And then tried blending that with some wood stain...
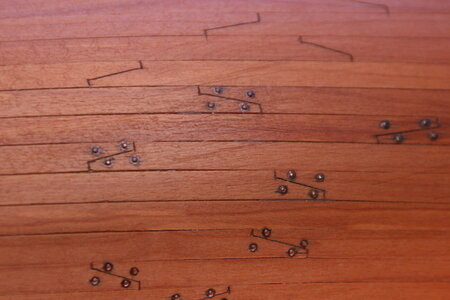
Total fail. I am at a loss.
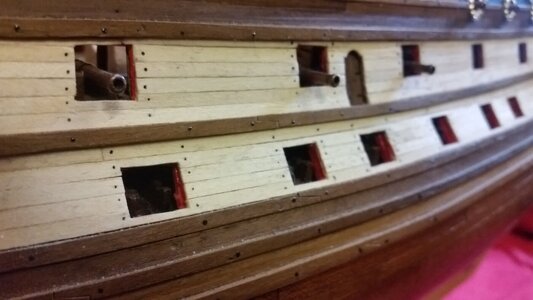
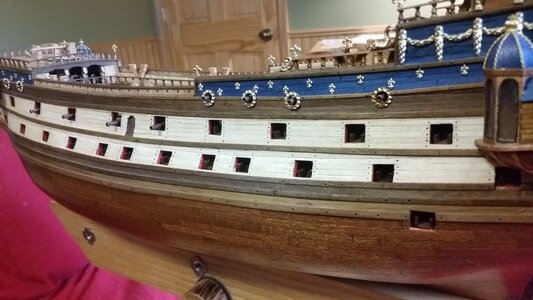
My current plan is to suspend the nailing where I am and then do something different (probably faux nails like I did around the gun ports) above that point (specifically for the scarf joints). Would that be weird? (Of course it would be weird - but unacceptably weird?)
I also considered actually adding more nails to this lower portion of the hull in an attempt to diminish the patchy look.
I would paint a waterline and cover the whole thing but some of the nails are above that point already.
Ugh... Here it is again as you consider the excellent suggestion you are about to make...
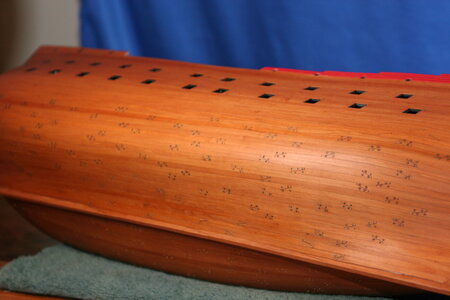
You know how at the end of some days of ship building you want to cry...
It all started innocently enough. I added brass nails to the lower portion of the hull (below the position of lowest wale which is currently in transit somewhere between Russia and Illinois...).

I then blacked the nail heads. Looks terrible...

Close up it's not as offensive - but the overall picture just looks blotchy...

I tried to soften the visual impact by painting the nail heads a wood color...

And then tried blending that with some wood stain...

Total fail. I am at a loss.
My current plan is to suspend the nailing where I am and then do something different (probably faux nails like I did around the gun ports) above that point (specifically for the scarf joints). Would that be weird? (Of course it would be weird - but unacceptably weird?)
I also considered actually adding more nails to this lower portion of the hull in an attempt to diminish the patchy look.
I would paint a waterline and cover the whole thing but some of the nails are above that point already.
Ugh... Here it is again as you consider the excellent suggestion you are about to make...

You know how at the end of some days of ship building you want to cry...
Hello Paul, I think the disaster comes as soon as you 'blackened' the inserted bolts. Given the fact that the finish layer is veneer, it is very thin and there is no 'meat' in the timber. The blackening solution dissolves the brass layer and penetrates the wood with the substance. You learn the lesson, never blacken 'in place', always blacken the parts first and then insert.
A lot of modelers use the copper treenails (without blackening), over time copper oxidize and gives the best look you can ever want\archive. Yes, it takes some time but the result worth waiting for, IMHO. Alternatively use brass without blackening, but it takes longer for the oxidizing time significantly and also gives a different end color.
But the stern looks amazing!

Paul,
I actually think the brass looks better...but you know me and artistic license!
In time they would turn darker as Jimsky mentioned.
The stern looks great! But I think since you did that, you’re pretty much committed to go all in.
So my recommendation is get busy doing the frame nails. You can tape some lines for guides.
Afterwards, those scarf nails will blend in. And you will get some uniformity that you’re looking for. The frame nails will shape the hull visually and the random scarf joints will blend in.
That’s my two cents. As I’ve said before, be careful the precedent you set! You’re in for some work now buddy!
But she will be a beauty when done!
You may be able to buff the nails to a shiny brass color once again, then use a browning solution to turn the nails to a bronze color. Here is a browning solution on Amazon:A bad day at the Kattner Shipyard. I have been adding nails to the scarf joints and I hate the result.
It all started innocently enough. I added brass nails to the lower portion of the hull (below the position of lowest wale which is currently in transit somewhere between Russia and Illinois...).
View attachment 203103
I then blacked the nail heads. Looks terrible...
View attachment 203105
Close up it's not as offensive - but the overall picture just looks blotchy...
View attachment 203106
I tried to soften the visual impact by painting the nail heads a wood color...
View attachment 203107
And then tried blending that with some wood stain...
View attachment 203108
Total fail. I am at a loss.
My current plan is to suspend the nailing where I am and then do something different (probably faux nails like I did around the gun ports) above that point (specifically for the scarf joints). Would that be weird? (Of course it would be weird - but unacceptably weird?)
I also considered actually adding more nails to this lower portion of the hull in an attempt to diminish the patchy look.
I would paint a waterline and cover the whole thing but some of the nails are above that point already.
Ugh... Here it is again as you consider the excellent suggestion you are about to make...
View attachment 203109
You know how at the end of some days of ship building you want to cry...
Brass Darkening Solution
This stuff browns brass to a bronze color, not blacken it. A light buffing with 600 grit sandpaper or similar fine buffing may lighten the wood as well as shine the nails, but the beauty of linseed oil is that if you scratch or even re-sand the wood, a fresh coat of linseed blends everything back in flawlessly. Also, linseed oil oxides with time, and your model will darken noticeably in 5 years. I have a crossbow I made 25 years ago that was a rich red wood tone, and it darkened to a very dark red brown because of linseed oil. So your orange model won't stay orange, but darken to a burnt sienna.
A browning of the nails will be brown and blend in better with the wood. And next time make a small practice piece before trying a new technique on your beautiful hull. The problem with all the modellers using real nails in a model is that they are never subtle and stand out with too much contrast and too large in size. When you look at the Wasa hull, even with 300 years of time at the sea bottom, the nails are a subtle effect and the head so small that they practically disappear at a distance of 100m. Your hull is light orangish brown, while the real Wasa is dark walnut in color, so your nails will stand out all the more. No matter what, you can recover from almost any wrong turn given enough time and work, and I know from experience that re-work is a bitch.
Take the time to back up a few steps and make it right, or you will not be satisfied. Keep in mind what type of model you want to build, one that looks realistic as the real ship, or a model that is meant to show off the shipwrights techniques, which usually includes the nails, even when out of scale, in order to demonstrate the methods used in building the ship over the realism. I plan on copying your splines, and using my paint micro-dot technique for the nails, with the color several shades darker than whatever the wood color will be, which will probably a very dark brown on mahogany, and a darker off-white on the bottom where the white stuff is on the hull. Hang in there Doc!
Last edited:
- Joined
- Nov 25, 2018
- Messages
- 598
- Points
- 403

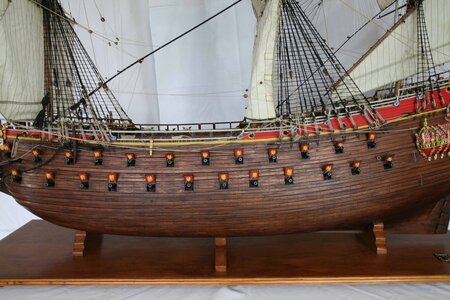
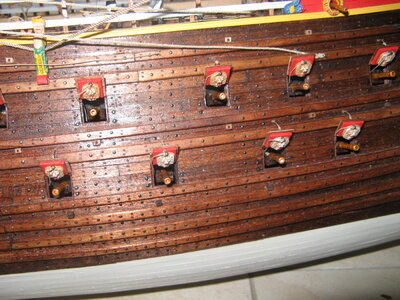
Yeah.It wasn't quite ice.Now the main thing is not to hurry, to outline the lines of frames around the ship's hull.Along the lines, make nailing with copper or brass nails (without caps).Then these hats will not stand out so much from the general background.If you were going to make such a bolt on the skin in advance, you had to first mark the lines of the frames.And place the locks on some principle, that is, randomly.It turned out-would not be so heap.


Last edited:
Paul,
Maybe you could prepare a couple of test squares and duplicate what you have done. Then see for example what an aggressive sanding looks like or possibly apply more Danish oil with some stain added in if such a process can even be done. For me personally uniformity is what I would strive for and testing out alternatives at least gives you some options that just may be what you are looking for.
Maybe you could prepare a couple of test squares and duplicate what you have done. Then see for example what an aggressive sanding looks like or possibly apply more Danish oil with some stain added in if such a process can even be done. For me personally uniformity is what I would strive for and testing out alternatives at least gives you some options that just may be what you are looking for.
Yes, @Jimsky, you have it right. The bleed-over makes the dark nails appear larger than I intended for them to look. My attempts at repairing things made it even worse. I used the same blackening strategy on the stern but I was MUCH more careful with the liquid. It's one thing to blacken 20 nail heads and another to blacken 500.Hello Paul, I think the disaster comes as soon as you 'blackened' the inserted bolts. Given the fact that the finish layer is veneer, it is very thin and there is no 'meat' in the timber. The blackening solution dissolves the brass layer and penetrates the wood with the substance. You learn the lesson, never blacken 'in place', always blacken the parts first and then insert.
A lot of modelers use the copper treenails (without blackening), over time copper oxidize and gives the best look you can ever want\archive. Yes, it takes some time but the result worth waiting for, IMHO. Alternatively use brass without blackening, but it takes longer for the oxidizing time significantly and also gives a different end color.
But the stern looks amazing!
Because the stern turned out so nice (I did the stern first) I was overly confident in what I was doing on the hull and didn't really see the mess I was making until I sat back at the end of an extended work session. Several lessons learned...
Last edited:
Hello Dean, Thank you, as always, for sharing your thoughts. Yes, I do agree that when frame nails are added it will take the visual focus off the scarf joint nails. The shiny brass bits work on your ship as an effective foil to the black details - but I am less inclined to go that way with mine, so I'll need to figure out a way to make it work.Paul,
I actually think the brass looks better...but you know me and artistic license!
In time they would turn darker as Jimsky mentioned.
The stern looks great! But I think since you did that, you’re pretty much committed to go all in.
So my recommendation is get busy doing the frame nails. You can tape some lines for guides.
Afterwards, those scarf nails will blend in. And you will get some uniformity that you’re looking for. The frame nails will shape the hull visually and the random scarf joints will blend in.
That’s my two cents. As I’ve said before, be careful the precedent you set! You’re in for some work now buddy!
But she will be a beauty when done!
Yes, Kurt, the black is too much - a brown tone would have helped. The blackening comes off easily with steel wool. The bleed-out into the pear is more problematic (the nail head is in the way so the steel wool doesn't get to it). I can actually remove some of the wood staining with a paintbrush dipped in water but then that removes the blackening from the edge of the nail leaving it a shiny brass again.You may be able to buff the nails to a shiny brass color once again, then use a browning solution to turn the nails to a bronze color. Here is a browning solution on Amazon:
Brass Darkening Solution
This stuff browns brass to a bronze color, not blacken it. A light buffing with 600 grit sandpaper or similar fine buffing may lighten the wood as well as shine the nails, but the beauty of linseed oil is that if you scratch or even re-sand the wood, a fresh coat of linseed blends everything back in flawlessly. Also, linseed oil oxides with time, and your model will darken noticeably in 5 years. I have a crossbow I made 25 years ago that was a rich red wood tone, and it darkened to a very dark red brown because of linseed oil. So your orange model won't stay orange, but darken to a burnt sienna.
A browning of the nails will be brown and blend in better with the wood. And next time make a small practice piece before trying a new technique on your beautiful hull. The problem with all the modellers using real nails in a model is that they are never subtle and stand out with too much contrast and too large in size. When you look at the Wasa hull, even with 300 years of time at the sea bottom, the nails are a subtle effect and the head so small that they practically disappear at a distance of 100m. Your hull is light orangish brown, while the real Wasa is dark walnut in color, so your nails will stand out all the more. No matter what, you can recover from almost any wrong turn given enough time and work, and I know from experience that re-work is a bitch.
Take the time to back up a few steps and make it right, or you will not be satisfied. Keep in mind what type of model you want to build, one that looks realistic as the real ship, or a model that is meant to show off the shipwrights techniques, which usually includes the nails, even when out of scale, in order to demonstrate the methods used in building the ship over the realism. I plan on copying your splines, and using my paint micro-dot technique for the nails, with the color several shades darker than whatever the wood color will be, which will probably a very dark brown on mahogany, and a darker off-white on the bottom where the white stuff is on the hull. Hang in there Doc!
These are the super tiniest nails I have ever found - but even they are too big at this scale. I thought they would be fine - and they appear to be on the stern - but when they show up in force on the hull it's visually jolting.
Thank you, especially, for saying that I need to 're-work' this problem. That's what I have trying to avoid but I am beginning to accept that the solution lies there... What I fear most is re-planking this hull. Hopefully it won't come to that!
Hello @Mr.Deep, thank you so much for commenting. I believe your solution is the way forward - or some version of it.Yeah.It wasn't quite ice.Now the main thing is not to hurry, to outline the lines of frames around the ship's hull.Along the lines, make nailing with copper or brass nails (without caps).Then these hats will not stand out so much from the general background.If you were going to make such a bolt on the skin in advance, you had to first mark the lines of the frames.And place the locks on some principle, that is, randomly.It turned out-would not be so heap.View attachment 203143View attachment 203144View attachment 203145
You are showing some images of a DeAgostini Wasa that I have not seen. Is she yours? Would you be willing to share more pictures? The ship is remarkably well done and I could certainly learn from seeing even more. If you have more images would you please message me and I'll suggest a way you could easily get pictures to me!
Again, thank you for commenting and sharing your suggested solutions. I am most appreciative you took the time.
Great idea Daniel. I have been experimenting on the hull of my ship - perhaps not the wisest choice! It's amazing what foolishness one is capable of when frustration cuts off the blood flow to one's brain!Paul,
Maybe you could prepare a couple of test squares and duplicate what you have done. Then see for example what an aggressive sanding looks like or possibly apply more Danish oil with some stain added in if such a process can even be done. For me personally uniformity is what I would strive for and testing out alternatives at least gives you some options that just may be what you are looking for.
Several others have commented about using test panels. I actually have one and used it to test out what you see. The problem creeped in when I started to get sloppy with my technique (careless, really). But I think a second issue is the matter of scale. My test panel is small and the hull is relatively large. It's the overall visual impact that I find offensive. Some of the Vasa hulls I have seen are a study in nailing patterns and (for me), that distracts from an otherwise fine build. A nail-heavy hull is not what I have envisioned in my head. Of course, this comes from a guy who just put 1000 nails into the hull of his ship and now needs to add more. Alas...


