
Thank you, John, I'm glad you stopped by.

You are using an out of date browser. It may not display this or other websites correctly.
You should upgrade or use an alternative browser.
You should upgrade or use an alternative browser.
VASA 490 Build Log - Billing Boats, 1:75 [Completed Build]
- Thread starter Daniel20
- Start date
- Watchers 64
-
- Tags
- billing boats vasa
- Joined
- Apr 20, 2020
- Messages
- 5,144
- Points
- 738

Good morning all.
I have finally finished the upper rail section and I must say it was a challenge that at first, I was not sure I could pull off but now am ecstatic at the results! I scratch built all of the rail members because the kit supplied version was for me totally unacceptable. The first group of pics are during construction and showing a set of end mill engraving bits I purchased to carve the profile into the 12ea radius sections.
View attachment 274111View attachment 274112View attachment 274113
At this point as you will see I am woefully lacking in ability to carve the radial profiles, but the show must continue to move forward. This looks much better from a distance.
View attachment 274117View attachment 274118View attachment 274119View attachment 274120
To maintain the rail width through the radius sections, I had to glue several short pieces together then cut out the radii from that.
I hope you all enjoy the pictures and thanks for stopping by. Happy modeling to you!
Dear Daniel
wonderful work it's looks fantastic
")

Hey Shota, good to hear from you! Thank you checking in on me.Dear Daniel
wonderful work it's looks fantastic
Good afternoon to everyone.
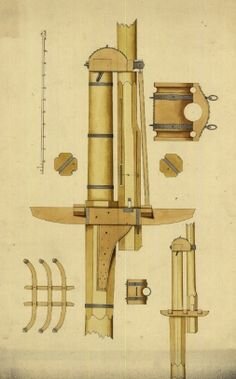
Here is a progress report on the mast and spars. You can see the three foremast sections have been turned, stained, and wax sealed. I started with square stock basswood to accommodate the square section shown on each section. I was able to start with round stock on the primary bowsprit section but the remainder of the mast sections, main and mizzen, will come from square stock. I'm waiting on delivery of a 4-jaw wood chuck for my lathe because it is really difficult to get a good centering from a 3-jaw chuck on a four-sided stock piece. The spars all came out satisfactory so after staining and waxing, I can begin attaching some of the block and tackle items.


I'm struggling with the tops that go with the mast, Billing's instructions are rather cryptic to me, I will however figure it out. @PeterG and @dockattner 's pictures have been a tremendous resource in understanding their construction. Note the hounds on the foremast are just lightly glued at this point for finishing purposes, I had to order 6mm pulleys which were not in my kit, so the attachment is temporary.
Thanks for checking in on me and if I don't get back to Ya'll before Christmas, I wish a great and safe one to you all!!
Here is a progress report on the mast and spars. You can see the three foremast sections have been turned, stained, and wax sealed. I started with square stock basswood to accommodate the square section shown on each section. I was able to start with round stock on the primary bowsprit section but the remainder of the mast sections, main and mizzen, will come from square stock. I'm waiting on delivery of a 4-jaw wood chuck for my lathe because it is really difficult to get a good centering from a 3-jaw chuck on a four-sided stock piece. The spars all came out satisfactory so after staining and waxing, I can begin attaching some of the block and tackle items.
I'm struggling with the tops that go with the mast, Billing's instructions are rather cryptic to me, I will however figure it out. @PeterG and @dockattner 's pictures have been a tremendous resource in understanding their construction. Note the hounds on the foremast are just lightly glued at this point for finishing purposes, I had to order 6mm pulleys which were not in my kit, so the attachment is temporary.
Thanks for checking in on me and if I don't get back to Ya'll before Christmas, I wish a great and safe one to you all!!
Fine job my friend!
Great Job Daniel. I attempted making my mizzen mast yesterday- total disaster. Respect my friend. Looking great.
- Joined
- Oct 17, 2020
- Messages
- 1,336
- Points
- 393

Buongiorno Daniel , ho visto tutto il Tuo cantiere ottimo lavoro e impegno tantissimo, mi piace, non hai qualche manuale di costruzione navale?lavoro molto bello e preciso Daniel
Thank you so much @dockattner, @Heinrich, @GrantTyler, and @shota70 for your kind comments. You guys and all the rest following my build are such a wonderful inspiration.
Thank you for your helpful picture and kind comments. I am delighted that you are interested in my Vasa build log! The Bilings kit does indeed furnish a builder's manual and 1:1 drawings. There are however gaps in their instruction which I'm sure they assume someone building one of their advanced models, would know how to 'fill' if you will. While I'm not exactly a rookie at this I am much closer to being a rookie than I am being a seasoned veteran builder. I hope this translates to Italian ok for you.Good afternoon Daniel this picture can help you
I agree with Heinrich, the finish on the mast looks very nice! Great job Daniel!Daniel you have done a very good job on the masts. I really like your finish on them - it will be perfectly in line with the rest of the ship!
Thank you Dean and Merry Christmas my friend.I agree with Heinrich, the finish on the mast looks very nice! Great job Daniel!
- Joined
- Dec 16, 2017
- Messages
- 34
- Points
- 48

Just found this log. Vasa has been one of my Christmas wish list kits for several years but the price has always been beyond our budget. You're doing a first class job, and I'll be following with real interest.
Thank you John, and welcome aboard. There are four other Vasa builders that I'm aware of on this forum @dockattner, @mgovey, @PeterG, and @Short John Bronze . Check them out too!Just found this log. Vasa has been one of my Christmas wish list kits for several years but the price has always been beyond our budget. You're doing a first class job, and I'll be following with real interest.

Daniel, those spars and masts look excellent - Welcome to world above the hull - It only gets trickier from here!!! You finish on the masts is outstanding as it brings the tones of the timber out nicely.
When you come to adding rigging to your spars, there are a number of fittings for them, which I would urge you to review. For example, I added all the fittings as per the 1:1 drawings, but I have now found that, in particular, the small brass 'eyes' which are intended by Billings to be inserted along the length for predominantly clewlines, I have found that using the museum's rigging diagrams, precludes their use and smaller blocks are a much better representation of the real thing. I suggest you try and do a bit of forward review of the lines for the various spars and see what I mean.
Unfortunately, it wasn't until I was rigging the spars (I have just completed the furled mainsail), that I realised these kit parts I don't regard as appropriate.
Regards,
PeterG
Same to you!Thank you Dean and Merry Christmas my friend.
Hi Peter, thank you for the complements. Also thank you for the heads up on the spar fittings, I shall do as you recommend. The strange cylindrical brass eyes just cannot be even close to correct. I'm not sure I will even use them on the deck either. Proper eyelets on the deck and properly stropped blocks on the spars seems more realistic.Daniel, those spars and masts look excellent - Welcome to world above the hull - It only gets trickier from here!!! You finish on the masts is outstanding as it brings the tones of the timber out nicely.
When you come to adding rigging to your spars, there are a number of fittings for them, which I would urge you to review. For example, I added all the fittings as per the 1:1 drawings, but I have now found that, in particular, the small brass 'eyes' which are intended by Billings to be inserted along the length for predominantly clewlines, I have found that using the museum's rigging diagrams, precludes their use and smaller blocks are a much better representation of the real thing. I suggest you try and do a bit of forward review of the lines for the various spars and see what I mean.
Unfortunately, it wasn't until I was rigging the spars (I have just completed the furled mainsail), that I realised these kit parts I don't regard as appropriate.
Regards,
PeterG