-

Win a Free Custom Engraved Brass Coin!!!
As a way to introduce our brass coins to the community, we will raffle off a free coin during the month of August. Follow link ABOVE for instructions for entering.
-

PRE-ORDER SHIPS IN SCALE TODAY!
The beloved Ships in Scale Magazine is back and charting a new course for 2026!
Discover new skills, new techniques, and new inspirations in every issue.
NOTE THAT OUR FIRST ISSUE WILL BE JAN/FEB 2026
You are using an out of date browser. It may not display this or other websites correctly.
You should upgrade or use an alternative browser.
You should upgrade or use an alternative browser.
Vasa Build Log - Billing Boats - Scale 1/75 [COMPLETED BUILD]
- Joined
- Jan 9, 2020
- Messages
- 10,566
- Points
- 938

Sorry, Peter! My apologies. I thought I was reading @dockattner 's log. Old age I guess! 
No problems Heinrich. I am sometimes confused about whose log I am on too.
Hopefully my log will start to move a bit quicker now I am nearly finished the ratlines.
PeterG
Hopefully my log will start to move a bit quicker now I am nearly finished the ratlines.
PeterG
Peter,
Nice well executed updates --
PS: the Artesania Latina kit looks to be very good as well - that said, as an aside, how they decided to paint the entire hull with brown paint for their brochure images is very odd IMO - looks like well
Nice well executed updates --
PS: the Artesania Latina kit looks to be very good as well - that said, as an aside, how they decided to paint the entire hull with brown paint for their brochure images is very odd IMO - looks like well
The DeAg and AL kits are essentially the same. AL was making the DeAg version and their agreement with DeAg has apparently expired. Both have painted everything  .
.
Hi Peter, thanks for the great reference material. When I get to the rigging ( a few months from now) I have a lot of good options to choose from. I downloaded the PDF and Excel data sheets you and @dockattner provide.
The only reason I would ever paint an entire hull of a "wooden" ship model would be to hide bad planking and I hope I never do a bad job of that!
The only reason I would ever paint an entire hull of a "wooden" ship model would be to hide bad planking and I hope I never do a bad job of that!
Many thanks John (as well as your comments Paul and Daniel). I agree with the comments regarding the painting of a planked, wooden hull - Why would you do that if there is a reasonable job of planking done ??? Seems like a waste of good paint to me, ARRRH but then, maybe they didn't plank the hulls - Maybe they are only a plastic mock-up made to look like a Vasa hull!! I guess its all about the marketing...
PeterG
PeterG
Just a quick update - I am STILL working on ratlines. I have however completed all the lower sections of the foremast, main and mizzen. I am now working on the main topgallant. I have to then install the shrouds for the foremast topgallant and then ratlines which will finish it off. A lot of people comment that they hate doing ratlines - I find it somewhat therapeutic, but it is certainly a LONG job. On my calculation its a total of around 1680 clove hitch knots!!! The other astounding thing is the amount of ratline rope it uses. I think I have made about 25 metres so far, of just ratline scaled material.
I'll get some pictures up soon - Sorry for the rush,
PeterG
I'll get some pictures up soon - Sorry for the rush,
PeterG
Yep, I used all the kit supplied line and then used all my wife’s black embroidery thread. Maybe I’ll get me one of those rope makers for my next one.Just a quick update - I am STILL working on ratlines. I have however completed all the lower sections of the foremast, main and mizzen. I am now working on the main topgallant. I have to then install the shrouds for the foremast topgallant and then ratlines which will finish it off. A lot of people comment that they hate doing ratlines - I find it somewhat therapeutic, but it is certainly a LONG job. On my calculation its a total of around 1680 clove hitch knots!!! The other astounding thing is the amount of ratline rope it uses. I think I have made about 25 metres so far, of just ratline scaled material.
I'll get some pictures up soon - Sorry for the rush,
PeterG
Thanks Vic. I think making your own rope is part of the challenge in model ship building. A few (a lot actually) posts ago, I remember having a discussion with a couple of guys about rope thicknesses, colour and ropewalks. It is an interesting subject as the rigging of our ships is so complimentary to the effort and build time we put into the detail of the ship itself, deck fittings, armour etc etc. One of the things in particular that came out of the discussion were a couple of really useful Excel spreadsheet tables relating to line thickness for the various ropes/lines governed by the scale of our model.
PeterG
PeterG
So, now an update - I have FINALLY finished the ratlines!!! I think I have said it before, this aspect of the standing rigging is a LONG job and takes a lot of time, but is quite rewarding and therapeutic. It is however worth doing well as the ratlines lie to the fore of all detail on the deck and within the ship - You have to look through them to see the detail, so they should be done well. In Post #213 I detailed the fitting of the shrouds and the futtock staves and these were all completed before I commenced the ratlines. I opted for a ratline vertical spacing of between 5-6mm which at scale corresponds to about 15-17 inches (360-450mm). From what I have read and in other forums, this seems to be about right. The ratlines were rarely 'straight' but usually had a bit of 'droop' so the separation is only a guide in any case.
There are MANY methods to get ratline spacing even and looking good. Some advocate the use of 'jigs' to separate and position the line both off the ship and on the ship, others use pre-drawn paper templates with the separation heights placed behind the shrouds and the lines tied in front. Others simply use a ruler, eye and lots of scrutiny. For me, after looking extensively, I find the best solution was that detailed in a couple of build logs by Kurt Suleski (alias DARIVS ARCHITECTVS) who draws on his excellent build of La Couronne. In his build he uses a build jig that maintains tension, keeps the ratlines evenly distributed vertically, and is relatively simple to construct and use. His description (with full credit to Kurt) is below:
"To take the guesswork out of maintaining proper tension in ratline tying.
Take a look at my build log, starting at Post #188, and make the tool shown in Post #193 (see below). Glue strips of sandpaper or emery cloth to the inside gripping surfaces. The jig clamps onto the shrouds horizontally. Read the posts and you'll see how that ratline jig 1) holds the shrouds at their proper distances apart while you tie the ratlines with clove hitches, 2) spaces the ratline knots from the row you just tied below, and 3) acts as a straight edge that keeps the clove hitched on a nice, horizontal line. You can work on the port side shrouds, then use a ruler to match the heights of rows of ratlines relative to the bulwark, such that both sets of ratlines, port and starboard, match up in number, spacing, and height locations as you go. I grab the ruler and check the height of the ratline row I'm tying with the one on the opposite side every three rows or so. Everything will come out pretty even, and there is minimal knot position adjustment, which can suck up LOTS of your time. Tweaking is minimized. The secure each knot with a paint brush with diluted PVA glue. Each ratline section should be a tiny bit slack to look realistic, but if they are taut, that's okay as long as they are not too taut and pull the shrouds out of position."
The jig I built is almost identical to Kurt's and is shown below:
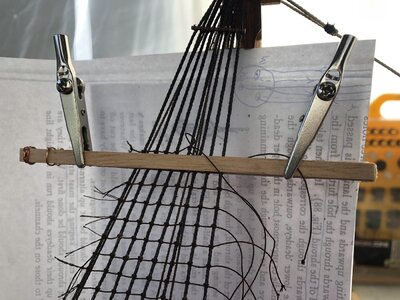
The width of the two timber 'bars' are 5mm and I have glued some emery paper inside to prevent the shroud lines from moving as you tie the knots. In EVERY case I have used CLOVE HITCH knots, even at the end shrouds and I have found them to be ideal for positioning (up down and where extra tension is needed or reduced). I have used some copper wire to hold one end of the two timber bars together and this applied enough pressure, along with two crocodile clips to stop the jig from moving while I tied the knots. As Kurt says, near the top, there is often insufficient room for the bar jig to be used and so the ratlines had to be tied by eye with a ruler to ensure vertical positioning.
Note that while I have been tying the ratlines for each mast section, if a futtock stave is required (which is all but the most top sections of masts and spritsail mast), this tended to hold the shrouds well separated and once tied, before applying dilute PVA white glue, I was able to 'eyeball' the ratlines and make sure that they were all parallel and evenly distributed. The clove hitch knots allowed some adjustment along the shrouds to make everything look even. I tended to leave every ratline row extending beyond the outer start and end shrouds until I had finished and applied the PVA glue. This ensured there was no unravelling or loosening of knots before I trimmed the ends off with a scalpel blade, taking care to cut away from the shroud lines.
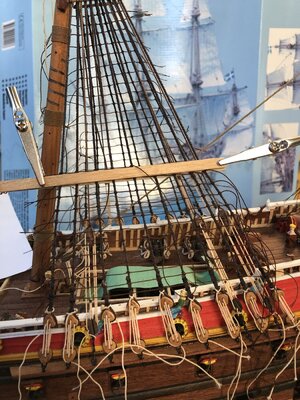
One of the more interesting aspects of the alignment of the ratlines, relate to the angles of these relative to the deck and towards the tops, as these angle considerably, especially for the mizzen and main masts. I discuss this in Post #220 and compare the actual ship rake of ratlines with those from the DeAgostini and Artesania Latina Vasa models. I have largely adopted the angles as shown in the Vasamuseet Rigging Plans (which appear to also have been adopted by Billing Boats). For the foremast, the ratlines appear almost horizontal from deck level to tops. For main and mizzen the angle is raked to parallel the deck railings and then slightly increases in angle to the top as the tops for these masts rakes forward. As such, the ratline angle changes slightly as they go higher. It is an almost imperceptible increase in angle, but it has been done for my model.
Elapsed Time: 2120 Hrs
Regards,
PeterG
There are MANY methods to get ratline spacing even and looking good. Some advocate the use of 'jigs' to separate and position the line both off the ship and on the ship, others use pre-drawn paper templates with the separation heights placed behind the shrouds and the lines tied in front. Others simply use a ruler, eye and lots of scrutiny. For me, after looking extensively, I find the best solution was that detailed in a couple of build logs by Kurt Suleski (alias DARIVS ARCHITECTVS) who draws on his excellent build of La Couronne. In his build he uses a build jig that maintains tension, keeps the ratlines evenly distributed vertically, and is relatively simple to construct and use. His description (with full credit to Kurt) is below:
"To take the guesswork out of maintaining proper tension in ratline tying.
Take a look at my build log, starting at Post #188, and make the tool shown in Post #193 (see below). Glue strips of sandpaper or emery cloth to the inside gripping surfaces. The jig clamps onto the shrouds horizontally. Read the posts and you'll see how that ratline jig 1) holds the shrouds at their proper distances apart while you tie the ratlines with clove hitches, 2) spaces the ratline knots from the row you just tied below, and 3) acts as a straight edge that keeps the clove hitched on a nice, horizontal line. You can work on the port side shrouds, then use a ruler to match the heights of rows of ratlines relative to the bulwark, such that both sets of ratlines, port and starboard, match up in number, spacing, and height locations as you go. I grab the ruler and check the height of the ratline row I'm tying with the one on the opposite side every three rows or so. Everything will come out pretty even, and there is minimal knot position adjustment, which can suck up LOTS of your time. Tweaking is minimized. The secure each knot with a paint brush with diluted PVA glue. Each ratline section should be a tiny bit slack to look realistic, but if they are taut, that's okay as long as they are not too taut and pull the shrouds out of position."
The jig I built is almost identical to Kurt's and is shown below:

The width of the two timber 'bars' are 5mm and I have glued some emery paper inside to prevent the shroud lines from moving as you tie the knots. In EVERY case I have used CLOVE HITCH knots, even at the end shrouds and I have found them to be ideal for positioning (up down and where extra tension is needed or reduced). I have used some copper wire to hold one end of the two timber bars together and this applied enough pressure, along with two crocodile clips to stop the jig from moving while I tied the knots. As Kurt says, near the top, there is often insufficient room for the bar jig to be used and so the ratlines had to be tied by eye with a ruler to ensure vertical positioning.
Note that while I have been tying the ratlines for each mast section, if a futtock stave is required (which is all but the most top sections of masts and spritsail mast), this tended to hold the shrouds well separated and once tied, before applying dilute PVA white glue, I was able to 'eyeball' the ratlines and make sure that they were all parallel and evenly distributed. The clove hitch knots allowed some adjustment along the shrouds to make everything look even. I tended to leave every ratline row extending beyond the outer start and end shrouds until I had finished and applied the PVA glue. This ensured there was no unravelling or loosening of knots before I trimmed the ends off with a scalpel blade, taking care to cut away from the shroud lines.

One of the more interesting aspects of the alignment of the ratlines, relate to the angles of these relative to the deck and towards the tops, as these angle considerably, especially for the mizzen and main masts. I discuss this in Post #220 and compare the actual ship rake of ratlines with those from the DeAgostini and Artesania Latina Vasa models. I have largely adopted the angles as shown in the Vasamuseet Rigging Plans (which appear to also have been adopted by Billing Boats). For the foremast, the ratlines appear almost horizontal from deck level to tops. For main and mizzen the angle is raked to parallel the deck railings and then slightly increases in angle to the top as the tops for these masts rakes forward. As such, the ratline angle changes slightly as they go higher. It is an almost imperceptible increase in angle, but it has been done for my model.
Elapsed Time: 2120 Hrs
Regards,
PeterG
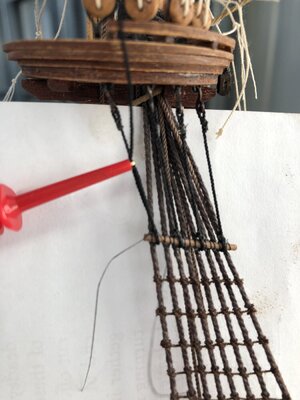
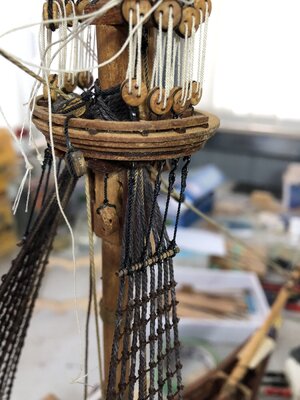
While I have now completed my ratlines, you will have noted that I have NOT applied final tying off of the lanyards of the deadeyes tensioning each shroud. This I have done intentionally as even with the ratlines completed, I was unsure as to whether I would require adjustment of shroud tension or not. As it turns out, the NEXT phase of building has required me to place the futtock lines from the futtock staves to the tops. What I have found is that by placing these lines, I have been able to pull tension of the entire shroud/ratline sections even and slightly outwards, away from the mast section, such that the shrouds and ratlines come under considerable tension, are taut and well controlled in maintaining or adjusting any 'out of vertical' alignment of the various parts of the mast sections. As I looked from stem to stern along the ship, I could see that there was minor misalignment of the mast sections, which I needed to correct. I could do this by shroud tension, but the futtock stave tension has also helped. Below I show how I have tied the futtock shrouds. Note that The shrouds have each been pre-prepared with it's securing hook beneath the top.
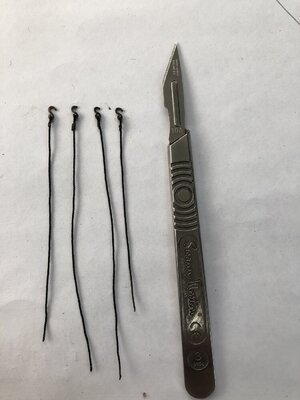
Each futtock shroud hooks through a loop made from the tops deadeyes support as shown below. While tying off the futtock shroud the line is looped from the hook, around the futtock stave and secured by an electrical hook. This holds it surprisingly tight while I wrap and secure the shroud
After the futtock shrouds are all secured, my next task will be to fix the deadeye shroud lanyards and this would then finalise this part of the standing rigging.
Elapsed Time: 2138 Hrs
PeterG

Each futtock shroud hooks through a loop made from the tops deadeyes support as shown below. While tying off the futtock shroud the line is looped from the hook, around the futtock stave and secured by an electrical hook. This holds it surprisingly tight while I wrap and secure the shroud

After the futtock shrouds are all secured, my next task will be to fix the deadeye shroud lanyards and this would then finalise this part of the standing rigging.

Elapsed Time: 2138 Hrs
PeterG
Hi Peter,
I see you like to use the electrical circuit clips for the rigging same as me. They are ideal for ratlines.
I see you like to use the electrical circuit clips for the rigging same as me. They are ideal for ratlines.
Hi Peter.
Your shroud lines look great, well executed. I like the idea of 'post tensioning' the main shrouds through the futtock shrouds thus keeping the dead eye to dead eye spacing relatively even along the chain plates.
Your shroud lines look great, well executed. I like the idea of 'post tensioning' the main shrouds through the futtock shrouds thus keeping the dead eye to dead eye spacing relatively even along the chain plates.
I have finally completed all the futtock shrouds and ratlines for them - That's the end of the ratline knots for a while. It has taken a long time and it has been interrupted by some paying work I have had to do (don't you just hate those tasks that take us away from modelling!!).
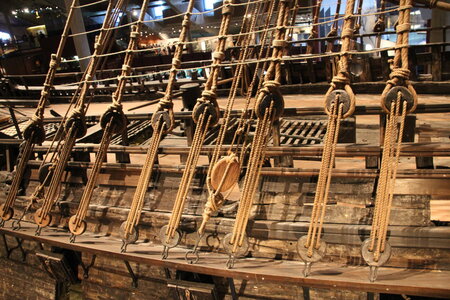
As I mentioned in a previous post, the futtock shrouds have added tension to the ratlines I was not expecting but it has all pulled up surprisingly tightly. This means that I can now spend some time tying off the shroud deadeye lanyards and neaten up their appearance. I was reluctant to do this previously as I thought I may have to make additional adjustments for individual ratlines but probably not. This exercise will probably take a while too as the lanyards for each shroud are wrapped around the shroud then extended up from the deadeye to again be wrapped and then tied off (see below on the actual ship).
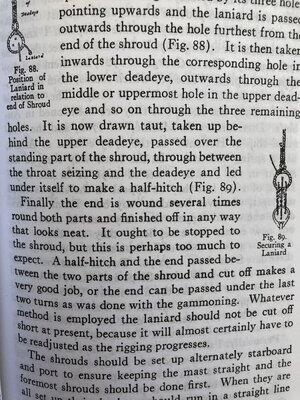
Note too that R.C. Anderson's description is as follows. I like the idea of the final 'wound several times round both parts (of the shroud line) and finished off in any way that looks neat.'
In any case, that should keep me occupied for a few hours!!
Regards,
PeterG.
As I mentioned in a previous post, the futtock shrouds have added tension to the ratlines I was not expecting but it has all pulled up surprisingly tightly. This means that I can now spend some time tying off the shroud deadeye lanyards and neaten up their appearance. I was reluctant to do this previously as I thought I may have to make additional adjustments for individual ratlines but probably not. This exercise will probably take a while too as the lanyards for each shroud are wrapped around the shroud then extended up from the deadeye to again be wrapped and then tied off (see below on the actual ship).

Note too that R.C. Anderson's description is as follows. I like the idea of the final 'wound several times round both parts (of the shroud line) and finished off in any way that looks neat.'

In any case, that should keep me occupied for a few hours!!
Regards,
PeterG.
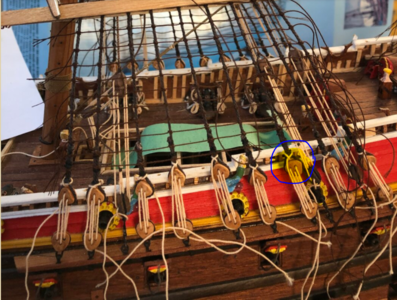
I've studied this photo extensively and I believe the deadeye is correct - the rest of the ship is upside down...Nice work Peter! I am not sure if you noticed, but you have a deadeye that is upside down. Thought I would point out before you get too far along.
View attachment 241454
As I live in Australia Paul, you are correct- the whole ship is upside down (as am I - gravity sucks). However, to change ALL the dead eyes (except one) seems like a lot of work!!
So, I am indebted to Dean for pointing out this error. He is of course correct so I will rectify it as soon as I can. I must be getting old (which I am) to not have picked it up before this. Attention to detail is a one thing but it’s the old ‘forest and trees’ problem.
Again, thanks Dean and I’ll try and do better.
PeterG
Last edited:
Glad I could help…I hate to nit pick, but I would want someone to tell me!As I live in Australia Paul, you are correct- the whole ship is upside down (as am I - gravity sucks). However, to change ALL the dead eyes (except one) seems like a lot of work!!
So, I am indebted to Dean for pointing out this error. He is of course correct so I will rectify it as soon as I can. I must be getting old (which I am) to not have picked it up before this. Attention to detail is a one thing but it’s the old ‘forest and trees’ problem.
Again, thanks Dean and I’ll try and do better.
PeterG
Isn't all of Australia and New Zealand upside down?As I live in Australia Paul, you are correct- the whole ship is upside down (as am I - gravity sucks). However, to change ALL the dead eyes (except one) seems like a lot of work!!
So, I am indebted to Dean for pointing out this error. He is of course correct so I will rectify it as soon as I can. I must be getting old (which I am) to not have picked it up before this. Attention to detail is a one thing but it’s the old ‘forest and trees’ problem.
Again, thanks Dean and I’ll try and do better.
PeterG


