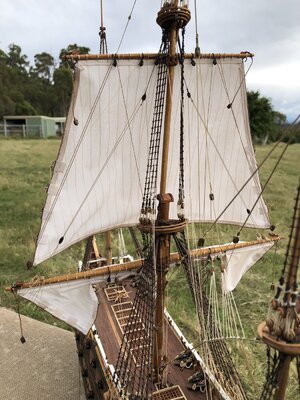
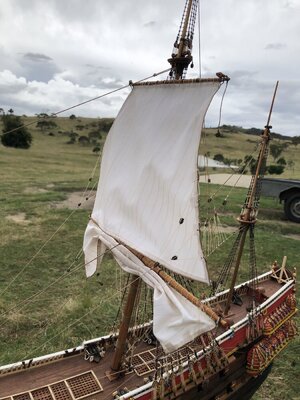
Vasa Build Log - Billing Boats - Scale 1/75 [COMPLETED BUILD]

Many thanks John. Your comment is appreciated. I have been following your Soverign of the Seas (another SOS), and I can only say, that I am in awe. Clearly the Sergal kit is exceptional, but it only comes together well in the hands of a true craftsman. Well done - A very clean build. Are you going to add sails to the Sovereign? I know its a long way off, but it's a decision we all have to make at some stage....

I am a bit frustrated by the sails at the moment simply because they are taking so long to get right. I am making my own rope too and its proving hard to get the threads that I want to put on the ropewalk with the right thickness and colour. I see your refernce to McKay's rigging notes too, and I am not familiar with this reference, so I will have a search and a closer look. One resource that I have just recently come across which I am sure many would have or be keen to access is 'The young sea officer's sheet anchor' by Lever Darcy, 1760-1837. Although a little after the Vasa, many of the terms, descriptions and excellent plates I have found very useful.

PeterG
 
Moving on to the sails and yards, I have been thinking about how to attach the yards to the masts. The Vasa made use of parrels to achieve this and this is in keeping with the age of the ship and the accepted conventions/practice of the time (according to Anderson). A bit more research however, because, parrels by their design, are simple a grouping of vertical pieces of timber, between which are threaded some wooden 'balls' like beads and with rope that allowed the parrels to be tightened or loosened from deck when the yard was to be lowered or lifted along the shaft of the mast to raise and lower the sail. In fact, in Fig 29 of the Billing Boats instructions, you can see a hint of the parrels being used for the yards shown.

View attachment 268573
A parrel to be mounted around a mast to support a yard.

However, I like to question things to give a bit more detail - So, how big were the vertical timbers, how big were the beads (called 'trucks'), and how many were needed to surround the mast for various yards? The Billing kit provided a set of black, plastic beads ready to be threaded onto line with laser cut vertical plywood timber to construct the parrels. The mainsail and foresail yards have three groupings of trucks and the other yards (except the spritsails yards), have only two groups of trucks. Well, in my research, I came across reference to descriptions of parrels by Lees (the following information on page 168 of his Masting and Rigging English Ships of War 1625-1860 - albeit English ships but evidently suited to the Vasa given the timeframe:

"The lower yards had three rows of trucks and the others two rows. Except for the sprit topsail and topgallant yards, the length of the ribs on the lower parrels were one and a half times the diameter of the yard. For the sprit topsail and topgallant yards they were twice the diameter of the yard. The depth of the ribs was equal to the diameter of the trucks, and the width of the ribs was a quarter the diameter of the trucks. The trucks' diameter was one fifth the ribs length on parrels of three rows and one third the length of parrels of two rows. The length of the trucks was one and a quarter times their diameter."

View attachment 268572

OK, so using the above, the truck's diameter was 1/5 the rib length.
Rib length was 1.5 times the diameter of the yard.

For the Billing model, for the larger yards eg mainsail yard, it is about 10mm in diameter, therefore rib length was 1.5 x 10mm = 15mm and truck diameter is 1/5, therefore 1/5 x 15mm = 3mm truck diameter. The supplied Billing beads are 4.00mm - Close but no cigar!!. Now, this ship is at a scale of 1/75, therefore a 4mm bead equates to a truck of carved wood (usually ash, as far as I can gather), of 4mm x 75 = 300mm or 11.8 inches - That's a BIG ball to carve, but not impossible. For smaller yards (eg topsails and topgallants), the trucks would have been smaller.

Reading further into Lee's book:

Regarding British practice, Lees says: "The parrels for the yards comprised ribs and trucks, those on the lower yards made of of three rows of trucks, and the other parrels made up of two. The length of the ribs on the lower parrels were one and a half times the diameter of the yard, those on the mizzen yard, the topsail yards (except the sprit topsail and the spritsail yard were one and a half times the diameter of their yards; finally those on the sprit topsail, and all the topgallant yards, were twice the diameter. The depth of the ribs was equal to the diameter of the trucks and the width of the ribs was a quarter the diameter of the trucks. The trucks' diameter was one fifth the rib's length on parrels of three rows, and one third the length on parrels of two rows. The length of the trucks was one and a quarter times their diameter. A hole was bored through the trucks to take the parrel rope; holes were also bored through the ribs for the same purpose. The trucks were positioned so that 1/2 inch of truck protruded beyond the back of the rib. There was a slight cavity in the ribs in the way of the trucks."

So, for smaller yards, the parrels size is approximating 1/3 the rib length and the rib length was 1.5 times the yard diameter. So for a topsail yard (eg the fore topsail), the diameter for the Vasa model is about 4 mm, so 1.5 = 6mm rib length and truck diameter should be 1/3, therefore 2mm (or HALF the size of the beads supplied by Billing Boats). This to me was a problem. While I am happy to use the supplied beads for the larger yards, I went hunting for smaller beads to use on the upper yards.

Reading even further into Lees book, he describes the parrels and trucks of the Mary Rose. In this case a number of trucks were found in the wreck and on the seafloor and these were of varying size from about 70mm, up to 120mm (or only 2 3/4 inches to 4 3/4 inches). This to me seems a more reasonable and manageable size, but the Mary Rose was considerably smaller than the Vasa. I still have trouble getting my head around balls carved to 12 inches around!!

As far as the arrangement of lines and securing the trucks in the ribs around the mast and then around the yard, I have opted for a single, looped line which then returns to deck to allow adjustment of parrel tension for raising and lowering of the yard. A LOT of variation and not much certainty about how these were rigged seems to exist for many ships of this and later age, let alone the Vasa. Possible arrangements are shown below:

View attachment 268575

Regards,

PeterG
You Vasa builders are fortunate to have the references from each other build- so much pertinent information. Fantastic.
 
Many thanks John. Your comment is appreciated. I have been following your Soverign of the Seas (another SOS), and I can only say, that I am in awe. Clearly the Sergal kit is exceptional, but it only comes together well in the hands of a true craftsman. Well done - A very clean build. Are you going to add sails to the Sovereign? I know its a long way off, but it's a decision we all have to make at some stage....

I am a bit frustrated by the sails at the moment simply because they are taking so long to get right. I am making my own rope too and its proving hard to get the threads that I want to put on the ropewalk with the right thickness and colour. I see your refernce to McKay's rigging notes too, and I am not familiar with this reference, so I will have a search and a closer look. One resource that I have just recently come across which I am sure many would have or be keen to access is 'The young sea officer's sheet anchor' by Lever Darcy, 1760-1837. Although a little after the Vasa, many of the terms, descriptions and excellent plates I have found very useful.

PeterG
Peter,

Thanks for following my SotSeas. Very kind of you. I think that Sergal are the only ones producing this kit at present. Some improvements were made with their revised release some years back – in fact some very good upgrades were included. That said, as I noted in my log the 650+ “bronze” bits are -sadly - of very poor quality when compared to the initial Sergal release of this kit’s solid bronze bits. The new kit uses a white metal electroplated with a gold look – and castings are sometimes very poorly detailed. Given the MSRP of this kit – hmmm??

Sails have been on and off of my mind hundreds of times lol. My last build (Corel Vasa) was my first attempt at making, adding and rigging sails when very little information was available with certainly none from Stockholm- many of us are still waiting for the Vasa II book.

I did however, have great success, using the full Vasa rigging plan sheets from the Billing’s example of this kit. Regarding historical accuracy – hmm??? - You certainly have these sheets as well.

Your sails, as I had mentioned, came out super well scaled, and rigged to the yards. Excellent work. Be proud. Sails are some of the hardest bits to get “looking right” right IMO

As far as rope making – you and others will always be ahead of me in this regard. Good for you that you are exploring learning those skills as well.

I will just keep buying after-market ropes haha. Also my next project will be a Viking ship – so ropes? haha.

The McKay reference is from his Sovereign book. That book details all lines and locations for a fully rigged example of the Sovereign.

I did not know your Lever Darcy reference – I will check it out.

The Anderson book The Rigging of Ships in the Days of the Spritsail is considered by many as the best historical reference

Regards,
 
Peter,

BTW Thanks - I found that book 'The young sea officer's sheet anchor' by Lever Darcy, 1760-1837 on Amazon a used hardcover copy - ordered it Thumbsup
 
Thanks Grant, we are indeed extremely fortunate!!

Thanks also for your contribution John (Oldflyer). I use Anderson's book constantly and am always referring to it for one thing or another with the rigging. For the standing rigging it was invaluable. For the running rigging, I am finding the emphasis is on English ships and while the Vasa is European (with Dutch influence), as Peter Janssen said, 'it was rigged with a Scotsman's eye' (not his quote), so it has a number of influences. I am still coming to terms with the belaying issue (will I use belaying pins or not? - clearly the kits supply them and their plans expect them, but photos of railings of the actual ship so NO signs of holes for the belaying pins!!). I have already drilled holes in the lower bulwark railings (as per the kit), so I think the decision has been made for me, but I suspect it is an error based on the actual ship.

One other question that comes to mind now is, where are some of the extraneous running rigging lines belayed. For example, it is likely that the parrels (at least for the lower yards), had lines which went to deck level to release and tension the parrel ropes. OK, so where was the line(s) used for tensioning belayed? No reference to this anywhere (although Anderson does indicate these lines running to deck level). As the rigging moves forward, I suspect there are going to be a number of these questions that remain unanswered (I don't think I can wait for Vasa II). Progress dictates that some guesses and assumptions will have to be made.

I have started to mount the sails (starting with the mainsail), onto the ship. This is raising a lot of questions and I am having to invent answers, but in my next post, I will load a few more pictures and the trials and tribulations encountered. I am rapidly coming to the conclusion too that the Billings kit will not have enough single blocks. This is a pain as I have reworked the blocks supplied by the kit extensively to be more 'life-like' and it has taken considerable time, so to need more will require more time. To be fair, I think I am adding more blocks than in the Billings plans to route my various lines, and this is where the shortage is coming from. However, nothing for it, I am off to the online shop to look for some more 3mm and 4mm single blocks!!

Regards.
PeterG
 
Hello Peter.
Extra blocks, wow I am glad to have some extra 4mm that I ordered but did not use on the canon rigging. I'm still a ways off from top rigging but plan on using your ship photos extensively when I get there.
 
Thanks Grant, we are indeed extremely fortunate!!

Thanks also for your contribution John (Oldflyer). I use Anderson's book constantly and am always referring to it for one thing or another with the rigging. For the standing rigging it was invaluable. For the running rigging, I am finding the emphasis is on English ships and while the Vasa is European (with Dutch influence), as Peter Janssen said, 'it was rigged with a Scotsman's eye' (not his quote), so it has a number of influences. I am still coming to terms with the belaying issue (will I use belaying pins or not? - clearly the kits supply them and their plans expect them, but photos of railings of the actual ship so NO signs of holes for the belaying pins!!). I have already drilled holes in the lower bulwark railings (as per the kit), so I think the decision has been made for me, but I suspect it is an error based on the actual ship.

One other question that comes to mind now is, where are some of the extraneous running rigging lines belayed. For example, it is likely that the parrels (at least for the lower yards), had lines which went to deck level to release and tension the parrel ropes. OK, so where was the line(s) used for tensioning belayed? No reference to this anywhere (although Anderson does indicate these lines running to deck level). As the rigging moves forward, I suspect there are going to be a number of these questions that remain unanswered (I don't think I can wait for Vasa II). Progress dictates that some guesses and assumptions will have to be made.

I have started to mount the sails (starting with the mainsail), onto the ship. This is raising a lot of questions and I am having to invent answers, but in my next post, I will load a few more pictures and the trials and tribulations encountered. I am rapidly coming to the conclusion too that the Billings kit will not have enough single blocks. This is a pain as I have reworked the blocks supplied by the kit extensively to be more 'life-like' and it has taken considerable time, so to need more will require more time. To be fair, I think I am adding more blocks than in the Billings plans to route my various lines, and this is where the shortage is coming from. However, nothing for it, I am off to the online shop to look for some more 3mm and 4mm single blocks!!

Regards.
PeterG
Hi Peter,

From what Fred Hocker has stated in other discussions, belaying would definitely have been done using belaying pins through the caprail.
Why there are no holes in the caprails on the actual ship, I can't say.
The caprails do not appear to be original though. Much original material that has been found were not installed on the ship and modern replacements were used instead for various reasons.
If you want more precise information on the caprail belaying pins, I suggest contacting Fred Hocker. He is usually very helpful, especially if the question asked gives an excuse to go aboard the ship and check something! ;-)
(Maybe not relevant for this particular question...)

Cheers,
Peter
 
Peter,
re; For example, it is likely that the parrels (at least for the lower yards), had lines which went to deck level to release and tension the parrel ropes. OK, so where was the line(s) used for tensioning belayed? No reference to this anywhere (although Anderson does indicate these lines running to deck level). As the rigging moves forward,

As I was working on the Vasa I also referred to Anderson - deciding to add that bit of rope detail as well. The line leading from the parrel is just glued into place appearing as the lower end of the lines going through the parrels and spacers. Attaching to the deck per Anderson I did the following... A simple image seemed easier that trying to articulate what I did. Apology for posting an image of my work into your log - I typically very much resits doing this....
Your Vasa is looking very well detailed indeed. Very rare to see builders adding the rope from parrels to the deck below.

Regards,

IMG_3728 copy.jpeg
 
The planking (my fears are always with this stage!!!) has now commenced in earnest!!!

I started the planking from the topsides towards the keel. The upper most section was not too bad as the curvature shape at the bow and stern were relatively mild and so the mahogany strip timber with soaking in hot water for a few minutes, seemed to bend without too much trouble. Shaping of each plank was done initially, according to the width marks on the hull, and after a few planks were added, it started to progress quite well.

It then became time to allow for the gun ports. On the Vasa, beneath the weather deck guns, are two additional levels. How to position these? On the Billing Boat kit, is supplied a series (86 I think), plastic 'inserts' for the gunports and within these are the 'half' cannons supplied in brass. These cannon barrels are a stub, false cannon designed to push fit into timber within the cannon locations behind the ports. No information is provided in the instructions as to how to fit these. Well, I was not happy about the plastic cannon port surrounds, and I realised I would have to construct some internal mounting and simulated gun carriages for the brass below-deck cannon barrels.

The picture below indicates how I located the positions of the various cannon ports. From the instruction plans of the hull, I created an overlay of some clear plastic and used some fixed points (such as the weather deck upper cannon ports and breaks in the deck line to locate the overlay on the outside of the partially planked hull. I used masking tape to fix the overlay to the upper parts of the ship so I could roll it on and off the hull planking for marking the port positions for cutting out. At this stage the planking was down to about the first level of below-deck cannon ports (6 planks in the picture below..

View attachment 113516

With the cannon ports drawn on the hull planking, I then used a piece of bent steel (actually roofing material called Colourbond in Australia), which I had punched out the precise size for the cannon ports. I then drilled around the perimeter of the ports and cut out with a sharp knife and then filed square. These came out quite well and in the correct locations.

View attachment 113517

Where a bulkhead was encountered as I removed the port plank section, I also had to cut some bulkhead timber to allow for the cannon support timber to be positioned. These timbers involved making a 'floor' for the deck, gluing between the adjacent bulkheads and then inserting a false gun carriage to support the false cannon barrel. Each gun carriage was painted and inserted and glued into position. From the outside it looks OK and provides the support for the guns well.

As the planking progressed, the gunports were eventually completed and it formed a good solid hull. I had to be careful with the planking as there is only a single planking used by Billings. while this is alright, it leaves little room for error if a mistake is made. Below is a picture of the planking on the starboard side with most of the gunports cut out.
View attachment 113518

Similarly on the port side. You will note that there is quite a lot of variation in the mahogany planking colour along the hull. I tried to position planking and plank selection randomly but it has occurred that the lighter coloured sections appear where the gunports are. This was not by design as the gunport locations do not follow the line of the plank edges anyway. Nevertheless the finish I think will look OK when painted. I am not intending to use a stain, as I quite like the look of the mahogany anyway. The side gunwales still to be added will also be in black and these will add contrast that should look good. If necessary, I can also stain later when I see the overall hull's finished planking.

View attachment 113519

For all planking I am using PVA white glue and then after each plank is attached I, go over the bulkhead-plank joints on the inside (where and while I can still access them), and add additional glue. At this stage I have used no nails, only glue and pressure for bending, plus I am pleased that as the planking proceeds, no stealers to fill gaps have been required.

More soon...

Regards,

Peter G.
Hello Peter G.!

Your build log has been my Bible as I also work to build the Billing VASA - thank you!

Can you refer me to an online source to order additional Obechi strips used in planking the VASA? I am looking specifically for Part No. 143, the 1.8mm x 7mm x 780 mm Obechi (Obeche) strips used to plank the hull. I made several mistakes in planking and have used all those that came with the kit itself. I'm hoping I can find a source for more.

Thank you again, Peter.

Doug B.
 
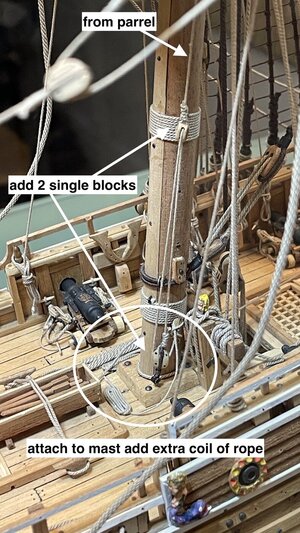
Thank you Oldflyer for your advice on the parrel ropes at deck level and coming down from the main yard. I have also inserted a ring into the deck for securing the line, next to the mast foot. I was thinking of having a single hook-block combination through the deck eye and then routing the parrel line to the main knight bitt abaft the mast. However, I think I like your solution better.

I have no feeling for how much tension would be applied to the parrel line to close the parrel ‘beads’ around the mast, but I would not have thought too much (although the line does get routed across and back through the beads and vertical spaces). Nevertheless, I think I will use your solution. Below is how I have rigged the parrel line.

8A220546-9D12-4873-9F2E-3A2736BF2ED5.jpeg

So there are two single blocks with a hook on the bottom block which is hooked through the deck eye. I have belayed the parrel line from the bottom block to the knight’s bitt rather than a cleat on the mast.

Regards

PeterG

PS Never feel guilty about posting a helpful image of your model to illustrate a point - It is only helpful!! Thanks again.
 
Last edited:
Sorry to take so long to upgrade my build log - A lot happening in my life at the moment, and although I have been putting some time in to the Vasa, I am finding that the running rigging with sails is taking a really long time. I have so far got a fair way along with the setting up of two sails - The mainsail (furled), and the Main Topsail. In a previous post, I have said that I am only going to rig the sails as was thought to be set on the ship, when she sank - A total of four likely, but with the mainsail possibly furled.

I have decided on starting with the mainmast sails, as these are at the centre of the ship, and so, any additional rigging will impact on these being rigged if they came after. My thinking is to use the installation order of lower sails to upper, and then centre to foremast, and then mizzen. In this way, although I will be working with existing lines, the rope clutter at deck level should be more manageable as I work upwards. Similarly as I move from mainmast to foremast or mizzen, I should be working away from the already installed mainsails. I am not sure if this is the normal approach, but so far, it is working for me.

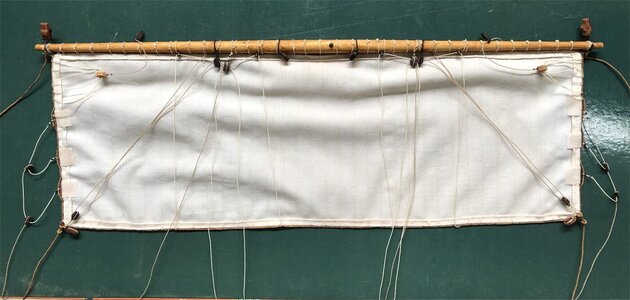
The next thing is that I have noticed, a lot of builders recommend placing as many ropes and rigging to their yards, before they are fitted to the mast. While this is good advice, the problem is, how long do you make your lines, before they are cut and reasonably accurate when installed. If they are short, it is really inconvenient to have to undertake rigging on the ship (although it is inevitable), and prone to upsetting existing rigging. If you get around this problem, by attaching lines to the yards, that are excessively long before installing, this is OK, but you use a huge amount of unwanted rope. Below is a picture of the mainsail with most of the rigging attached. Note that my mainsail is to be furled, and as such, it is only about 2/3 of the height it should be. If it's height is not reduced, there is too much fabric in the furl and it's hard to get tight enough.

IMG_8530a.jpg

As an example, I have rigged the bowlines for the mainsail and main topsail. I thought I had the length correct when I was pre-attaching them, but I soon realised that in practice, these lines, which run forward (near to the foot of the foremast), would require an additional two blocks with a hook, to be belayed to a deck-mounted eye. So, although the line was attached, the yard was secured around the mainmast, I still had to modify the rig, by adding two blocks and a pulley system, four times (for each bowline), while the lines were on the ship.

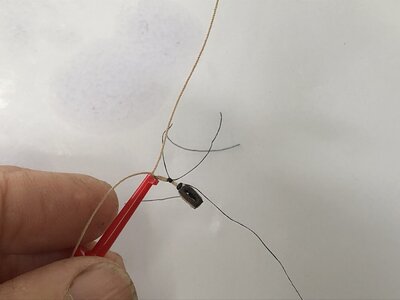
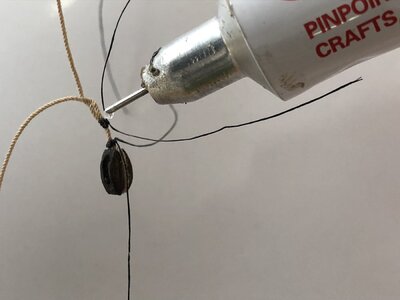
Attaching blocks or parts while the rigging is on the ship, needs to be done carefully, but it can be managed. I find the small, electronic spring-loaded hooks excellent for this. This picture below shows a line which is in mid air and suspended from the fore topmast yard, and requiring a block. The red hook holds the line and block in place while I wrap the enclosing line to be tight.

IMG_8835.JPG

I like to do every join of rigging which is under tension with two wrappings of securing line (as you can see above). Too many times I have had a rope or block pull out when a single wrapping has been used only. Once I have the two wrappings in place, I then add a small amount of G-S Hypo cement (which dries effectively clear and invisibly into the rope), to secure the joint, and then I trim off any excess and wrapping (see below).

IMG_8836.JPG

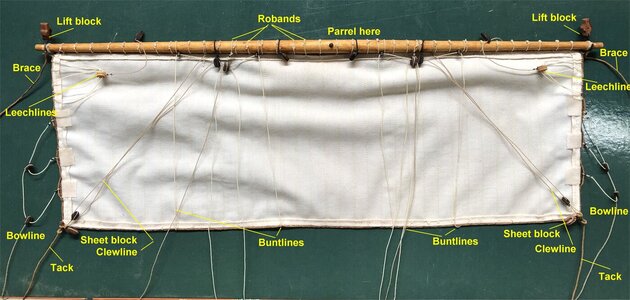
For each sail there is a significant list of lines required. These include:

- Robands (to secure the sail to the yard)
- Sheets
- Braces
- Tacks
- Clewlines
- Bowlines
- Buntlines (there may be a number of these per sail)
- Leechlines (or Martinets which may have a few attachment points)
- Halyards (for hoisting)
- Parrel lines (for tightening/loosening the parrels)
- Lifts

So, you can see it is quite a list. For most of these, they are also BOTH starboard and port, so the work has to be done twice for each sail. In the mainsail as shown above, I have added labels to the same sail and show below:

IMG_8530b.jpg

One other consideration too, is that for each of the rigging lines, the diameter of the various lines needs to be different, depending on the amount of strain the line may be under. Obviously, the greater the strain, the greater and stronger the line needs to be. There are a number of excellent spreadsheets for obtaining an estimate of the scaled size of the ropes required for the different applications. I have especially liked Masting and Rigging for Period Ship Models spreadsheet.

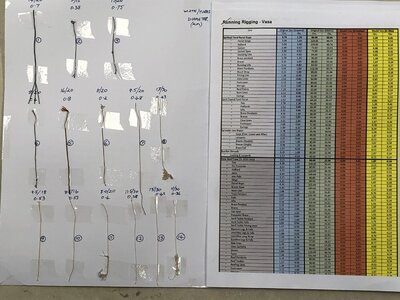
From this, and because I am making my own rope, I have created a 'book' of rope sizes for different applications on the ship. I have printed reference sheets which indicate the line location for each sail/yard/rigging, and then a relatively wide range of ropes with an index showing:

- The turns/distance, to calculate the rope size (diameter) in millimetres (Australia is metric)
- The calculated diameter
- A key to refer to the initial thread source I have used.

IMG_8837.JPG

From this, I simply look up the scaled diameter required in the reference list, and then select the rope, as required. There is a bit of an issue with colour, as I have tended to use light brown or creamy white, but the size is near correct. I am constantly amazed at the amount of rope needed, so the rope supply and my ropewalk are in frequent use.

Regards,

PeterG
 
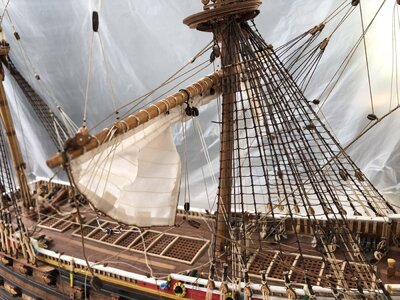
My previous post was getting a little long, so I have entered this second post describing the two sails I have (at this stage), nearly completed. Below are the state of the nearly rigged sails. These are not yet complete, but getting close.

IMG_8576.JPG

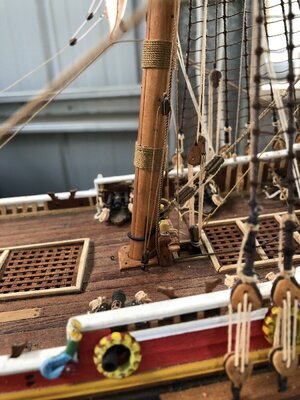
The picture above is of the mounted and furled mainsail. Having the sail furled but not set means as a finished model, you can still see the detail on the deck etc but all its running rigging is attached. The mainsail is the first to be installed. I learnt a lot about creating and handling the parrels for the yard to be mounted in this exercise.

IMG_8841.JPG

Here the second sail, the main topsail has also been added. A second photo, looking from the front is shown here:

IMG_8840.JPG

As I progress through the additional yards and sails, I will post some more photos.

Regards,

PeterG
 
My previous post was getting a little long, so I have entered this second post describing the two sails I have (at this stage), nearly completed. Below are the state of the nearly rigged sails. These are not yet complete, but getting close.

View attachment 281042

The picture above is of the mounted and furled mainsail. Having the sail furled but not set means as a finished model, you can still see the detail on the deck etc but all its running rigging is attached. The mainsail is the first to be installed. I learnt a lot about creating and handling the parrels for the yard to be mounted in this exercise.

View attachment 281046

Here the second sail, the main topsail has also been added. A second photo, looking from the front is shown here:

View attachment 281052

As I progress through the additional yards and sails, I will post some more photos.

Regards,

PeterG
Hello Peter. Your Vasa coming out brilliantly and an exceptional build log to go with it. I enjoy your outdoor pics. Where in Australia is your farm?
 
Sorry to take so long to upgrade my build log - A lot happening in my life at the moment, and although I have been putting some time in to the Vasa, I am finding that the running rigging with sails is taking a really long time. I have so far got a fair way along with the setting up of two sails - The mainsail (furled), and the Main Topsail. In a previous post, I have said that I am only going to rig the sails as was thought to be set on the ship, when she sank - A total of four likely, but with the mainsail possibly furled.

I have decided on starting with the mainmast sails, as these are at the centre of the ship, and so, any additional rigging will impact on these being rigged if they came after. My thinking is to use the installation order of lower sails to upper, and then centre to foremast, and then mizzen. In this way, although I will be working with existing lines, the rope clutter at deck level should be more manageable as I work upwards. Similarly as I move from mainmast to foremast or mizzen, I should be working away from the already installed mainsails. I am not sure if this is the normal approach, but so far, it is working for me.

The next thing is that I have noticed, a lot of builders recommend placing as many ropes and rigging to their yards, before they are fitted to the mast. While this is good advice, the problem is, how long do you make your lines, before they are cut and reasonably accurate when installed. If they are short, it is really inconvenient to have to undertake rigging on the ship (although it is inevitable), and prone to upsetting existing rigging. If you get around this problem, by attaching lines to the yards, that are excessively long before installing, this is OK, but you use a huge amount of unwanted rope. Below is a picture of the mainsail with most of the rigging attached. Note that my mainsail is to be furled, and as such, it is only about 2/3 of the height it should be. If it's height is not reduced, there is too much fabric in the furl and it's hard to get tight enough.

View attachment 281032

As an example, I have rigged the bowlines for the mainsail and main topsail. I thought I had the length correct when I was pre-attaching them, but I soon realised that in practice, these lines, which run forward (near to the foot of the foremast), would require an additional two blocks with a hook, to be belayed to a deck-mounted eye. So, although the line was attached, the yard was secured around the mainmast, I still had to modify the rig, by adding two blocks and a pulley system, four times (for each bowline), while the lines were on the ship.

Attaching blocks or parts while the rigging is on the ship, needs to be done carefully, but it can be managed. I find the small, electronic spring-loaded hooks excellent for this. This picture below shows a line which is in mid air and suspended from the fore topmast yard, and requiring a block. The red hook holds the line and block in place while I wrap the enclosing line to be tight.

View attachment 281030

I like to do every join of rigging which is under tension with two wrappings of securing line (as you can see above). Too many times I have had a rope or block pull out when a single wrapping has been used only. Once I have the two wrappings in place, I then add a small amount of G-S Hypo cement (which dries effectively clear and invisibly into the rope), to secure the joint, and then I trim off any excess and wrapping (see below).

View attachment 281033

For each sail there is a significant list of lines required. These include:

- Robands (to secure the sail to the yard)
- Sheets
- Braces
- Tacks
- Clewlines
- Bowlines
- Buntlines (there may be a number of these per sail)
- Leechlines (or Martinets which may have a few attachment points)
- Halyards (for hoisting)
- Parrel lines (for tightening/loosening the parrels)
- Lifts

So, you can see it is quite a list. For most of these, they are also BOTH starboard and port, so the work has to be done twice for each sail. In the mainsail as shown above, I have added labels to the same sail and show below:

View attachment 281036

One other consideration too, is that for each of the rigging lines, the diameter of the various lines needs to be different, depending on the amount of strain the line may be under. Obviously, the greater the strain, the greater and stronger the line needs to be. There are a number of excellent spreadsheets for obtaining an estimate of the scaled size of the ropes required for the different applications. I have especially liked Masting and Rigging for Period Ship Models spreadsheet.

From this, and because I am making my own rope, I have created a 'book' of rope sizes for different applications on the ship. I have printed reference sheets which indicate the line location for each sail/yard/rigging, and then a relatively wide range of ropes with an index showing:

- The turns/distance, to calculate the rope size (diameter) in millimetres (Australia is metric)
- The calculated diameter
- A key to refer to the initial thread source I have used.

View attachment 281041

From this, I simply look up the scaled diameter required in the reference list, and then select the rope, as required. There is a bit of an issue with colour, as I have tended to use light brown or creamy white, but the size is near correct. I am constantly amazed at the amount of rope needed, so the rope supply and my ropewalk are in frequent use.

Regards,

PeterG
Excellent reference here Peter! I shall use it. Your idea of reducing the size of sail for furled sail is just brilliant, thank you.
 
I am feeling very overwhelmed...
Yes, Paul I am too. Until recently, other than making rope, I have not allowed myself to think much about actual rigging. Now I am forced to start planning it and I'm hitting the wall in several aspects. So not one day at a time but one rigging line at a time. Billings is making me guess what size blocking to use over the majority of the ship. Or I am really missing a huge key somewhere???
 
Yes, Paul I am too. Until recently, other than making rope, I have not allowed myself to think much about actual rigging. Now I am forced to start planning it and I'm hitting the wall in several aspects. So not one day at a time but one rigging line at a time. Billings is making me guess what size blocking to use over the majority of the ship. Or I am really missing a huge key somewhere???
I looked at the Billings rigging plan (I believe you were the one to send it to me) and I agree that there is no direction regarding block sizes. For what it's worth the BB plans are encyclopedic compared to the DeAg plans :(.
 
Back
Top