-

Win a Free Custom Engraved Brass Coin!!!
As a way to introduce our brass coins to the community, we will raffle off a free coin during the month of August. Follow link ABOVE for instructions for entering.
-

PRE-ORDER SHIPS IN SCALE TODAY!
The beloved Ships in Scale Magazine is back and charting a new course for 2026!
Discover new skills, new techniques, and new inspirations in every issue.
NOTE THAT OUR FIRST ISSUE WILL BE JAN/FEB 2026
You are using an out of date browser. It may not display this or other websites correctly.
You should upgrade or use an alternative browser.
You should upgrade or use an alternative browser.
I had a great time with the Scientific Cutty Sark.
View attachment 363596
View attachment 363597
View attachment 363598
View attachment 363599
View attachment 363600

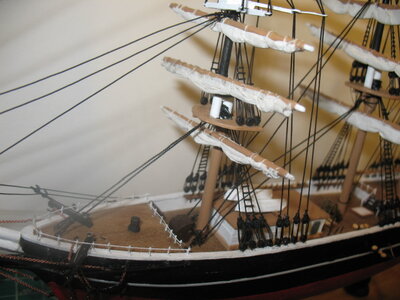
I did include furled sails on the Flying Cloud
Viejo, muy viejoAntiguo
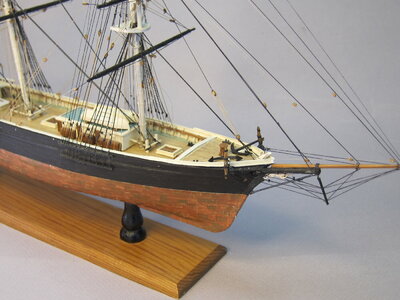
How did you do the copper plates? Did they come with the kit?I collected 6 Scientific Kits with great hopes - Sea Witch, the smaller USS Constitution, Charles W. Morgan, Cutty Sark, Sovereign of the Seas and Flying Cloud. Of these I only built Flying Cloud, which I' already posted here somewhere. It's very small, only about 14", 1/24" = 1' and my work with a clipper was not all it could have been, but I've enjoyed the result. I posted this somewhere here before.
View attachment 363595
Is that newsboy? I think that was a boy band my daughter used to listen to.boy,
Last edited:
I have several of their kits, still in storage and none came with copper, although it would have been appropriate to the model.How did you do the copper plates? Did they come with the kit?
Wow! What a result, even if not considering the small size of the model!I collected 6 Scientific Kits with great hopes - Sea Witch, the smaller USS Constitution, Charles W. Morgan, Cutty Sark, Sovereign of the Seas and Flying Cloud. Of these I only built Flying Cloud, which I' already posted here somewhere. It's very small, only about 14", 1/24" = 1' and my work with a clipper was not all it could have been, but I've enjoyed the result. I posted this somewhere here before.
View attachment 363595
- Joined
- Jun 17, 2021
- Messages
- 3,199
- Points
- 588

I kit bashed the Scientific Robt. E. Lee into a model of the "John W. Cannon." Cannon built the R. E. Lee (Three of the same name actually) and piloted her to victory over the Natchez. He built a rather larger and fancier dedicated Cruise ship named after himself in the 1870s. I found pictures on line and got copies from the Floyd Co. Indiana library, and info from the Steamboat museum nearby. I used a book called "the Steamboat Cyclopedia" (If I remember correctly) good for all things riverboat. My model took considerable modification (including a saloon deck foredeck extension over the bow as a promenade for passengers .That and a whole two tier Texas stateroom cabin deck with extensions fore and aft over the Saloon deck. I had the help of a friend with some sophisticated 3d modelling cad equipment, a laser cutter, and another friend with some really nice graphics programs to make colorized copies for the doors and window glass reflections as well as the flags and name plate graphics extrapolated from the black and white copies supplied in the kit and adapted for the "John W. Cannon". the hardest part were the spreaders between the stacks and gluing the whole assembly in place with five minute Epoxy There are pictures on showcase #12
Couldn't have done it without the computer equipment and considerable skills of friends.
Couldn't have done it without the computer equipment and considerable skills of friends.
Last edited:
You're a better man than I am, Gunga Din! My plan at this point is to go with the kit. But who knows, something may catch my eye in the meantime.I kit bashed the Scientific Robt. E. Lee into a model of the "John W. Cannon." Cannon built the R. E. Lee (Three of the same name actually) and piloted her to victory over the Natchez. He built a rather larger and fancier dedicated Cruise ship named after himself in the 1870s. I found pictures on line and got copies from the Floyd Co. Indiana library, and info from the Steamboat museum nearby. I used a book called "the Steamboat Cyclopedia" (If I remember correctly) good for all things riverboat. My model took considerable modification (including a saloon deck foredeck extension over the bow as a promenade for passengers .That and a whole two tier Texas stateroom cabin deck with extensions fore and aft over the Saloon deck. I had the help of a friend with some sophisticated 3d modelling cad equipment, a laser cutter, and another friend with some really nice graphics programs to make colorized copies for the doors and window glass reflections as well as the flags and name plate graphics extrapolated from the black and white copies supplied in the kit and adapted for the "John W. Cannon". the hardest part were the spreaders between the stacks and gluing the whole assembly in place with five minute Epoxy There are pictures on showcase #12
Couldn't have done it without the computer equipment and considerable skills of friends.
- Joined
- Jun 17, 2021
- Messages
- 3,199
- Points
- 588

Vic,
Impressive list of builds! Have fun with the Robert E. Lee. Post build log, if you are so moved. I'd like to see what you come up with/your approach to this model's many challenges. I realize it could take awhile to get to. My stash has more shelf life at this point than I do.
Impressive list of builds! Have fun with the Robert E. Lee. Post build log, if you are so moved. I'd like to see what you come up with/your approach to this model's many challenges. I realize it could take awhile to get to. My stash has more shelf life at this point than I do.
I think I still have an older Billings kit of the "Wasa" which has all the parts printed on the wood sheets, but you have to cut them out yourself !
I can't look to see if I still have it because all my kits are packed with the exception of the 2 currently at my bench.
I can't look to see if I still have it because all my kits are packed with the exception of the 2 currently at my bench.
- Joined
- Nov 28, 2020
- Messages
- 160
- Points
- 88

Parece que compráis los kits a peso....
Why do you think that? Because it has a solid hull?It seems that you buy the kits by weight....
- Joined
- Oct 25, 2022
- Messages
- 7
- Points
- 3

I got the Charles W. Morgan from a garage sale some years back. Built it a year or so ago and it got me hooked on this hobby. C.W. Morgan is a neat kit, you'll love it. I had to get the New Bedford Whaleboat to go with it. Someone else on this site built it recently too. Go Team!I collected 6 Scientific Kits with great hopes - Sea Witch, the smaller USS Constitution, Charles W. Morgan, Cutty Sark, Sovereign of the Seas and Flying Cloud. Of these I only built Flying Cloud, which I' already posted here somewhere. It's very small, only about 14", 1/24" = 1' and my work with a clipper was not all it could have been, but I've enjoyed the result. I posted this somewhere here before.
View attachment 363595
- Joined
- Mar 22, 2019
- Messages
- 46
- Points
- 78

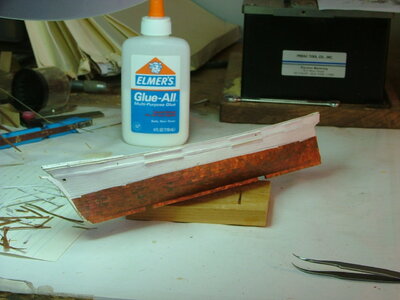
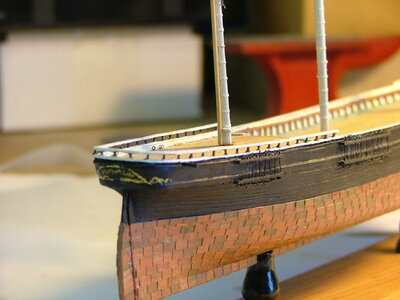
The copper plates were made by painting a piece of light weight paper with acrylic Iridescent Copper mixed unevenly with acrylic Green Oxide. Using a paper cutter I cut the painted paper into strips a little longer than the length of a single plate. Then these strips were glued together, with Elmer's, with a slight overlap. When dry, the sheet of glued up strips was turned 90 degrees and cut on the paper cutter into strips the height of a copper plate. These strips were then applied to the hull, again with Elmer's, in belts. In spite of using light weight paper, the final "plates" are still a little heavy for the scale (1/24" = 1' or 1/288) I learned this from Erik Ronnberg, who used this technique for applying copper plates on larger scale models, using actual copper foil and an appropriate adhesive.How did you do the copper plates? Did they come with the kit?


Got pictures?I got the Charles W. Morgan from a garage sale some years back. Built it a year or so ago and it got me hooked on this hobby. C.W. Morgan is a neat kit, you'll love it. I had to get the New Bedford Whaleboat to go with it. Someone else on this site built it recently too. Go Team!
Nice!The copper plates were made by painting a piece of light weight paper with acrylic Iridescent Copper mixed unevenly with acrylic Green Oxide. Using a paper cutter I cut the painted paper into strips a little longer than the length of a single plate. Then these strips were glued together, with Elmer's, with a slight overlap. When dry, the sheet of glued up strips was turned 90 degrees and cut on the paper cutter into strips the height of a copper plate. These strips were then applied to the hull, again with Elmer's, in belts. In spite of using light weight paper, the final "plates" are still a little heavy for the scale (1/24" = 1' or 1/288) I learned this from Erik Ronnberg, who used this technique for applying copper plates on larger scale models, using actual copper foil and an appropriate adhesive.
View attachment 364001
View attachment 364002
View attachment 364003
How did you cut the strakes for the hull?The copper plates were made by painting a piece of light weight paper with acrylic Iridescent Copper mixed unevenly with acrylic Green Oxide. Using a paper cutter I cut the painted paper into strips a little longer than the length of a single plate. Then these strips were glued together, with Elmer's, with a slight overlap. When dry, the sheet of glued up strips was turned 90 degrees and cut on the paper cutter into strips the height of a copper plate. These strips were then applied to the hull, again with Elmer's, in belts. In spite of using light weight paper, the final "plates" are still a little heavy for the scale (1/24" = 1' or 1/288) I learned this from Erik Ronnberg, who used this technique for applying copper plates on larger scale models, using actual copper foil and an appropriate adhesive.
View attachment 364001
View attachment 364002
View attachment 364003
- Joined
- Jun 17, 2021
- Messages
- 3,199
- Points
- 588

Alex, Wonderful model! I love it , and the "coppering" technique. Thanks for sharing.
I did an old Model Shipways Young America that I got as a Christmas present in1955 in the old yellow box. I carted it around for 50 years, started it and finished it "dockyard" style ten years after that. The scale is more like 1:192-1/16" to the foot. the hull bottom is painted. I didn't want to spend another year rigging it, just to obscure all the detail on deck, so I declared victory and moved on . The case I wanted to look like it was made in the 1850s, like the ship. Pictures are in the same showcase #12 as the steamboat et al.
I Have a "Chasseur" Baltimore Clipper based on Pride II plans from Model Ship Ways. The copper bottom is adhesive backed copper adhered to mahogany strip wood , glued down to the hull with CA and the edges of the "plates" scribed in with a small chisel and "rivets" with a ponce wheel. Then wiped down with blackening solution and rubbed lightly with 6 aught steel wool. In the same show case #12, I have a solid hull "Harriet Lane" modeled as she might have appeared Jan1 1863 when she was captured at Galveston Bay. The "coppered" bottom is mahogany veneer strips " pickled" with copper paint and applied as above with the "Chasseur". (no "rivets") "Pickling" Is applying paint to a raw wood surface, then wiping it off while still wet, leaving color imbedded in the grain for a subtle effect.
Last edited:


