- Joined
- Jan 9, 2020
- Messages
- 10,706
- Points
- 938

@Peter Voogt I hope so Peter!

 |
The beloved Ships in Scale Magazine is back and charting a new course for 2026! Discover new skills, new techniques, and new inspirations in every issue. NOTE THAT OUR NEXT ISSUE WILL BE MARCH/APRIL 2026 |
|
 |
As a way to introduce our brass coins to the community, we will raffle off a free coin during the month of August. Follow link ABOVE for instructions for entering. |
|
Is she the Admiral or the Warden?Hello Everyone
Well it was on with the bracing of the bulwarks on the Port Side.
View attachment 205491
Inner bracing completed and sanded even. The deck is not dirty - it's just sawdust after the sanding! (The pictures are taken hot of the press!)
View attachment 205492
The excess material is cut away from the bulwarks so that we can see a rough line emerging. At this stage, I am not finishing this as the railing first has to go on. Thereafter everything will be finely finished on both sides.
View attachment 205494
Then it was on to the railing on the forecastle. As I have no powertools, each little spar has to be cut with an X-Acto knife, painted and glued into position. Then out came the file and the tops are filed even. Inevitably in this process, there are a few who do not make it!
View attachment 205496
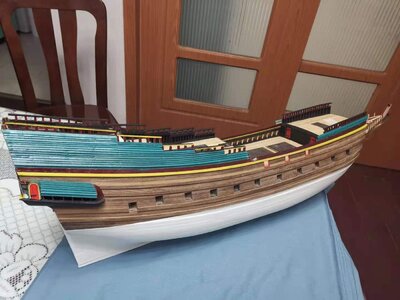
While waiting for the glue to dry she enjoyed a rare outing in the afternoon "sun" from the balcony of the Nantong Penitentiary!
View attachment 205497
When the Admiral inspected the results, it was summarily dismissed! So, there is only one way of doing this. Yep - do over!
Effort Number Two:
View attachment 205498
View attachment 205499
This is a very difficult one to call as the little spars not only run along an incline towards the bow, but also round a corner!
View attachment 205500
Overview. I am happy with this effort, but will now wait in anticipation for the Admiral to come home.
Stay well and happy everyone - until next time!
Heinrich

You'd better be!Whatever the Admiral/Warden says I'm in 100% agreement with
 And she is an engineer -I'd better listen!
Yes. I noticed the bars of the penitentiary.@Vfordyce Hi Victator! She is the Admiral an all-encompassing term which means she is the warden as well!
I know about those...lol@Dean62 Thank you Dean. I have just finished with the top railing on both sides after an all-nighter!

Hello Everyone
Well it was on with the bracing of the bulwarks on the Port Side.
View attachment 205491
Inner bracing completed and sanded even. The deck is not dirty - it's just sawdust after the sanding! (The pictures are taken hot of the press!
View attachment 205492
The excess material is cut away from the bulwarks so that we can see a rough line emerging. At this stage, I am not finishing this as the railing first has to go on. Thereafter everything will be finely finished on both sides.
View attachment 205494
Then it was on to the railing on the forecastle. As I have no powertools, each little spar has to be cut with an X-Acto knife, painted and glued into position. Then out came the file and the tops are filed even. Inevitably in this process, there are a few who do not make it!
View attachment 205496
While waiting for the glue to dry she enjoyed a rare outing in the afternoon "sun" from the balcony of the Nantong Penitentiary
View attachment 205497
When the Admiral inspected the results, it was summarily dismissed! So, there is only one way of doing this. Yep - do over!
Effort Number Two:
View attachment 205498
View attachment 205499
This is a very difficult one to call as the little spars not only run along an incline towards the bow, but also round a corner!
View attachment 205500
Overview. I am happy with this effort, but will now wait in anticipation for the Admiral to come home.
Stay well and happy everyone - until next time!
Heinrich
") After the strips were glued in place and the superglue had properly settled, I would then use a small file to file the tops even before gluing on the top railing. For the railings, I used PVA as per normal, properly weighted down with plenty of drying time.
After the strips were glued in place and the superglue had properly settled, I would then use a small file to file the tops even before gluing on the top railing. For the railings, I used PVA as per normal, properly weighted down with plenty of drying time.


Wow, wow. That little ship is taking on a personality of it’s own. Excellent work.Hello Everyone
As mentioned earlier this morning, the top railings have now been completed after an all-nighter.
View attachment 206318
Looking at this picture, I realised that one can't see very much, but before taking some "nicer" and clearer pictures (by my mediocre photographic standards), it was first time to do something that I was not looking forward to ...
View attachment 206319
... cut off these terrible-looking overhangs.
View attachment 206320
The Bluenose's "Backdrop" sheeting doesn't even come close to providing an adequate background for the Haarlem.
View attachment 206322
After the bulwarks had been trimmed level with the stern, some serious touching-up is required. This is because of the overlapping, "Clinker-style" laying of the planks that does not allow for a straight-line cut. This is no big deal as the final painting will be air-brushed in any case. Of course it remains to be seen whether my Chinese paint supplier will be able to supply me with the actual paint (not of the spray-can variety).
View attachment 206323
The starboard side did not seem to have taken such a severe beating.
View attachment 206324
The cleaned-up bow section (minus overhangs) is clearly visible here, but will require a substantial amount of finishing work before I'm happy.
That is all for now - tomorrow is another day with another challenge. Thank you all so much for looking and for following and please feel free to comment - criticism included!
Kind regards - Heinrich