-

Win a Free Custom Engraved Brass Coin!!!
As a way to introduce our brass coins to the community, we will raffle off a free coin during the month of August. Follow link ABOVE for instructions for entering.
-

PRE-ORDER SHIPS IN SCALE TODAY!
The beloved Ships in Scale Magazine is back and charting a new course for 2026!
Discover new skills, new techniques, and new inspirations in every issue.
NOTE THAT OUR FIRST ISSUE WILL BE JAN/FEB 2026
You are using an out of date browser. It may not display this or other websites correctly.
You should upgrade or use an alternative browser.
You should upgrade or use an alternative browser.
VOC SPIEGELRETOURSCHIP BATAVIA 1628 - KOLDERSTOK 1:72
- Thread starter Heinrich
- Start date
- Watchers 64
-
- Tags
- batavia kolderstok
Heinrich ship is coming beautiful and that planking issue is easy to be solved. And whatever imperfection you see now as a consequence of that repair it will disappear in the whole view of a finished ship like that one with many details.
And, in case an eagle eye friend spot the repair, you answer "it was due to a cannon ball impact on her last battle"
Cheers and HAPPY BIRTHDAY
DANIEL
And, in case an eagle eye friend spot the repair, you answer "it was due to a cannon ball impact on her last battle"
Cheers and HAPPY BIRTHDAY
DANIEL
Now, here goes what I do to increase the size of holes in a job like yours.
I do exactly what you did increasing slowly the bit diameter. But after I have a hole of around 1 mm, then I fit a round file of a diameter that will fit my job. As they all go from a very thin diameter to the highest at the middle I turn it with my fingers at the same time I push until the hole is as I want.
If you have wood behind the planking at the place to drill the holes. Then, after doing a guiding hole, as you did, I use one of those "pointed cone like dremel stones" (don't know the name) used for sanding, to increase the diameter of the hole.
I try to avoid to use, till the end, the drill bits. You know why ??? ... Because I went through your same issue. Bigger the drill bit, higher are the chances it will happen your issue if at that section the plank is just not glued to the upper and lower plank. Too much tension.
Cheers
Daniel
- Joined
- Jan 9, 2020
- Messages
- 10,566
- Points
- 938

Thank you Stephan! Much appreciated my friend!
Happy Birthday!
- Joined
- Jan 9, 2020
- Messages
- 10,566
- Points
- 938

@Dematosdg Hi Daniel Good to see you in action here again!  Thank you very much for the birthday wishes and for the excellent advice. You are right - most of the time I have built in quite a robust manner because the ship is so strong - but on that one particular spot I obviously over-estimated her strength. For the remaining holes, and for the repair I will be more careful and take more time!
 Thank you very much for the birthday wishes and for the excellent advice. You are right - most of the time I have built in quite a robust manner because the ship is so strong - but on that one particular spot I obviously over-estimated her strength. For the remaining holes, and for the repair I will be more careful and take more time!
 Happy Birthday Heinrich!
Happy Birthday, Heinrich! Many more years to come! 

Happy birthday Heinrich!
Happy birthday!!
Gelukkige verjaardag, Heinrich! Many more to come.
Happy birthday Heinrich.
From a Dutch in a great build-log of a beautiful Dutch ship.
Regards, Peter
From a Dutch in a great build-log of a beautiful Dutch ship.
Regards, Peter
- Joined
- Jan 9, 2020
- Messages
- 10,566
- Points
- 938

@Kolderstok
@zoly99sask
@Gennaro
@Peter Voogt
Thank you so much for all the wishes gentlemen. I really appreciate this and it makes the day all the more special!
@zoly99sask
@Gennaro
@Peter Voogt
Thank you so much for all the wishes gentlemen. I really appreciate this and it makes the day all the more special!

- Joined
- Jan 9, 2020
- Messages
- 10,566
- Points
- 938

Hello Everyone
Today was spent trying to rescue my fiasco from the previous post. You will recall that in the process of installing the scuppers on the starboard side, I very successfully managed to destroy my planking between two of the wales.
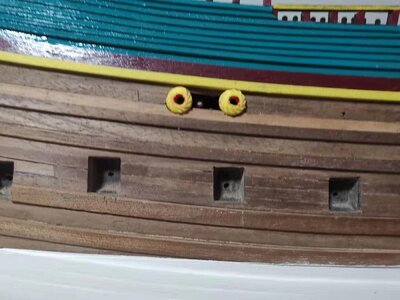
Fiasco revisited
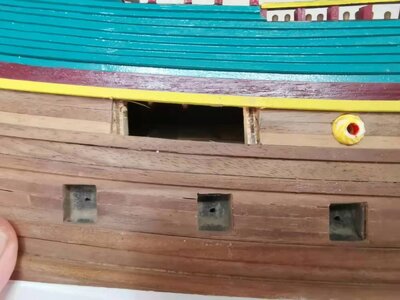
The first step was to cut out the whole affected area trying to do it in such a way that I would end up on a bulkhead on either side. That way I would have something substantial to glue the replacement part to.
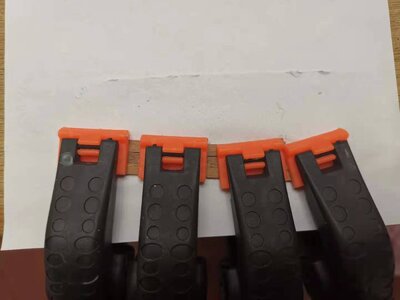
Then it was a case of carefully bending and gluing the strips to each other taking care to maintain the curvature of the area between the wales.
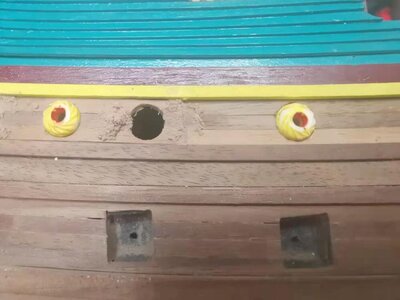
Work in progress. As you can see the technique of PVA mixed with sanding residue to fill any potential gaps was on standby.
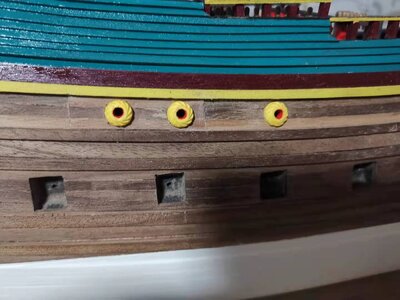
For now, I'm reasonably satisfied. It's not perfect, but it is what it is. The colour difference between the two sections is still prominent, but that is because of the recent sanding.
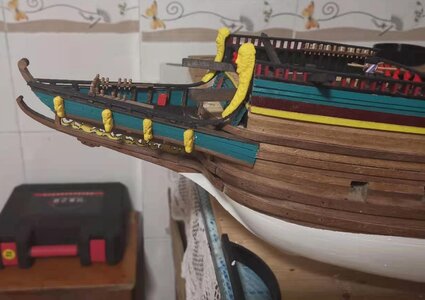
Further progress included placing some more ornaments on the galleon and treating the two grumpy old men with was as per @dockattner Paul's advice.
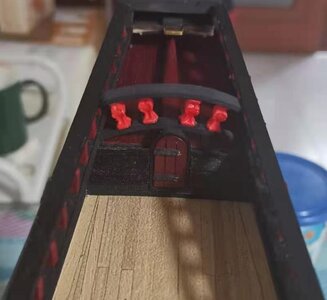
The last interior railing had been placed.
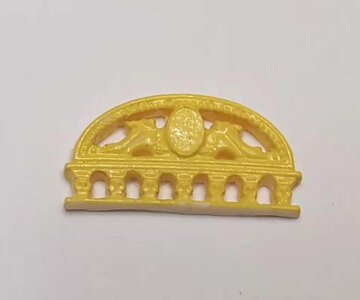
The first piece of the stern ornamentation has been painted ...
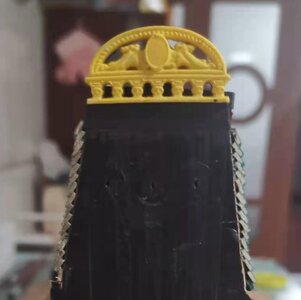
and placed in its rightful position atop the stern. Please don't pay attention to the condition of the rest of the stern - it all still needs to be finished.
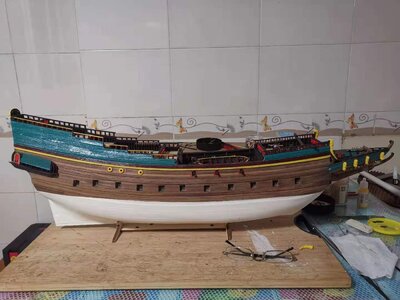
And four days short of one year since the build has commenced, this is where we are tonight.
Thank you all for following, looking, commenting and for your overall support throughout the last year. It has been a blast!
Kind regards - Heinrich
Today was spent trying to rescue my fiasco from the previous post. You will recall that in the process of installing the scuppers on the starboard side, I very successfully managed to destroy my planking between two of the wales.

Fiasco revisited

The first step was to cut out the whole affected area trying to do it in such a way that I would end up on a bulkhead on either side. That way I would have something substantial to glue the replacement part to.

Then it was a case of carefully bending and gluing the strips to each other taking care to maintain the curvature of the area between the wales.

Work in progress. As you can see the technique of PVA mixed with sanding residue to fill any potential gaps was on standby.

For now, I'm reasonably satisfied. It's not perfect, but it is what it is. The colour difference between the two sections is still prominent, but that is because of the recent sanding.

Further progress included placing some more ornaments on the galleon and treating the two grumpy old men with was as per @dockattner Paul's advice.

The last interior railing had been placed.

The first piece of the stern ornamentation has been painted ...

and placed in its rightful position atop the stern. Please don't pay attention to the condition of the rest of the stern - it all still needs to be finished.

And four days short of one year since the build has commenced, this is where we are tonight.
Thank you all for following, looking, commenting and for your overall support throughout the last year. It has been a blast!
Kind regards - Heinrich
Brilliant Heinrich! A small change makes a world of difference! And nice recovery on the hull snafu...
- Joined
- Jan 9, 2020
- Messages
- 10,566
- Points
- 938

@dockattner Thank you Paul! Your advice did the trick -I also think it looks much better! 

Maybe one of your ancesters was a ships carpenter... 
Looking great Heinrich! With every addition, it looks that much better!Hello Everyone
Today was spent trying to rescue my fiasco from the previous post. You will recall that in the process of installing the scuppers on the starboard side, I very successfully managed to destroy my planking between two of the wales.
View attachment 215923
Fiasco revisited
View attachment 215927
The first step was to cut out the whole affected area trying to do it in such a way that I would end up on a bulkhead on either side. That way I would have something substantial to glue the replacement part to.
View attachment 215928
Then it was a case of carefully bending and gluing the strips to each other taking care to maintain the curvature of the area between the wales.
View attachment 215929
Work in progress. As you can see the technique of PVA mixed with sanding residue to fill any potential gaps was on standby.
View attachment 215934
For now, I'm reasonably satisfied. It's not perfect, but it is what it is. The colour difference between the two sections is still prominent, but that is because of the recent sanding.
View attachment 215935
Further progress included placing some more ornaments on the galleon and treating the two grumpy old men with was as per @dockattner Paul's advice.
View attachment 215940
The last interior railing had been placed.
View attachment 215941
The first piece of the stern ornamentation has been painted ...
View attachment 215945
and placed in its rightful position atop the stern. Please don't pay attention to the condition of the rest of the stern - it all still needs to be finished.
View attachment 215946
And four days short of one year since the build has commenced, this is where we are tonight.
Thank you all for following, looking, commenting and for your overall support throughout the last year. It has been a blast!
Kind regards - Heinrich
If I could make a suggestion, I would recommend on the yellow pieces, that you mix a little bit of white to the yellow paint, and then dry brush those pieces with it. That will highlight them very nicely.
Last edited:


