-

Win a Free Custom Engraved Brass Coin!!!
As a way to introduce our brass coins to the community, we will raffle off a free coin during the month of August. Follow link ABOVE for instructions for entering.
-

PRE-ORDER SHIPS IN SCALE TODAY!
The beloved Ships in Scale Magazine is back and charting a new course for 2026!
Discover new skills, new techniques, and new inspirations in every issue.
NOTE THAT OUR FIRST ISSUE WILL BE JAN/FEB 2026
You are using an out of date browser. It may not display this or other websites correctly.
You should upgrade or use an alternative browser.
You should upgrade or use an alternative browser.
Willem Barentsz by Kolderstok AD 1596
- Thread starter Pathfinder65
- Start date
- Watchers 34
Sorry I should have been more specific, I'm planking up following your planking notes for the WB #1, I'm currently working on the Port Side.Whoaaa!!! I misunderstood. You are talking about the top wale - I did the wale immediately before laying the next plank.
Good morning Jan. This is looking good. After reading yours and Heinrich logs Dutch ships are permanently off my agenda. These are seriously technical and difficult models to build- there would not be enough swear jars in my house@Heinrich
I think I've got the routine down. Soak the plank, bend, pin and clamp, to form the plank. Then wet the plank, glue, pin and clamp.rolleyes:Sit and watch the glue dry
)
View attachment 319839
- Joined
- Jan 9, 2020
- Messages
- 10,566
- Points
- 938

That they are, but oh so satisfying when done right!Good morning Jan. This is looking good. After reading yours and Heinrich logs Dutch ships are permanently off my agenda. These are seriously technical and difficult models to build- there would not be enough swear jars in my house. Well done Jan. Cheers Grant
Good morning Heinrich...I wouldn’t know- however True story, I presume, as when I do get some of those technical things even reasonable on my Victory it is so satisfying.That they are, but oh so satisfying when done right!
 Cheers Grant.
@Heinrich. Just to ease your mind the wale correction isn't much of a problem.
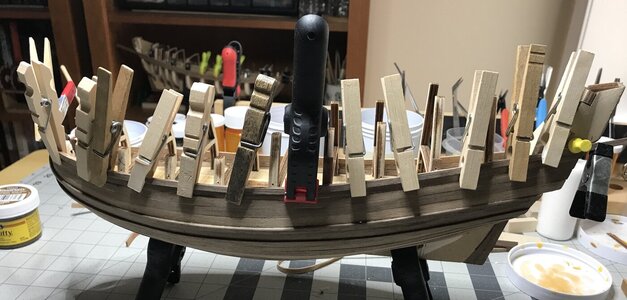
Adding the third wale to the outside of the second 4mm plank.
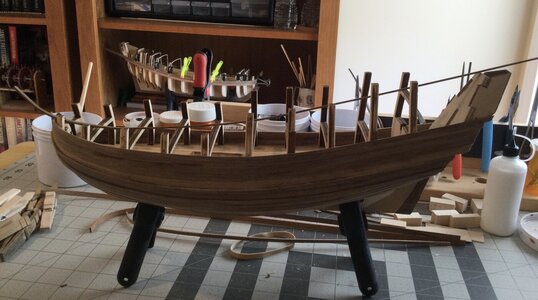
The plank removed, cleaned of glue and ready to be placed on the first 4mm plank. My thanks to Heinrich for pointing out the planking error in his build notes.

Adding the third wale to the outside of the second 4mm plank.

The plank removed, cleaned of glue and ready to be placed on the first 4mm plank. My thanks to Heinrich for pointing out the planking error in his build notes.
- Joined
- Jan 9, 2020
- Messages
- 10,566
- Points
- 938

Jan I am so relieved. Once more- a 1000 Apologies!@Heinrich. Just to ease your mind the wale correction isn't much of a problem.
View attachment 320307
Adding the third wale to the outside of the second 4mm plank.
View attachment 320308
The plank removed, cleaned of glue and ready to be placed on the first 4mm plank. My thanks to Heinrich for pointing out the planking error in his build notes.

Good evening Jan. Starting to look like a ship. I love it when planking progresses. Really looking good your WB is. Cheers Grant.@Heinrich. Just to ease your mind the wale correction isn't much of a problem.
View attachment 320307
Adding the third wale to the outside of the second 4mm plank.
View attachment 320308
The plank removed, cleaned of glue and ready to be placed on the first 4mm plank. My thanks to Heinrich for pointing out the planking error in his build notes.
Indeed, as I add planks upward the shape of the ship is appearing. I'm looking forward to seeing the same shape as Heinrich's WB #1 and now his WB #2. I don't think there is anyway one can hurry this build. I had time this morning to run several errands while waiting for the glue to set on the 3rd wale.Good evening Jan. Starting to look like a ship. I love it when planking progresses. Really looking good your WB is. Cheers Grant.
Five so far. Enough so I can start on the garboard and work my way up.Excellent excellent excellent, WOW! How many 6mm planks below the lower wales have you now glued Jan?
Necessity, the mother of invention. Lookin’ good JanTodays progress. Setting wale #3:
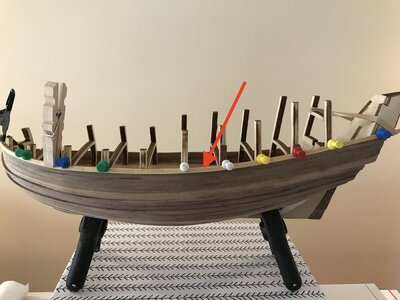
I tried a little innovation. To get the wale positioned to follow the curve of the first 4mm plank I used a piece of scrap as a template. (Red Arrow)
View attachment 320400
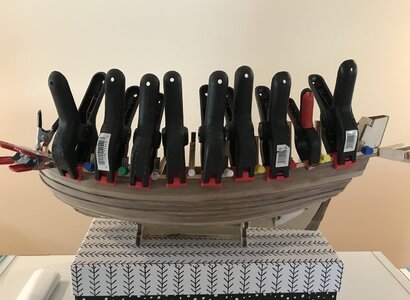
The wale was snubbed up against the "template", glued and clamped.
View attachment 320401
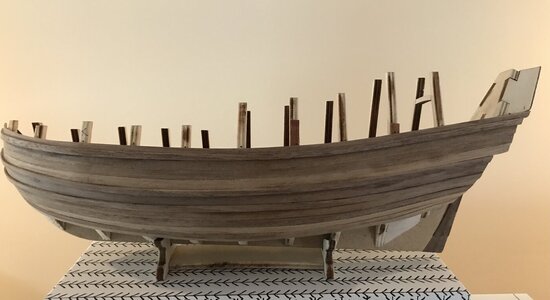
The final result.
View attachment 320402
- Joined
- Jan 9, 2020
- Messages
- 10,566
- Points
- 938

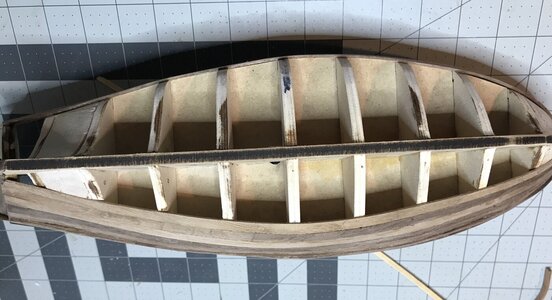
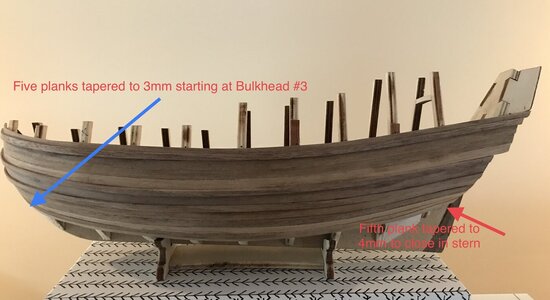
You must please post a pic of that Jan. I would just like to see what line the planking follows. I may have a tip for you, but I need to see how the planks run first. The best pic is actually one taken with the model upside down.
- Joined
- Jan 9, 2020
- Messages
- 10,566
- Points
- 938

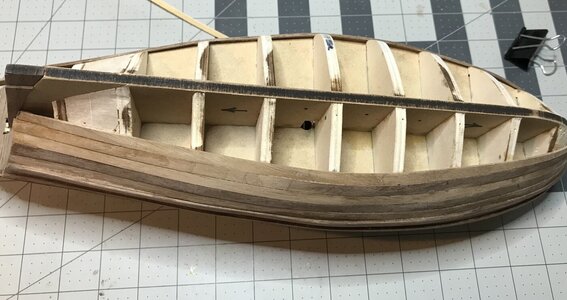
Thank you Jan. This is exactly how I planked WB #1, - and is exactly as per the instruction manual and my description.
However...
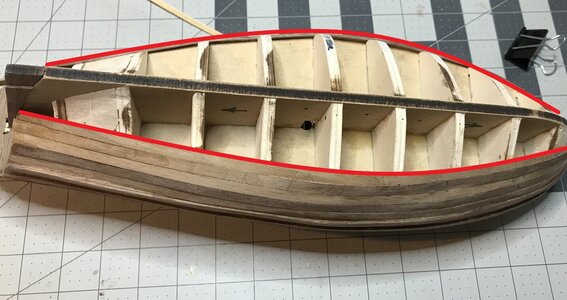
This half-moon shape (which is exactly like mine was on WB #1) will cause you a lot of head scratching later on to close the hull - believe me, I know. Piet being the genius that he is, has come up with a solution whereby we can greatly reduce that curve and make it much straighter. Unfortunately, you did this before I got to offer you the amended advice. If I may make a suggestion and you are willing to wait a day or so for me before you continue, I can share my experience with you in practice. It entails the use of an insert much earlier and tapering the plank at both ends, but I first want to cut a plank like that and see how it works in practice.
However...

This half-moon shape (which is exactly like mine was on WB #1) will cause you a lot of head scratching later on to close the hull - believe me, I know. Piet being the genius that he is, has come up with a solution whereby we can greatly reduce that curve and make it much straighter. Unfortunately, you did this before I got to offer you the amended advice. If I may make a suggestion and you are willing to wait a day or so for me before you continue, I can share my experience with you in practice. It entails the use of an insert much earlier and tapering the plank at both ends, but I first want to cut a plank like that and see how it works in practice.
OK. I'll hold off.Thank you Jan. This is exactly how I planked WB #1, - and is exactly as per the instruction manual and my description.
However...
View attachment 320408
This half-moon shape (which is exactly like mine was on WB #1) will cause you a lot of head scratching later on to close the hull - believe me, I know. Piet being the genius that he is, has come up with a solution whereby we can greatly reduce that curve and make it much straighter. Unfortunately, you did this before I got to offer you the amended advice. If I may make a suggestion and you are willing to wait a day or so for me before you continue, I can share my experience with you in practice. It entails the use of an insert much earlier and tapering the plank at both ends, but I first want to cut a plank like that and see how it works in practice.
- Joined
- Jan 9, 2020
- Messages
- 10,566
- Points
- 938

Jan, You have such good momentum that I do not want to keep you up.
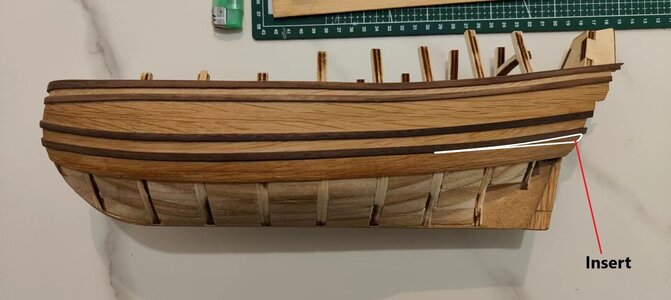
I am not sure how many planks it takes to close the stern, but as Piet has done, I have started my planking below the wales with an insert that ran from the third last bulkhead (Bulkhead #8) all the way to the stern. That was followed by a normal strake - tapered to 3mm at the bow and untapered at the back. The next strake I lay will be tapered to 2mm at the bow AND 2mm at the stern. Once I have done that, I will calculate how the rest of the planks go, but that will already have the effect of straightening that half-moon shape considerably. You can already see how much straighter this line is on the picture by starting off with the insert.
However, I want to repeat: On WB #1 I planked it exactly as you have done up to this point, so it is doable. The choice is yours.

