Willem Barentsz by Kolderstok AD 1596

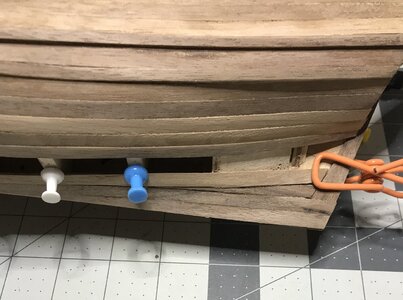
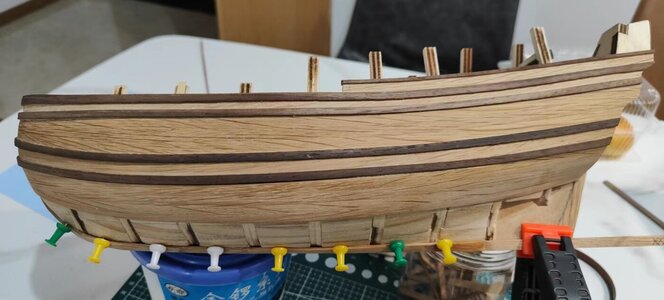
Jan, my planking guideline is just what I did on WB #1 - it is by no means gospel. I have changed it considerably above the wales on WB #2 and believe that I have "improved" it considerably. I have now closed the stern on the Port side (that has taken me four days to lay 4 planks) and have three more planks to go on the starboard side. So far, I have followed my own guideline below the wales with the exception of the insert (which I still have to incorporate on the SB side). You will also note that the two inserts below the wales have the result of straightening the planking line.

About the number of projects, you have going, it is difficult for me to comment as each person is different. All I can say is that I know the WB so well that I can close my eyes and take myself for a virtual tour of the ship. The fact that I understand the layout of the ship so well has helped me immeasurably, but then, this is a life-long dedication to one ship which I am sure is not healthy either.
 
@Heinrich, @dockattner, @RDN1954

My nature has always been to multitask. My interests are varied and I've always had several projects going at the same time. Sometimes project overlap causes a misstep here and there but mostly I just hum along. Ship building is a new realm for me and I'm fascinated by the hobby. I'm blown away by Pauls VASA build (as a first build) and also Heinrich's Sampan - WB#1 - Batavia/Haarlem and now WB#2. To be honest, my ship building is in the class of -- wow can I do that? I can understand that one project from start to finish is the way to go, but as my logo says "So much hobby and so little time":D
 
Actually, from an outsider's point of view, I have to agree. When I read your build logs I get confused about what ship you're posting about and what you were doing when you posted last. I'm simply too 'linear' to keep track...
Good morning Jan. I am always tempted to do 2 ships at the same time. Unlike Paul i am like a role of thread which came loose and went haywire....what is linear . It would be cool when you get bored with rigging one to go and plank another. Only reason why I don’t is I would not finish any:rolleyes:.

Watching yours and Heinrich WB makes me realize the difficulty level of these WB’s - above my pay grade for sure. Cheers Grant
 
The problem for me is that I'm not smart enough to remember what I was doing on project A once I get involved with project B. I can barely remember what I learned yesterday about rigging and find I am constantly returning to my research just to be reminded of how I decided to do something... Having two models going at the same time would equate to accomplishing nothing. Anyway, we all have our preferences...
 
Good morning Jan. I am always tempted to do 2 ships at the same time. Unlike Paul i am like a role of thread which came loose and went haywire....what is linear . It would be cool when you get bored with rigging one to go and plank another. Only reason why I don’t is I would not finish any:rolleyes:.

Watching yours and Heinrich WB makes me realize the difficulty level of these WB’s - above my pay grade for sure. Cheers Grant
I like to stay busy. The WB is a challenge and quite a step up for my modeling abilities (As evidenced by the number of Do-Overs and the coin level in the Bad Word jar). My other two builds (the Chaperon and Duyfken are fill-ins while strakes are drying or being glued on the WB. Other distractions are reading and my RR layout. Then of course there are the seasonal distractions. SOS has also become my morning go to while having that first cup of coffee, its wonderful distraction. So many incredible builds to follow, an endless source of information and a great bunch of guys to chat with.
 
I like to stay busy. The WB is a challenge and quite a step up for my modeling abilities (As evidenced by the number of Do-Overs and the coin level in the Bad Word jar). My other two builds (the Chaperon and Duyfken are fill-ins while strakes are drying or being glued on the WB. Other distractions are reading and my RR layout. Then of course there are the seasonal distractions. SOS has also become my morning go to while having that first cup of coffee, its wonderful distraction. So many incredible builds to follow, an endless source of information and a great bunch of guys to chat with.
I’d probably get a lot more done on my build if I would quit scouring the internet. Not only does it take time away from my build time but I frequently find another kit I just have to have. :) When I’ll find the time to build, who knows, but I sure have a stock to choose from.
Like they say “I’m spending my kids inheritance”
Building more than one at a time doesn’t work for me. I learned that many years ago building RC aircraft. Had a room full of unfinished planes.
 
(Ik hoop dat iemand dit kan vertalen, groet Piet)

Bij het achterschip gaat het beplanken enigszins anders als bij het voorschip. Hier gebruiken we i.p.v. de zogenaamde 'verloren' gangen of 'verjongde' gangen de zogenaamde 'instekers' dit zijn (vaak) korte taps toe lopende latjes die tussen de gangen worden aangebracht wanneer de natuurlijke verloop van de lat niet meer ongeforceerd naast de voorgaande gang kan worden gelegd. (dus

1e foto
Hierboven is te zien dat de laatste aangebrachte gang niet netjes tegen de voorlaatste past, tenzij je deze geforceerd gaat dwingen, hetgeen dus niet de bedoeling is. In de ontstane opening gaan we nu een insteker inlassen.

2e foto
Leg een globaal opmaat gesneden lat in de opening en zet een potlood puntje aan de achterkant op het punt waar deze de volgende lat raakt.

3e foto
Vervolgens zet je aan de voorkant ook een potlood puntje op het punt waar de twee latten elkaar raken waar de insteker tussen moet komen.

4e foto
Met een stalen liniaal verbind je nu de 2 potlood puntjes en snij de lat langs de liniaal zorgvuldig door.

5e foto
De langwerpige driehoekvormige lat heeft nu de perfecte maat en kan nu worden vast gelijmd aan de voorgaande (laatste lat) op je model.

6e foto
de lat die eerst open stond leg je nu ongeforceerd tegen de insteker, past netjes en kan nu dus vast gelijmd worden.
Zoals te zien op de foto heb je vaak meerdere instekers nodig vanwege de vorm van het achterschip, de latten hebben met dit systeem allemaal de zelfde breedte tegen de achtersteven, wat natuurlijk ten goede komt aan het uiterlijk van je model. Een enkele keer kan het ook nodig zijn bij de ronding van het achterschip iets verder naar boven dus om ook enkele latten te verjongen net als bij de boeg.

Dit alles lijkt misschien wat bewerkelijk, maar dat valt in de praktijk reuze me en voorkomt lelijke kiertjes en overmatig gebruik van vulmiddelen zoals plamuur .ed. Neem de tijd voor het beplanken van je model....
IMG_7617_bewerkt-1.JPG
IMG_7618_bewerkt-1.JPG
IMG_7619_bewerkt-1.JPG
IMG_7620_bewerkt-1.JPG
IMG_7621_bewerkt-1.JPG
IMG_7622_bewerkt-1.JPG
pietsan, 27 dec 2019
#5
 
At the stern, the planking is slightly different than at the front. Here, instead of the so-called 'lost' courses or 'rejuvenated' courses, we use the so-called 'inserts', which are (often) short tapering slats that are applied between the courses when the natural course of the bar is no longer unforced next to the previous course. can be laid. (So

1st picture
Above you can see that the last applied corridor does not fit neatly against the penultimate, unless you are going to force it, which is not the intention. We are now going to insert an insert into the resulting opening.

2nd picture
Place a roughly cut lath in the opening and put a pencil point on the back at the point where it meets the next lath.

3rd photo
Then you also put a pencil point on the front at the point where the two slats meet where the insert has to come between.

4th photo
Now connect the 2 pencil points with a steel ruler and carefully cut the bar along the ruler.

5th photo
The elongated triangular slat is now the perfect size and can now be glued to the previous (last slat) on your model.

6th photo
you now place the slat that was open unforced against the insert, fits neatly and can now be glued.
As can be seen in the photo you often need several inserts because of the shape of the stern, the slats with this system all have the same width against the stern, which of course benefits the appearance of your model. Occasionally it may also be necessary at the curve of the stern a little further up, so to rejuvenate a few battens as with the bow.

All this may seem a bit laborious, but in practice it really appeals to me and prevents unsightly cracks and excessive use of fillers such as filler. Take the time to plan your model....
 
@pietsan Bedankt hiervoor Piet. Ik ben zeker dat Jan veel nut hiervan zal krij! Thumbsup

@RDN1954 Thank you also for this Johan - I think it is such a nice gesture that I have to comment as well.
 
Jan, in essence your insert is looking good, but you are using the wrong clamp. That clamp is much too weak and allows the plank to bulge at Bulkhead #9.

微信图片_20220801214751.jpg
I would suggest the strongest clamp you have, similar to the one I used above to clamp the strake that follows the insert. you can also pin it (at least 2 x pins) between Bulkheads #9 and #10 - you can use the balsa block for that.
 
I would suggest the strongest clamp you have, similar to the one I used above to clamp the strake that follows the insert. you can also pin it (at least 2 x pins) between Bulkheads #9 and #10 - you can use the balsa block for that.
Heinrich, once again thank you for your input. That area is a bit tricky. I’m not sure that the Balsa filler isn’t also part of the problem just because of the compound curves between the last two BH’s. I’m going to give your method a try this morning.
 
That is why you will see that I left the Balsa filler blocks out in that last section - I wanted the strakes to run their natural course.
 
Back
Top