Good evening Heinrich and Jan. True story! As a rookie, I’m always amazed how we do learn from our lessons however somehow, from somewhere our trials and tribulations resurrect in a different place in a different form...Don't count on that Jan!I am reinventing as I go along! With my Port Side, I am dealing with the Cheshire cat much earlier than on the Starboard side.
-

Win a Free Custom Engraved Brass Coin!!!
As a way to introduce our brass coins to the community, we will raffle off a free coin during the month of August. Follow link ABOVE for instructions for entering.
-

PRE-ORDER SHIPS IN SCALE TODAY!
The beloved Ships in Scale Magazine is back and charting a new course for 2026!
Discover new skills, new techniques, and new inspirations in every issue.
NOTE THAT OUR FIRST ISSUE WILL BE JAN/FEB 2026
You are using an out of date browser. It may not display this or other websites correctly.
You should upgrade or use an alternative browser.
You should upgrade or use an alternative browser.
Willem Barentsz by Kolderstok AD 1596
- Thread starter Pathfinder65
- Start date
- Watchers 34
- Joined
- Jan 9, 2020
- Messages
- 10,566
- Points
- 938

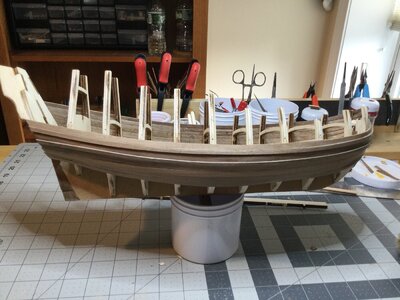
With all the tapering, beveling, the sheer which you constantly have to deal with plus the convex and concave curves which change all the time as the planking progresses, there are just so many variables that it is virtually impossible to get both sides perfectly symmetrical. If you start the tapering of a plank .05mm earlier or later than on the other side - that's it - you're done for.Good evening Heinrich and Jan. True story! As a rookie, I’m always amazed how we do learn from our lessons however somehow, from somewhere our trials and tribulations resurrect in a different place in a different form.... Got to love this hobby! Cheers Grant
Don't count on that Jan!I am reinventing as I go along! With my Port Side, I am dealing with the Cheshire cat much earlier than on the Starboard side.
I'm thinking we are having a Farragut moment. The battle cry of the WB is " taper, bevel ,sheer and bend constantly changing convex and concave curves " instead of "Damn the torpedoes, full speed ahead". 

- Joined
- Jan 9, 2020
- Messages
- 10,566
- Points
- 938

No need to apologize my friend. One plank a day will keep Heinrich happy!Sorry Heinrich, I'm just a little bit behind.
Plank #2 below the Wales - glued and fixed in place. The early adding of the Wales aids in the clamping process.
View attachment 323193
...no pressure JanNo need to apologize my friend. One plank a day will keep Heinrich happy!

RE-DO of PLANK #2.
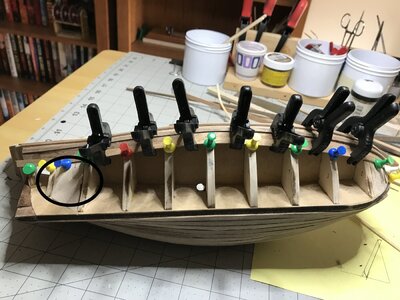
The initial test fit of the plank looked great, but this morning I noticed that at the Balsa filler (circled area) was not faired enough to fit the area between the two Bulkheads and was causing an odd fit. I’m now in process of removing the Balsa filler, I think I can get a better fit without it.

The initial test fit of the plank looked great, but this morning I noticed that at the Balsa filler (circled area) was not faired enough to fit the area between the two Bulkheads and was causing an odd fit. I’m now in process of removing the Balsa filler, I think I can get a better fit without it.

I did not have the same problem on the PS. The SB side looked good until I placed and glued that plank. But this morningJan, I think that is the right thing to do. That is why I did not cover that area with filler blocks - potentially it can actually interfere with the planking line at the stern.
 . Used quite a bit of hot H2O to remove the filler block and separate the plank . Going to take a bit to dry out. Oh well tomorrow is another day.
Major Re-Do on the SB side.
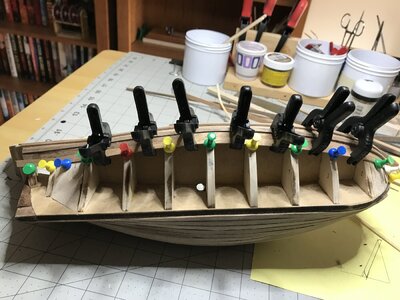
Removing the Balsa filler block was quite a chore. Unfortunately all the soaking, prying, etc. caused some bending and bowing at the stern of the first two planks below the wales. My second problem emerged when I tried to lay in the third plank. I picked the plank out of the bundle in the kit box, tapered it to 3mm to fit the stem, soaked it, used the K iron to get a good bend, pinned it in place, had lunch, ran some errands and glued the plank in place after I returned home. The fourth plank was next on the agenda. I picked the plank out of the kit bundlle, ”measured the dimensions“ following the procedure I had used on the PS. When the “@##$&&$##@“ hit the fan. Instructions —“place a 1.5 X 6mm tapered plank, etc.”, Nuts, I never checked the third plank before I started to work with it. Pinning the fourth plank below it I found that either my fairing was way off or the third planks thickness was off. The third plank was definitely thicker than it’s neighbors, So faced with a slight bulge that would probably be tough to sand down, I started the Re-Do. Once gain I’m starting from the Wales on the SB side.
Removing the Balsa filler block was quite a chore. Unfortunately all the soaking, prying, etc. caused some bending and bowing at the stern of the first two planks below the wales. My second problem emerged when I tried to lay in the third plank. I picked the plank out of the bundle in the kit box, tapered it to 3mm to fit the stem, soaked it, used the K iron to get a good bend, pinned it in place, had lunch, ran some errands and glued the plank in place after I returned home. The fourth plank was next on the agenda. I picked the plank out of the kit bundlle, ”measured the dimensions“ following the procedure I had used on the PS. When the “@##$&&$##@“ hit the fan. Instructions —“place a 1.5 X 6mm tapered plank, etc.”, Nuts, I never checked the third plank before I started to work with it. Pinning the fourth plank below it I found that either my fairing was way off or the third planks thickness was off. The third plank was definitely thicker than it’s neighbors, So faced with a slight bulge that would probably be tough to sand down, I started the Re-Do. Once gain I’m starting from the Wales on the SB side.
- Joined
- Jan 9, 2020
- Messages
- 10,566
- Points
- 938

I'm sorry to hear that my friend. I actually have a theory about this, as all my re-do's as far as the planking was concerned, were also on the Starboard and that includes WB #1 and #2. If you are right-handed, you will probably hold the hull in your left hand and starting from the front (stem) you do the actual sanding with your right hand in a movement that is away from you. The elbow of your right arm is tucked tightly against the right-hand side of your body and your head is directly above the fairing line. These factors all make for consistent controllable fairing of the Port Side.Major Re-Do on the SB side.
Removing the Balsa filler block was quite a chore. Unfortunately all the soaking, prying, etc. caused some bending and bowing at the stern of the first two planks below the wales. My second problem emerged when I tried to lay in the third plank. I picked the plank out of the bundle in the kit box, tapered it to 3mm to fit the stem, soaked it, used the K iron to get a good bend, pinned it in place, had lunch, ran some errands and glued the plank in place after I returned home. The fourth plank was next on the agenda. I picked the plank out of the kit bundlle, ”measured the dimensions“ following the procedure I had used on the PS. When the “@##$&&$##@“ hit the fan. Instructions —“place a 1.5 X 6mm tapered plank, etc.”, Nuts, I never checked the third plank before I started to work with it. Pinning the fourth plank below it I found that either my fairing was way off or the third planks thickness was off. The third plank was definitely thicker than it’s neighbors, So faced with a slight bulge that would probably be tough to sand down, I started the Re-Do. Once gain I’m starting from the Wales on the SB side.
When fairing the hull on the starboard side, and holding it in your left hand, it means your elbow is almost at a 90-degree angle to your body meaning that control of the process only resides in the wrist and hand of the right arm. It is also very difficult to fair in a continuous movement as your view of fairing line (particularly that of the stern) is now partially obscured. The above is all a song story to say that we fair the Port Side better because of better control and a better view of the process.
Now you guys can all go ahead and certify me ... again!
Heinrich that is a good theory. In my case it would have worked well. I’m right handed and the Admiral is left handed.
Geez I feel bad, because when they come to get you and put you into that white jacket with the long sleeves and take you away your Admiral will have to finish your WB builds.
Geez I feel bad, because when they come to get you and put you into that white jacket with the long sleeves and take you away your Admiral will have to finish your WB builds.

- Joined
- Jan 9, 2020
- Messages
- 10,566
- Points
- 938

Jan, as supportive as the Admiral is in my build, her finishing the model is a kite that is not going to fly. As to the guys coming to take me away - it might be closer than you think!Heinrich that is a good theory. In my case it would have worked well. I’m right handed and the Admiral is left handed.
Geez I feel bad, because when they come to get you and put you into that white jacket with the long sleeves and take you away your Admiral will have to finish your WB builds.
- Joined
- Jan 9, 2020
- Messages
- 10,566
- Points
- 938

Good going my friend. Just take your time and lay each plank as if it is the last.The Re-Do.
View attachment 324142
The four planks below the wales redone. Next step is plank #5 which will close in the stern, then it’s on to placing the two garboard planks and then planking up and filling in the Cheshire cats grin.
- Joined
- Oct 15, 2017
- Messages
- 1,191
- Points
- 443

Jan, sorry to hear about your need for a "re-do". But it seems you've recovered very quickly, and the fix looks great!!!
@Heinrich, I enjoyed reading your assessment of the WB SB planking phenomena. On top of that, I believe you to be quite lucid! Therefore, I consider myself lucky my current ship is much too big to pick up and hold in one hand!
@Heinrich, I enjoyed reading your assessment of the WB SB planking phenomena. On top of that, I believe you to be quite lucid! Therefore, I consider myself lucky my current ship is much too big to pick up and hold in one hand!

Ken, thanks for stopping by and looking at my bumbling effort to follow in Heinrich’s footsteps. I have to confess that this little ship has often and probably will continue to try my patience. I am very glad that I don’t live on the upper floors of a hi-rise and have to use my balcony railing for a photo shoot.Jan, sorry to hear about your need for a "re-do". But it seems you've recovered very quickly, and the fix looks great!!!
@Heinrich, I enjoyed reading your assessment of the WB SB planking phenomena. On top of that, I believe you to be quite lucid! Therefore, I consider myself lucky my current ship is much too big to pick up and hold in one hand!

- Joined
- Jan 9, 2020
- Messages
- 10,566
- Points
- 938

Size has its pros and cons. On the one hand, it's nice just to tuck the little ship in my lap to do something, but on the other, I could have added so many more details if it was a bigger size.Jan, sorry to hear about your need for a "re-do". But it seems you've recovered very quickly, and the fix looks great!!!
@Heinrich, I enjoyed reading your assessment of the WB SB planking phenomena. On top of that, I believe you to be quite lucid! Therefore, I consider myself lucky my current ship is much too big to pick up and hold in one hand!


