-

Win a Free Custom Engraved Brass Coin!!!
As a way to introduce our brass coins to the community, we will raffle off a free coin during the month of August. Follow link ABOVE for instructions for entering.
-

PRE-ORDER SHIPS IN SCALE TODAY!
The beloved Ships in Scale Magazine is back and charting a new course for 2026!
Discover new skills, new techniques, and new inspirations in every issue.
NOTE THAT OUR FIRST ISSUE WILL BE JAN/FEB 2026
You are using an out of date browser. It may not display this or other websites correctly.
You should upgrade or use an alternative browser.
You should upgrade or use an alternative browser.
Willem Barentsz by Kolderstok AD 1596
- Thread starter Pathfinder65
- Start date
- Watchers 34
Sorry to hear about your redo Jan, but remember this, You can only stop the redoactions when you are happy with the result.
She now looks great. and that is what counts
She now looks great. and that is what counts
Very nice and clean working dry dock, I wish my was like that.The model shipyard work area needed to be modified. The hunching over, the back stress and constant ache of Sciatica was getting old. I think I found a good alternative.
View attachment 295715
The work surface is 24 X 40 inches. The table can be raised and lowered by the push of a button. The assembly was straight forward and took about an hour.
View attachment 295716
The new shipyard dry dock.
( No the puppy didn’t come with it)
Nice winter scene to wake up to.@Heinrich
Sitting in our Sun Room with my morning coffee, looking at last night snowfall, I’m reading, re-reading your WB posts. Piece #11 bothers me. Did you add that piece and “fair” that section of the hull before you added the rear keel piece or was the keel piece added and then the “fairing“ done.
View attachment 295856
Last nights snow fall
Here in Miami I have to set my thermostat to 70 just to sleep comfortable because of the heat.
Jan, a little more info on your adjustable work table. How sturdy is it. I don’t want to sit on it just don’t like lateral movement when sanding and such.The model shipyard work area needed to be modified. The hunching over, the back stress and constant ache of Sciatica was getting old. I think I found a good alternative.
View attachment 295715
The work surface is 24 X 40 inches. The table can be raised and lowered by the push of a button. The assembly was straight forward and took about an hour.
View attachment 295716
The new shipyard dry dock.
( No the puppy didn’t come with it)
I think you are right about being happy with ones results. Compared to the Port side the Starboard side had taken on a life of its own. So... a Re-Do was required.Sorry to hear about your redo Jan, but remember this, You can only stop the redoactions when you are happy with the result.
She now looks great. and that is what counts
Hi Ron, the table is pretty rugged and heavy. I can't move it by myself. The legs are quite heavy and the top is almost 3/4 inch thick which adds to the weight,Jan, a little more info on your adjustable work table. How sturdy is it. I don’t want to sit on it just don’t like lateral movement when sanding and such.
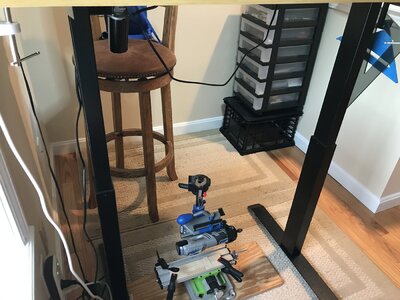
This is the highest position that I use. I can stand and work on the WB and be comfortable vs sitting and bending over the work.
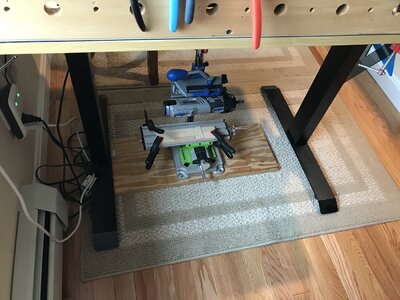
The lowest position, I've used this one to work on the Sternwheeler while working on the upper decks.
I was great to be able to adjust my work height especially when I was rigging my Alert.
I've not fastened any thing to the table top to do any "rigorous" sanding, but I'm fairly certain the table would be stable. Just my opinion!!
Hi, thank you for stopping by. Welcome the log, glad to have another kibitzer on board.Nice winter scene to wake up to.
Here in Miami I have to set my thermostat to 70 just to sleep comfortable because of the heat.
I like the seasons up here in the North country. Yup we have cold, snow, hot, rain, mud, black flies, etc. But I learned that the old salts here were right about Maine weather. "It ain't all that bad if them tourists keep coming back"


The SB side planking.
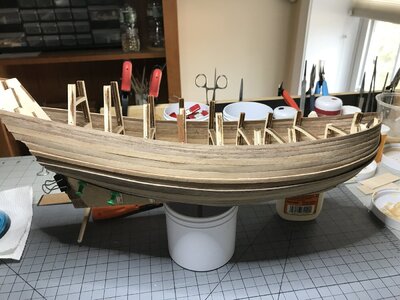
I decided to finish the planking above the Wales (I keep breaking off the tops of the bulkheads). My theory is - since the tops of bulkheads 1 - 6 will be removed later in the build and I had come to hate that tiny snapping sound when I broke one it was the least of the two evils, (ie. planking up or planking down).
Tomorrow todays work will be sanded and filled prior to placing the cap rail.
It really does look great, Jan! Awesome!
Hello Jan. You don't have far to go now. - keep up the good work!
Thanks for the great work vote, Still have a bit to go to get the hull closed in.It really does look great, Jan! Awesome!
The planking process continues. I'm making very slow progress.
Adding the plank above the SB garboard plank and closing in on the Cheshire cat's grin.
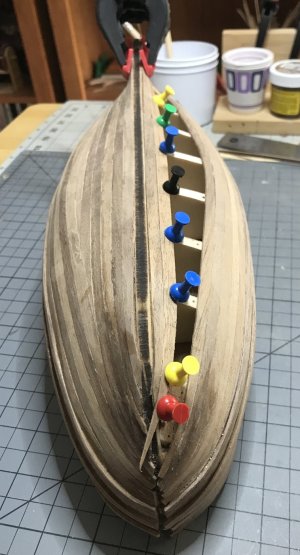
It's all about time. Dry fit the plank, soak the plank, use the K iron to form the bow bend, pin in place and wait for the plank to dry out and then fit and diddle with it until satisfied and finally glue it in place. Then repeat the process for the net plank. (@Henrich, much easier with Walnut than with Oak, eh?)
Adding the plank above the SB garboard plank and closing in on the Cheshire cat's grin.

It's all about time. Dry fit the plank, soak the plank, use the K iron to form the bow bend, pin in place and wait for the plank to dry out and then fit and diddle with it until satisfied and finally glue it in place. Then repeat the process for the net plank. (@Henrich, much easier with Walnut than with Oak, eh?)
- Joined
- Jan 9, 2020
- Messages
- 10,566
- Points
- 938

You are almost there now, Jan. The walnut is much more pliable than the oak.The planking process continues. I'm making very slow progress.
Adding the plank above the SB garboard plank and closing in on the Cheshire cat's grin.
View attachment 325827
It's all about time. Dry fit the plank, soak the plank, use the K iron to form the bow bend, pin in place and wait for the plank to dry out and then fit and diddle with it until satisfied and finally glue it in place. Then repeat the process for the net plank. (@Henrich, much easier with Walnut than with Oak, eh?)
@Heinrich, I think I have a question on the placement of the cap rail and the extra wale. But first I want try to get the hull closed in today and do some initial sanding.You are almost there now, Jan. The walnut is much more pliable than the oak.
She is looking Great Jan, 
- Joined
- Jan 9, 2020
- Messages
- 10,566
- Points
- 938

You are almost there now, Jan. The walnut is much more pliable than the oak.The planking process continues. I'm making very slow progress.
Adding the plank above the SB garboard plank and closing in on the Cheshire cat's grin.
View attachment 325827
It's all about time. Dry fit the plank, soak the plank, use the K iron to form the bow bend, pin in place and wait for the plank to dry out and then fit and diddle with it until satisfied and finally glue it in place. Then repeat the process for the net plank. (@Henrich, much easier with Walnut than with Oak, eh?)
No problem my friend. Shoot when you are ready.@Heinrich, I think I have a question on the placement of the cap rail and the extra wale. But first I want try to get the hull closed in today and do some initial sanding.
Good morning Jan. The “slow progress “ is paying dividends. Looking awesome. Following Heinrich’s log it is clear this little Dutch ship requires patience and a one plank at a time approach. You are owning this. Cheers GrantThe planking process continues. I'm making very slow progress.
Adding the plank above the SB garboard plank and closing in on the Cheshire cat's grin.
View attachment 325827
It's all about time. Dry fit the plank, soak the plank, use the K iron to form the bow bend, pin in place and wait for the plank to dry out and then fit and diddle with it until satisfied and finally glue it in place. Then repeat the process for the net plank. (@Henrich, much easier with Walnut than with Oak, eh?)
- Joined
- Jan 9, 2020
- Messages
- 10,566
- Points
- 938

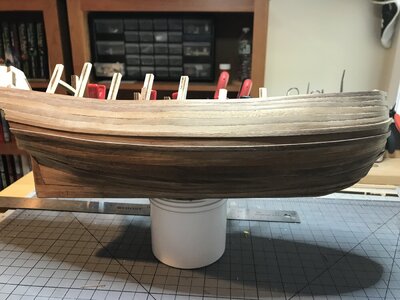
Well done, Jan! That is a major milestone to achieve and is a great confidence booster for the rest of the build!@Heinrich View attachment 326750
Finally after couple of days of "DO-OVERS" the Starboard side is closed in. It took a lot of reference to your and Piets build logs to get this far.


