Looking very good Jan. A major accomplishment and so well done!
-

Win a Free Custom Engraved Brass Coin!!!
As a way to introduce our brass coins to the community, we will raffle off a free coin during the month of August. Follow link ABOVE for instructions for entering.
-

PRE-ORDER SHIPS IN SCALE TODAY!
The beloved Ships in Scale Magazine is back and charting a new course for 2026!
Discover new skills, new techniques, and new inspirations in every issue.
NOTE THAT OUR FIRST ISSUE WILL BE JAN/FEB 2026
You are using an out of date browser. It may not display this or other websites correctly.
You should upgrade or use an alternative browser.
You should upgrade or use an alternative browser.
Willem Barentsz by Kolderstok AD 1596
- Thread starter Pathfinder65
- Start date
- Watchers 34
Looking good Jan. After seeing yours and Heinrich build progress, this beautiful little ship is not going to be on my to do list. As beautiful as she is, it a difficult build - no doubt. Cheers Grant@Heinrich View attachment 326750
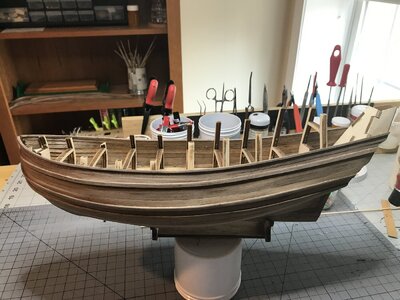
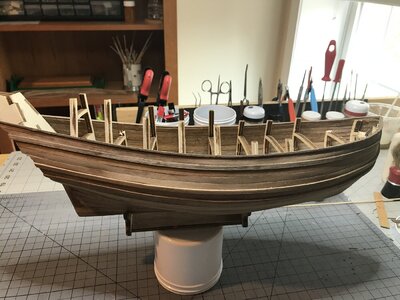
Finally after couple of days of "DO-OVERS" the Starboard side is closed in. It took a lot of reference to your and Piets build logs to get this far.

I think it was more of a “me” against “it” endeavor. But I managed to bumble my way through it. Thanks for having a look.Looking very good Jan. A major accomplishment and so well done!
Grant I look at your build and what you have accomplished and wonder if I could even come close to trying a Victory. As a novice builder and with a lot of SOS help I’ve been encouraged to keep bumbling away on this little ship. I‘ve spent a lot of time re-doing portions, scratching my head and looking at similar build logs trying to get to this point.Looking good Jan. After seeing yours and Heinrich build progress, this beautiful little ship is not going to be on my to do list. As beautiful as she is, it a difficult build - no doubt. Cheers Grant
I’m trying not get ahead of myself, but the question comes up on how to “carefully “ trim? sand? the ends of the planks at the bow so the keel piece will fit Your log shows a nifty tool you manufactured. Can you explain that?Well done, Jan! That is a major milestone to achieve and is a great confidence booster for the rest of the build!
- Joined
- Jan 9, 2020
- Messages
- 10,566
- Points
- 938

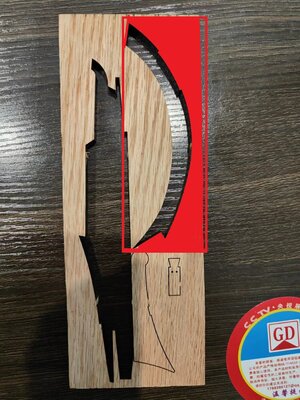
Hi Jan. Before you install the keel, do the majority of the sanding. After that, grab your laser cut sheet from which you have cut the keel.

Then cut out the portion as indicated by the red triangle and glue 80 grit sandpaper on the sides as shown. Now you just have to create a slot wide enough so that your tool with one layer of sandpaper on either side, can almost fit into the slot. Start sanding until the tool moves freely without touching either side. Then add another layer of sandpaper and so you build up the layers until you have achieved the required slot width.

Then cut out the portion as indicated by the red triangle and glue 80 grit sandpaper on the sides as shown. Now you just have to create a slot wide enough so that your tool with one layer of sandpaper on either side, can almost fit into the slot. Start sanding until the tool moves freely without touching either side. Then add another layer of sandpaper and so you build up the layers until you have achieved the required slot width.
Thank you for the information. That looks to be a slow job, but I’m excited to get to that point. Believe me the hull planking was getting to be a big PIA. I still have to add the upper wale and cap rail, so the bow will be the third item on the agenda this week.Hi Jan. Before you install the keel, do the majority of the sanding. After that, grab your laser cut sheet from which you have cut the keel.
View attachment 326874
Then cut out the portion as indicated by the red triangle and glue 80 grit sandpaper on the sides as shown. Now you just have to create a slot wide enough so that your tool with one layer of sandpaper on either side, can almost fit into the slot. Start sanding until the tool moves freely without touching either side. Then add another layer of sandpaper and so you build up the layers until you have achieved the required slot width.
- Joined
- Jan 9, 2020
- Messages
- 10,566
- Points
- 938

That is indeed a very slow process, but I would rather sand slowly than cutting a slot, only to find out you cut the slot too wide. The guys who build double-planked hulls have the luxury of filler - us adventurous folks, don't! 

Adventurous indeed. So far I think I’ve destroyed quite a few pieces of Walnut to get to my final result. I’m glad I wasn’t working with Oak. I applaud your patience working with that media.That is indeed a very slow process, but I would rather sand slowly than cutting a slot, only to find out you cut the slot too wide. The guys who build double-planked hulls have the luxury of filler - us adventurous folks, don't!
Ditto. That Oak single plank Heinrich pull off is a special feat.Adventurous indeed. So far I think I’ve destroyed quite a few pieces of Walnut to get to my final result. I’m glad I wasn’t working with Oak. I applaud your patience working with that media.
It’s the little things that go ….
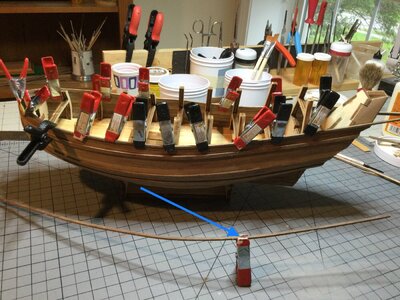
The instructions—— ”Place a 2 X 3mm strip horizontally”, after planking the hull upwards. So I researched the WB build logs that I’ve been following. Yes sir, by golly I believe I can do that!!!
After soaking the 2 X 3mm planks most of the day it was time to give the placing a go. $3.50 donated to the bad word jar later ……..

Please note the blue arrow. There was just a very tiny snapping sound when try number one failed to follow the bend while being clamped. BUT try number two did work out and is clamped in place as it dries.
So it’s me 1 and the bad word jar another $.25.

The instructions—— ”Place a 2 X 3mm strip horizontally”, after planking the hull upwards. So I researched the WB build logs that I’ve been following. Yes sir, by golly I believe I can do that!!!
After soaking the 2 X 3mm planks most of the day it was time to give the placing a go. $3.50 donated to the bad word jar later ……..

Please note the blue arrow. There was just a very tiny snapping sound when try number one
 failed to follow the bend while being clamped. BUT try number two did work out and is clamped in place as it dries.
So it’s me 1 and the bad word jar another $.25.
- Joined
- Jan 9, 2020
- Messages
- 10,566
- Points
- 938

One out of two! With those planks it is about the going rate!  That is why I placed a fourth wale which created the visual and historically correct effect and then placed a 1mm x 3mm plank horizontally on top of the fourth wale which was a cinch to do!
 That is why I placed a fourth wale which created the visual and historically correct effect and then placed a 1mm x 3mm plank horizontally on top of the fourth wale which was a cinch to do!
One out of two! With those planks it is about the going rate!That is why I placed a fourth wale which created the visual and historically correct effect and then placed a 1mm x 3mm plank horizontally on top of the fourth wale which was a cinch to do!
Ahh Jan- you will be able to buy another kit with your bad word jar funds on completion of your WB...It’s the little things that go ….
The instructions—— ”Place a 2 X 3mm strip horizontally”, after planking the hull upwards. So I researched the WB build logs that I’ve been following. Yes sir, by golly I believe I can do that!!!
After soaking the 2 X 3mm planks most of the day it was time to give the placing a go. $3.50 donated to the bad word jar later ……..
View attachment 326966
Please note the blue arrow. There was just a very tiny snapping sound when try number onefailed to follow the bend while being clamped. BUT try number two did work out and is clamped in place as it dries.
So it’s me 1 and the bad word jar another $.25.
Indeed, I think I’ll be able to build a museum and show off a 1:1 WB.Ahh Jan- you will be able to buy another kit with your bad word jar funds on completion of your WB...Cheers Grant
Maybe Rachel could sell baked goods out of the gift shop.
What a great idea. She would like that and it would end the discussion of adding a third floor dormer for a hobby room. She would be so busy running her business she wouldn’t have time to notice the sanding residue from my 2nd floor shipyard. Yessir great idea.Maybe Rachel could sell baked goods out of the gift shop.
- Joined
- Aug 8, 2019
- Messages
- 5,575
- Points
- 738

Yes, we modelers should think like Kasparov when it come to keep the admiral busyWhat a great idea. She would like that and it would end the discussion of adding a third floor dormer for a hobby room. She would be so busy running her business she wouldn’t have time to notice the sanding residue from my 2nd floor shipyard. Yessir great idea.
- Joined
- Sep 3, 2021
- Messages
- 5,197
- Points
- 738

I think a lot of us would be able to do that, and not the cheapest kit, mind you…Ahh Jan- you will be able to buy another kit with your bad word jar funds on completion of your WB...
Stubbornness, persistence and lots of bumling.
The final outcome.


The 2 X 3 cap rail is done. The ”Bad Word Jar” has benefited very well from this part of the build.
@Heinrich, I just had to do it this way. I knew if I took my time and worked carefully with a section at a time it would work out.
The final outcome.


The 2 X 3 cap rail is done. The ”Bad Word Jar” has benefited very well from this part of the build.
@Heinrich, I just had to do it this way. I knew if I took my time and worked carefully with a section at a time it would work out.
