Hi Frank,
Your message translated; Good evening Stefano, Ok, if I can be of help on projects please ask.
Thanks, I will keep that in mind for later, although I tend to like to work things out myself.
Cheers,
Stephen.

 |
The beloved Ships in Scale Magazine is back and charting a new course for 2026! Discover new skills, new techniques, and new inspirations in every issue. NOTE THAT OUR NEXT ISSUE WILL BE MARCH/APRIL 2026 |
|
 |
As a way to introduce our brass coins to the community, we will raffle off a free coin during the month of August. Follow link ABOVE for instructions for entering. |
|
Hi Frank,
Hi Kurt,It takes me a bit sometimes as well, I don't know if the SoS does auto translate or not.
Thanks Jim,SOS uses one of the sophisticated 'Forum' software for sure, but I have to disappoint you, it doesn't auto-translate. Most times, mods and admins translate. If you are using a Google browser, you can set up to automagically translate the entire page to your preferred language.
But we asked again if you using your foreign language to post, please translate using 'Google', it will make the post much valuable and interesting to others.
Thanks Rich,Down load a translator app for you phone to scan/translate in real time the translation from one language to your own. Sometimes it doesn't work but it will give you the main concept. Rich
Stephen, don't worry too much about translations...I might try that later although it sounds at bit above my skill level.
")
I don't think that you need SoS on your phone. Just install the translator app and it works optically through your camera as you scan along the text to be translated. I had to do that for Chinese instructions for my Kyrenia model until Messis in Cyprus sent me a full translation book that he had previously received. Rich (PT-2)Thanks Rich,
I don't have SOS setup on my phone and I can tend to be all thumbs when trying to do things on the phone.
Cheers,
Stephen.
Ok thanks Rich I misunderstood.I don't think that you need SoS on your phone. Just install the translator app and it works optically through your camera as you scan along the text to be translated. I had to do that for Chinese instructions for my Kyrenia model until Messis in Cyprus sent me a full translation book that he had previously received. Rich (PT-2)

Buongiorno Stefano, la mia disponibilità non è sul modello che hai in cantiere, non mi permetterei mai. Buon ventociao franco,
Il tuo messaggio tradotto; Buonasera Stefano, Ok, se posso esserti d'aiuto sui progetti chiedi pure.
Grazie, lo terrò a mente per dopo, anche se mi piace risolvere le cose da solo.
Saluti,
Stefano.
G'day Steve, again fantastic work, some very detailed and interesting work, hope to get some more done on my Drifter soon, you are an inspiration,
Best regards John,
.
Hi Frank,Buongiorno Stefano, la mia disponibilità non è sul modello che hai in cantiere, non mi permetterei mai. Buon vento
Thank you John, it is funny how we find inspiration, I also find inspiration with the work that you and the many other skilled and talented people that are on this site do.
If you are interested I can send you the side elevation that I did to whatever size you require, I will not be offended if you are not interested.
Cheers,
Stephen.


I really like this type of old photo documentation . . . conjures up brain games of the noises and smells. Great posting documentation for your builds. Rich (PT-2)Thank you for the offer Steve, but I'm going to do mine a little bit differently, its fantastic work you doing, I'm going for the sliding hatch to be on the top, I've searched the net and found a few pics of what I mean, i will attach a couple,
View attachment 281253
on this pic you can see that the two bottom boats have the hood piece on the top of the hatch,
View attachment 281256
and also on this one the very bottom ship, its surprising how many of the ships didn't have a fore hatch, this is the way Fred shows it in his book, I've just got to work out how they did the slides for the top to slide on,
best regards John,
Hi John,Thank you for the offer Steve, but I'm going to do mine a little bit differently, its fantastic work you doing, I'm going for the sliding hatch to be on the top, I've searched the net and found a few pics of what I mean, i will attach a couple,
View attachment 281253
on this pic you can see that the two bottom boats have the hood piece on the top of the hatch,
View attachment 281256
and also on this one the very bottom ship, its surprising how many of the ships didn't have a fore hatch, this is the way Fred shows it in his book, I've just got to work out how they did the slides for the top to slide on,
best regards John,
Hi John,
Where did you find the photo's, do you have a go to site?
Interesting to see that in the bottom photo to my eye there is only one wooden drifter the rest are steel, pity it isn't a colour photo.
Cheers,
Stephen.
.JPG")


.JPG")
.JPG")

.JPG")


Some Painting.
At long last some painting.
There are quite a few bits that need to be painted blue, I used Automotive Primer Filler on the Aft Skylight to fill the grain and give a smooth surface, lightly sanding between coats, with a bit of rinse and repeat going on. After I had a smooth surface I assembled the portholes removing the glazed outer rings.
View attachment 281699
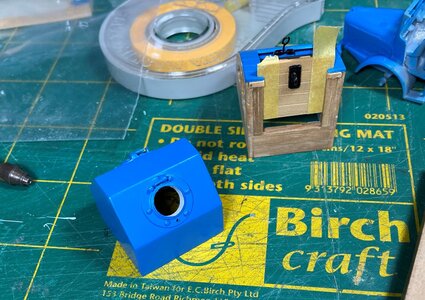
Next came a bit of masking the Forecastle Hoodway needing a bit of time to achieve what I was looking for, along with the Main fish hatch and Aft Skylight these were all painted on the inside with an off white first.
View attachment 281700
Everything was given a light coat of Automotive Etch Primer before the specially mixed Tamiya Acrylic was applied.
View attachment 281701
Then the Hasp and Staple was masked and painted Black.
View attachment 281702
Next up was to slide the hood in underneath the roof and glue the small pieces that stop the hood coming out and carefully sand it back until flush.
View attachment 281703
Then everything was painted with an Automotive Clear Coat all of this painting was done using my Badger Renegade Krome gravity fed airbrush.
If you are wondering why the clear over the colour it is to provide protection and enable weathering.
View attachment 281705View attachment 281706View attachment 281707View attachment 281708View attachment 281709
The main fish hatch covers are Blue on one side with clear on the underside to highlight the Huon Pine grain. I had made 2 spare main hatch covers that are clear coated all round.
View attachment 281710
I would have to say I am happy with the overall result with the grain showing through in areas where I wanted that sort of finish. As normal it took more time than expected, I thought I could knock it over in an afternoon, more like 4-5 afternoons.
That is not quite it for parts painted blue, the other bits haven’t been made yet they need the deck to be planked first. If you are wondering why the deck is not planked yet there are a few reasons the main one being my original method looked like it wasn’t going to work that is to plank the deck then build the bulwarks, then make and fit the structures I have just finished. The latest plan is to finish the covering boards build the bulwarks then plank the deck, all of this is subject to change.
That will do it for this one, at the moment I am thinking of taking a break from this build, a minor workshop reorganisation and maybe throw some stuff out.
Next time I will probably get back to the Bulwarks starting with the capping rail, thanks for looking in and reading my ramblings or just looking at the photo’s and stay safe.
Cheers,
Stephen.
G'day Steve, I've found the answer to my question, so it looks like the official version is blue, I was reading up on building the fore hatch etc and it was mentioned that the colour is blue,Wow, that is some beautiful work Steve, absolutely fantastic, and the fore hatch way is looking really great, the colours really stand out, I was wondering what to do about mine, seeing as you have gone with the blue I might go with green, did jack mention what colours were used or are they you choice, I did find that he said that below the water line was a Reddy Brown anti fouling, you are showing lots of info which is really good, i am just about to go back on your log and download some pics of the fish hatch and the aft skylight, hope you are not away from the LT100 for too long,
best regards john,
Fantastic to have your operable hatchway and ports with their small metal fittings. Rich (PT-2_Some Painting.
At long last some painting.
There are quite a few bits that need to be painted blue, I used Automotive Primer Filler on the Aft Skylight to fill the grain and give a smooth surface, lightly sanding between coats, with a bit of rinse and repeat going on. After I had a smooth surface I assembled the portholes removing the glazed outer rings.
View attachment 281699
Next came a bit of masking the Forecastle Hoodway needing a bit of time to achieve what I was looking for, along with the Main fish hatch and Aft Skylight these were all painted on the inside with an off white first.
View attachment 281700
Everything was given a light coat of Automotive Etch Primer before the specially mixed Tamiya Acrylic was applied.
View attachment 281701
Then the Hasp and Staple was masked and painted Black.
View attachment 281702
Next up was to slide the hood in underneath the roof and glue the small pieces that stop the hood coming out and carefully sand it back until flush.
View attachment 281703
Then everything was painted with an Automotive Clear Coat all of this painting was done using my Badger Renegade Krome gravity fed airbrush.
If you are wondering why the clear over the colour it is to provide protection and enable weathering.
View attachment 281705View attachment 281706View attachment 281707View attachment 281708View attachment 281709
The main fish hatch covers are Blue on one side with clear on the underside to highlight the Huon Pine grain. I had made 2 spare main hatch covers that are clear coated all round.
View attachment 281710
I would have to say I am happy with the overall result with the grain showing through in areas where I wanted that sort of finish. As normal it took more time than expected, I thought I could knock it over in an afternoon, more like 4-5 afternoons.
That is not quite it for parts painted blue, the other bits haven’t been made yet they need the deck to be planked first. If you are wondering why the deck is not planked yet there are a few reasons the main one being my original method looked like it wasn’t going to work that is to plank the deck then build the bulwarks, then make and fit the structures I have just finished. The latest plan is to finish the covering boards build the bulwarks then plank the deck, all of this is subject to change.
That will do it for this one, at the moment I am thinking of taking a break from this build, a minor workshop reorganisation and maybe throw some stuff out.
Next time I will probably get back to the Bulwarks starting with the capping rail, thanks for looking in and reading my ramblings or just looking at the photo’s and stay safe.
Cheers,
Stephen.