-

Win a Free Custom Engraved Brass Coin!!!
As a way to introduce our brass coins to the community, we will raffle off a free coin during the month of August. Follow link ABOVE for instructions for entering.
-

PRE-ORDER SHIPS IN SCALE TODAY!
The beloved Ships in Scale Magazine is back and charting a new course for 2026!
Discover new skills, new techniques, and new inspirations in every issue.
NOTE THAT OUR FIRST ISSUE WILL BE JAN/FEB 2026
You are using an out of date browser. It may not display this or other websites correctly.
You should upgrade or use an alternative browser.
You should upgrade or use an alternative browser.
YANGTZE RIVER HIGH-NET FISHING SAMPAN [COMPLETED BUILD]
- Thread starter Heinrich
- Start date
- Watchers 29
-
- Tags
- completed build
- Joined
- Mar 19, 2021
- Messages
- 98
- Points
- 113

Wonderful build, what a talent you have.
Larry
Larry
- Joined
- Jan 9, 2020
- Messages
- 10,566
- Points
- 938

@lmcneil1406 Wow Larry - that is high praise, thank you! It is great to see you here - you are sure doing a fine job on your Black Pearl!
The way you weave together history, stories and the construction of your sampan is extremely remarkable. It is a great pleasure to follow you.
- Joined
- Jan 9, 2020
- Messages
- 10,566
- Points
- 938

@pianoforte Thank you Adi! To have someone like you present here, is an honour for me. I am humbled and thankful that the format of the build log has been so favourably received.
Canoe21
Lawrence
Hello Heinrich, I thank you very much for your very nice and well did Sampan build and information on them. You have did an excellent job of building her, ans she will sit very proudly where ever you chose to display her. Just loved all of your old pictures and how you enplaned the Sampan, you have did a lovely job of it, Thank you very much.
I do hope that you will add much more detail to help us under stand just how these people lived and they all look so content by your pictures.
Regards Lawrence
I do hope that you will add much more detail to help us under stand just how these people lived and they all look so content by your pictures.
Regards Lawrence
- Joined
- Jan 9, 2020
- Messages
- 10,566
- Points
- 938

@Canoe21 Lawrence your comments are highly appreciated. I do promise that there is still lots of detail to be added - particularly to their lifestyles. You know, you make a very interesting observation about these sampan dwellers looking so content. It is difficult to say whether they were really content or whether they had just resigned themselves to their fate - but whichever it was - it was all that they knew.
Well well Heinrich what a wonderful log you have started here! 
 Your educator, historian and model building skills are certainly shining with this build. I am so looking forward to seeing more! My only concern with your attributes as a educator and historian is that, will there be an exam upon completion of this log? I prefer multiple choice questions and of course open book!!


 Your educator, historian and model building skills are certainly shining with this build. I am so looking forward to seeing more! My only concern with your attributes as a educator and historian is that, will there be an exam upon completion of this log? I prefer multiple choice questions and of course open book!!
- Joined
- Jan 9, 2020
- Messages
- 10,566
- Points
- 938

@DonRobinson Don!!! Our prodigal son has returned !!! 


 Man, it's good to see you back on SOS! You really had me worried - you know drinking and smoking while wearing goggles and a DIVING SUIT can be hazardous!
  Thank you for the most kind words and compliments my friend - I will start blushing. How is Bluenose, the Ontario and the missus doing? Keep us up to date man!


 Man, it's good to see you back on SOS! You really had me worried - you know drinking and smoking while wearing goggles and a DIVING SUIT can be hazardous!
  Thank you for the most kind words and compliments my friend - I will start blushing. How is Bluenose, the Ontario and the missus doing? Keep us up to date man!
- Joined
- Jan 9, 2020
- Messages
- 10,566
- Points
- 938

@DonRobinson And as far as the exam goes - you have given me a great idea! Thank you!
- Joined
- Jan 9, 2020
- Messages
- 10,566
- Points
- 938

Hello Everyone
We continue ...
@Pathfinder65 Jan earlier said that he is very interested in Tung Oil as a finish and I promised him that in the next posting, that will be covered. After everything that had to be glued, had been glued (no glue will adhere to a surface that is covered by 100% Tung Oil), I could start the process.
What is Tung Oil?

Tung oil is the oil from the seeds of a tree that originates in China (Aleuritis fordii and Aleuritis montana). The fruit of this tree that is 12 m (A. fordii) or 20 m (A. montana) in height contain 3–5 seeds. The seeds have a hard shell and contain ∼50% fat in their kernels. Despite its limited accessibility, tung oil is a favorite among furnishings due to its environment-friendly and versatile use. (Source: https://www.sciencedirect.com/topics/agricultural-and-biological-sciences/tung-oil)
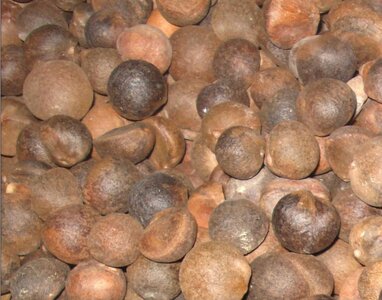
The seeds of the Tung tree.
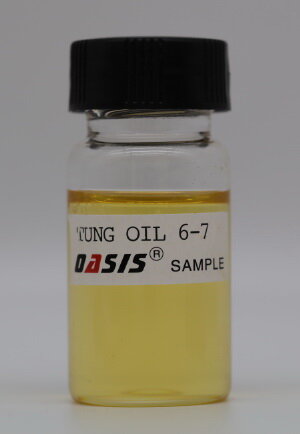
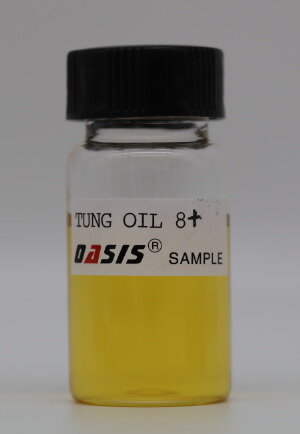
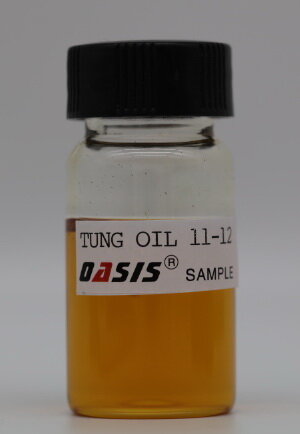
Different samples during the filtration process.
However, applying Tung oil correctly, is a long, drawn-out process. It can take up to two days for each coat to harden, and depending on the wood and finish that you want, you may need at least 5 to 7 coats before you can have a protective durable finish. After that, regular reapplication is required once every week for a month and then once every month for a year, and later, from the second year onwards, once every year. The result is a beautiful, honey-like finish (again depending on the wood and the Tung oil.)
Tung Oil meets the Sampan:

Brown "gold". I am extremely fortunate in that I do not have to rely on commercially available tung, but that I have a contact who can supply me with the 100% pure variety without any preserving additives.
I started off by diluting the Tung Oil with mineral turpentine in a ratio of 40:60. The thinner mixture will allow the oil to penetrate better into the wood, while the turpentine aids in evaporation. The mixture can be applied with a natural bristle brush or sponge or a clean cotton rag. Using these methods eliminate any unnecessary “lines” forming on the wood.
It is important to start with those places that are hard to reach or largely invisible to the eye. If any boo-boo occurs, it can be rectified immediately and once done, those places do not have to be reached again later. In this case it meant that the sleeping cabin (the part covered by the canopy), the fish tank and the storage spaces were done first. The oil is applied in the direction of the wood to ensure that it saturates the wood as much as it can. The first coat must be applied liberally, and spread evenly. Look out that there are no puddles – if that is the case, dab those areas immediately with a Kleenex, tissue or anything that will absorb the moisture.
As soon as the first coat is dry (in my case it took less than two hours), apply the second in the same way with the same mixture. Now leave to dry overnight. This is where the following tip comes into play. Leave the tung oil / turpentine mixture open during the night as well. During the night, the turpentine content will evaporate further, automatically changing the ratio of the mixture to one more biased towards the oil.
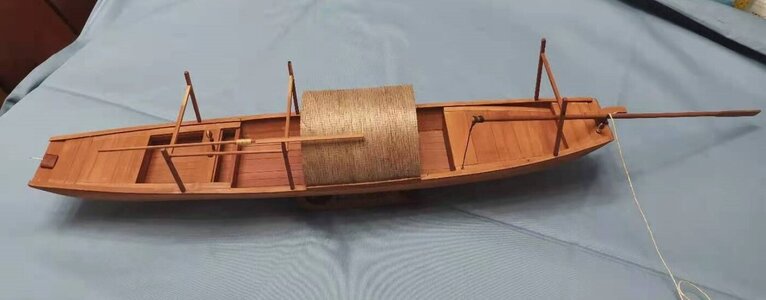
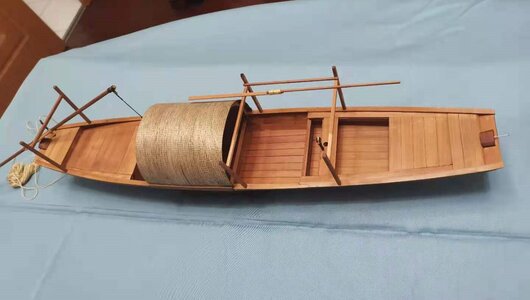
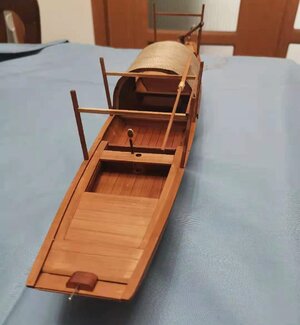
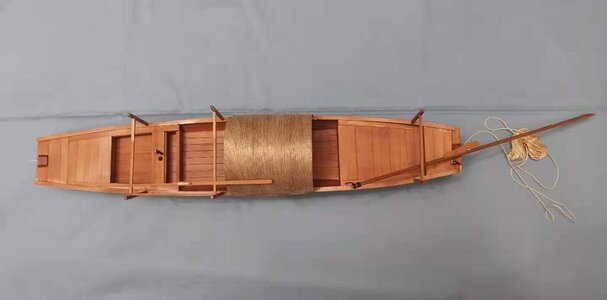
The above four pictures show the sampan after the application of the first two coats. Now it will stand overnight and tomorrow I will continue.
In the meantime let's take a look at how the caulking was done on the sampans. This information and photographs are derived from Ying Ying's research.
Technical Choice and Social Practice of Sampan Boats:
A Case Study of Tanka Sampan and the Dweller in Ethnoarchaeology
Archaeology Master Dissertation - Ying Ying YAN
" All the seams were caulked to ensure they were waterproof. Caulking here refers to the process of filling the gaps between the planks by using a mixture of fibre and tung oil. The typical material used for caulking was generally greasy materials and plant fibre (Guo, pers. common, 2017). There are accounts from literature in the Ming Dynasty (1368-1644) that describe the raw material for caulking: “China wood oil or fish oil are mixed with lime to make putty, add silk fabrics … for caulking the seams (Song, 1637: 289). The precise formula for the caulking materials was said to be “The lime should have high quality, oyster shells are the main material … the insufficient of oil would lead to the failure of bonding the lime (Li, 1553: 845)
There are also notes on the fine craftsmanship: “shipbuilders must have a poised mind, a pair of eyes with keen sight and powerful hands (Song, 1637: 290).” These aspects implicate the specific craft tradition. The following figures were collected from the shipbuilder from that area, introducing the caulking sequence (Xu, pers. common, 2017)"
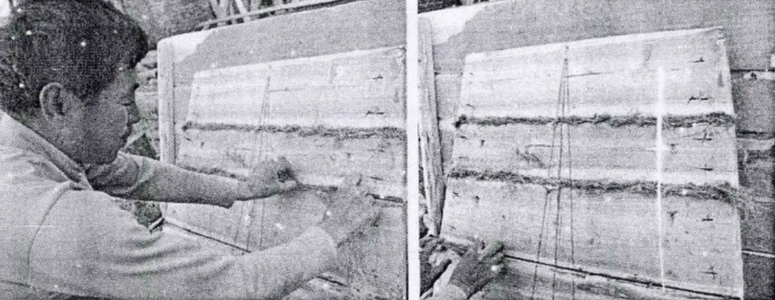
Firstly, the padding was used to fill the seams between the planks.
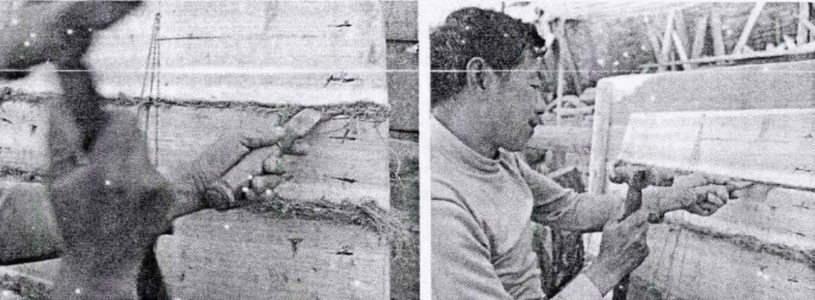
The caulking material was compacted with tools like a chisel.
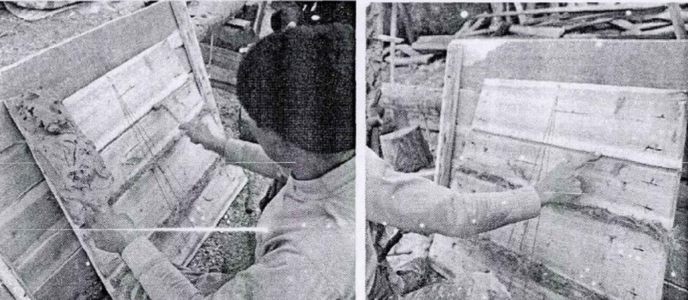
Subsequently, more mixtures of tung oil and fibres were inserted into the seams.
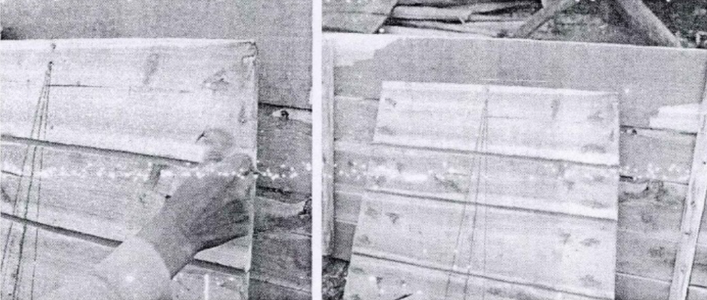
Finally, a mixture of tung oil and ash was applied to the seam, and the caulking was done.
After caulking, further waterproofing measures were taken in the form of a coating that was applied on the surface of the hull. The interior was lacquered in red* coating. The exterior was varnished with China wood oil (normally tung oil).
*This piece of information I discovered too late to incorporate into this build, but it will be done on the Tanka sampan.
And that my dear friends brings us to a close of tonight's posting. It may not seem like much progress, but bear in mind that I spend an equal amount of time on the actual build and on compiling this log. I want to thank each and all for the tremendous support that you have been giving me during this build. It has been absolutely heart-warming and is deeply appreciated.
Kindest regards - Heinrich
We continue ...
@Pathfinder65 Jan earlier said that he is very interested in Tung Oil as a finish and I promised him that in the next posting, that will be covered. After everything that had to be glued, had been glued (no glue will adhere to a surface that is covered by 100% Tung Oil), I could start the process.
What is Tung Oil?

Tung oil is the oil from the seeds of a tree that originates in China (Aleuritis fordii and Aleuritis montana). The fruit of this tree that is 12 m (A. fordii) or 20 m (A. montana) in height contain 3–5 seeds. The seeds have a hard shell and contain ∼50% fat in their kernels. Despite its limited accessibility, tung oil is a favorite among furnishings due to its environment-friendly and versatile use. (Source: https://www.sciencedirect.com/topics/agricultural-and-biological-sciences/tung-oil)

The seeds of the Tung tree.


Different samples during the filtration process.
However, applying Tung oil correctly, is a long, drawn-out process. It can take up to two days for each coat to harden, and depending on the wood and finish that you want, you may need at least 5 to 7 coats before you can have a protective durable finish. After that, regular reapplication is required once every week for a month and then once every month for a year, and later, from the second year onwards, once every year. The result is a beautiful, honey-like finish (again depending on the wood and the Tung oil.)
Tung Oil meets the Sampan:

Brown "gold". I am extremely fortunate in that I do not have to rely on commercially available tung, but that I have a contact who can supply me with the 100% pure variety without any preserving additives.
I started off by diluting the Tung Oil with mineral turpentine in a ratio of 40:60. The thinner mixture will allow the oil to penetrate better into the wood, while the turpentine aids in evaporation. The mixture can be applied with a natural bristle brush or sponge or a clean cotton rag. Using these methods eliminate any unnecessary “lines” forming on the wood.
It is important to start with those places that are hard to reach or largely invisible to the eye. If any boo-boo occurs, it can be rectified immediately and once done, those places do not have to be reached again later. In this case it meant that the sleeping cabin (the part covered by the canopy), the fish tank and the storage spaces were done first. The oil is applied in the direction of the wood to ensure that it saturates the wood as much as it can. The first coat must be applied liberally, and spread evenly. Look out that there are no puddles – if that is the case, dab those areas immediately with a Kleenex, tissue or anything that will absorb the moisture.
As soon as the first coat is dry (in my case it took less than two hours), apply the second in the same way with the same mixture. Now leave to dry overnight. This is where the following tip comes into play. Leave the tung oil / turpentine mixture open during the night as well. During the night, the turpentine content will evaporate further, automatically changing the ratio of the mixture to one more biased towards the oil.


The above four pictures show the sampan after the application of the first two coats. Now it will stand overnight and tomorrow I will continue.
In the meantime let's take a look at how the caulking was done on the sampans. This information and photographs are derived from Ying Ying's research.
Technical Choice and Social Practice of Sampan Boats:
A Case Study of Tanka Sampan and the Dweller in Ethnoarchaeology
Archaeology Master Dissertation - Ying Ying YAN
" All the seams were caulked to ensure they were waterproof. Caulking here refers to the process of filling the gaps between the planks by using a mixture of fibre and tung oil. The typical material used for caulking was generally greasy materials and plant fibre (Guo, pers. common, 2017). There are accounts from literature in the Ming Dynasty (1368-1644) that describe the raw material for caulking: “China wood oil or fish oil are mixed with lime to make putty, add silk fabrics … for caulking the seams (Song, 1637: 289). The precise formula for the caulking materials was said to be “The lime should have high quality, oyster shells are the main material … the insufficient of oil would lead to the failure of bonding the lime (Li, 1553: 845)
There are also notes on the fine craftsmanship: “shipbuilders must have a poised mind, a pair of eyes with keen sight and powerful hands (Song, 1637: 290).” These aspects implicate the specific craft tradition. The following figures were collected from the shipbuilder from that area, introducing the caulking sequence (Xu, pers. common, 2017)"

Firstly, the padding was used to fill the seams between the planks.

The caulking material was compacted with tools like a chisel.

Subsequently, more mixtures of tung oil and fibres were inserted into the seams.

Finally, a mixture of tung oil and ash was applied to the seam, and the caulking was done.
After caulking, further waterproofing measures were taken in the form of a coating that was applied on the surface of the hull. The interior was lacquered in red* coating. The exterior was varnished with China wood oil (normally tung oil).
*This piece of information I discovered too late to incorporate into this build, but it will be done on the Tanka sampan.
And that my dear friends brings us to a close of tonight's posting. It may not seem like much progress, but bear in mind that I spend an equal amount of time on the actual build and on compiling this log. I want to thank each and all for the tremendous support that you have been giving me during this build. It has been absolutely heart-warming and is deeply appreciated.
Kindest regards - Heinrich
Last edited:
Excellent, excellent. What great explanation on the use of Tung Oil. I had no idea that there were numerous steps involved to get a proper finis. Are you going to backtrack to simulate caulking?
Jan
Jan
- Joined
- Jan 9, 2020
- Messages
- 10,566
- Points
- 938

@Pathfinder65 Jan, you will have to be patient with the tung oil finish - we have just started the process. 
This is the one "drawback" to Tung oil. You are never really finished. With regards to the caulking - impossible - I had no real gaps between the planks for forcing that mixture into. I have already put out the feelers as to where I can obtain the muscle shells (they are then crushed into a fine powder which forms the lime), but that will have to wait for the Tanka sampan. If you want to do this, it does mean that you will have to consciously plank in a way that will leave very small gaps between the planks.

This is the one "drawback" to Tung oil. You are never really finished. With regards to the caulking - impossible - I had no real gaps between the planks for forcing that mixture into. I have already put out the feelers as to where I can obtain the muscle shells (they are then crushed into a fine powder which forms the lime), but that will have to wait for the Tanka sampan. If you want to do this, it does mean that you will have to consciously plank in a way that will leave very small gaps between the planks.
Looking great with the oil! Will you be using some steel wool on it?Hello Everyone
We continue ...
@Pathfinder65 Jan earlier said that he is very interested in Tung Oil as a finish and I promised him that in the next posting, that will be covered. After everything that had to be glued, had been glued (no glue will adhere to a surface that is covered by 100% Tung Oil, I could start the process.
What is Tung Oil?
View attachment 246523
Tung oil is the oil from the seeds of a tree that originates in China (Aleuritis fordii and Aleuritis montana). The fruit of this tree that is 12 m (A. fordii) or 20 m (A. montana) in height contain 3–5 seeds. The seeds have a hard shell and contain ∼50% fat in their kernels. Despite its limited accessibility, tung oil is a favorite among furnishings due to its environment-friendly and versatile use. (Source: https://www.sciencedirect.com/topics/agricultural-and-biological-sciences/tung-oil)
View attachment 246524
The seeds of the Tung tree.
View attachment 246525View attachment 246526View attachment 246527
Different samples during the filtration process.
However, applying Tung oil correctly, is a long, drawn-out process. It can take up to two days for each coat to harden, and depending on the wood and finish that you want, you may need at least 5 to 7 coats before you can have a protective durable finish. After that, regular reapplication is required once every week for a month and then once every month for a year, and later, from the second year onwards, once every year. The result is a beautiful, honey-like finish (again depending on the wood and the Tung oil.)
Tung Oil meets the Sampan:
View attachment 246528
Brown "gold". I am extremely fortunate in that I do not have to rely on commercially available tung, but that I have a contact who can supply me with the 100% pure variety without any preserving additives.
I started off by diluting the Tung Oil with mineral turpentine in a ratio of 40:60. The thinner mixture will allow the oil to penetrate better into the wood, while the turpentine aids in evaporation. The mixture can be applied with a natural bristle brush or sponge or a clean cotton rag. Using these methods eliminate any unnecessary “lines” forming on the wood. These few methods are preferred to avoid any harsh lines.
It is important to start with those places that are hard to reach or largely invisible to the eye. If any boo-boo occurs, it can be rectified immediately and once done, those places do not have to be reached again later. In this case it meant that the sleeping cabin (the part covered by the canopy), the fish tank and the storage spaces were done first. The oil is applied in the direction of the wood to ensure that it saturates the wood as much as it can. The first coat must be applied liberally, must be spread evenly. Look out that there are no puddles – if that is the case, dab those areas immediately with a Kleenex, tissue or anything that will absorb the moisture.
As soon as the first coat is dry (in my case it took less than two hours), apply the second in the same way with the same mixture. Now leave to dry overnight. This where the following tip comes into play. Leave the tung oil / turpentine mixture open during the night as well. During the night, the turpentine content will evaporate further, automatically changing the ratio of the mixture to one more biased towards the oil.
View attachment 246529
View attachment 246530
View attachment 246531
View attachment 246532
The above four pictures show the sampan after the application of the first two coats. Now it will stand overnight and tomorrow I will continue.
In the meantime let's take a look at how the caulking was done on the sampans. This information and photographs are derived from Ying Ying's research.
Technical Choice and Social Practice of Sampan Boats:
A Case Study of Tanka Sampan and the Dweller in Ethnoarchaeology
Archaeology Master Dissertation - Ying Ying YAN
" All the seams were caulked to ensure they were waterproof. Caulking here refers to the process of filling the gaps between the planks by using a mixture of fibre and tung oil. The typical material used for caulking was generally greasy materials and plant fibre (Guo, pers. common, 2017). There are accounts from literature in the Ming Dynasty (1368-1644) that describe the raw material for caulking: “China wood oil or fish oil are mixed with lime to make putty, add silk fabrics … for caulking the seams (Song, 1637: 289). The precise formula for the caulking materials was said to be “The lime should have high quality, oyster shells are the main material … the insufficient of oil would lead to the failure of bonding the lime (Li, 1553: 845)
There are also notes on the fine craftsmanship: “shipbuilders must have a poised mind, a pair of eyes with keen sight and powerful hands (Song, 1637: 290).” These aspects implicate the specific craft tradition. The following figures were collected from the shipbuilder from that area, introducing the caulking sequence (Xu, pers. common, 2017)"
View attachment 246533
Firstly, the padding was used to fill the seams between the planks.
View attachment 246534
The caulking material was compacted with tools like a chisel.
View attachment 246535
Subsequently, more mixtures of tung oil and fibres were inserted into the seams.
View attachment 246536
Finally, a mixture of tung oil and ash was applied to the seam, and the caulking was done.
After caulking, further waterproofing measures were taken in the form of a coating that was applied on the surface of the hull. The interior was lacquered in red* coating. The exterior was varnished with China wood oil (normally tung oil).
*This piece of information I discovered too late to incorporate into this build, but it will be done on the Tanka sampan.
And that my dear friends brings us to a close of tonight's posting. It may not seem like much progress, but bear in mind that I spend an equal amount of time on the actual build and on compiling this log. I want to thank each and all for the tremendous support that you have been giving me during this build. It has been absolutely heart-warming and is deeply appreciated.
Kindest regards - Heinrich
- Joined
- Jan 9, 2020
- Messages
- 10,566
- Points
- 938

@Dean62 Thank you very much for the kind words, Dean! About the steel wool - as you know, it is used to create a "shiny" or higher-gloss finish (as I have done on the Leudo). However, I have found that the 000 steel wool (which is the grit that is recommended), tends to leave behind a very fine, grey dust which is very difficult to remove afterwards. It gets into all the little nooks and crannies and cannot simply be blown or wiped off. from. Whether this is something that is just peculiar to the type and brand of steel wool that I have used, or whether it is typical of all steel wools, I do not know. For me, something like 1000 grit sandpaper works equally well, but without the metallic dust.
On the sampan however, a shiny or glossy finish will be all out of place, so I do not think I will go that route. But in all honesty, it is still early days. I will first see what it looks like when the wood is fully saturated and dry. I may use it just once - before applying the final coat.
On the sampan however, a shiny or glossy finish will be all out of place, so I do not think I will go that route. But in all honesty, it is still early days. I will first see what it looks like when the wood is fully saturated and dry. I may use it just once - before applying the final coat.
Well I always use 0000 steel wool. The finest. It is messy and leaves little debris of steel behind. That’s just part of using it. I just use my vacuum with brush attachment and it vacuums it all up and out of any crevices.@Dean62 Thank you very much for the kind words, Dean! About the steel wool - as you know, it is used to create a "shiny" or higher-gloss finish (as I have done on the Leudo). However, I have found that the 000 steel wool (which is the grit that is recommended), tends to leave behind a very fine, grey dust which is very difficult to remove afterwards. It gets into all the little nooks and crannies and cannot simply be blown or wiped off. from. Whether this is something that is just peculiar to the type and brand of steel wool that I have used, or whether it is typical of all steel wools, I do not know. For me, something like 1000 grit sandpaper works equally well, but without the metallic dust.
On the sampan however, a shiny or glossy finish will be all out of place, so I do not think I will go that route. But in all honesty, it is still early days. I will first see what it looks like when the wood is fully saturated and dry. I may use it just once - before applying the final coat.
Even on my Bluenose, I used it on the deck and hull after applying clear coat. My hull looks polished. But I can agree if you are after a weathered look, perhaps 1000 or 1500 grit sandpaper will work. If I want a satin finish, I sometimes use 2000 grit. But I prefer steel wool. Both need to be vacuumed afterwards!
- Joined
- Jan 9, 2020
- Messages
- 10,566
- Points
- 938

@Dean62 Thanks Dean. Now at least I know that the dust is typical. I may very well give it a go towards the end. I'm not really looking for as much of a "weathered" effect than just a natural one.
PS: About vacuum cleaners ... the majority of Chinese homes do not have carpets - wooden or tiled floors are the "in-thing". As such, I do not even own a vacuum cleaner. Good quality mops and brooms rule the roost here.
PS: About vacuum cleaners ... the majority of Chinese homes do not have carpets - wooden or tiled floors are the "in-thing". As such, I do not even own a vacuum cleaner.
We have no carpet downstairs, all wood and tile. However the vacuum cleaner, with all the different attachments, makes short work of dusting, and cleaning. No need to sweep, just vacuum floors, window sills, blinds, baseboards, etc. Then you only have to mop to sanitize.@Dean62 Thanks Dean. Now at least I know that the dust is typical. I may very well give it a go towards the end. I'm not really looking for as much of a "weathered" effect than just a natural one.
PS: About vacuum cleaners ... the majority of Chinese homes do not have carpets - wooden or tiled floors are the "in-thing". As such, I do not even own a vacuum cleaner.Good quality mops and brooms rule the roost here.
In addition, I have a shop vac for the garage…great to clean up after wood working, etc.
We rely heavily on vacuums!!!
And the porch? Leaf blower…lol
Ps - you could always get a small hand held vac for hobby use!
- Joined
- Jan 9, 2020
- Messages
- 10,566
- Points
- 938

One last suggestion. Take your ship outside and use a hair dryer, on the cool setting, to blow off your ship!@Dean62 You are 100% correct, Dean. Hopefully, we will be moving to a new apartment around the same time next year (they are still building it at the moment) which will have all the necessary amenities. But you are right - I must just get my a** into gear and go get a vacuum cleaner!
I do this when I do any heavy sanding, like on the hull. I sand outside, then blow off the ship.

 I'm glad you like the canopy - I also think that turned out well.
