Perfectionist?Thanks Dean.
Progress is slow; I have a tendency to overthink certain issues...
-

Win a Free Custom Engraved Brass Coin!!!
As a way to introduce our brass coins to the community, we will raffle off a free coin during the month of August. Follow link ABOVE for instructions for entering.
-

PRE-ORDER SHIPS IN SCALE TODAY!
The beloved Ships in Scale Magazine is back and charting a new course for 2026!
Discover new skills, new techniques, and new inspirations in every issue.
NOTE THAT OUR FIRST ISSUE WILL BE JAN/FEB 2026
- Home
- Forums
- Ships of Scale Group Builds and Projects
- Bluenose PoF Group Build
- Bluenose Group Build Logs
You are using an out of date browser. It may not display this or other websites correctly.
You should upgrade or use an alternative browser.
You should upgrade or use an alternative browser.
Nice work Johan, I enjoy watching your problem solving and methodsAs I wrote earlier today, I would present some background info on how I am adding more detail to the aft cabin.
First order of businesses was to establish the cabin height, since this ultimately determines the vertical position of the two clamps. Why two clamps? Because I wanted to use the same construction principle as is used on the fishhold; clamps attached to the frames, beams on top of the clamps and planks on top of the beams.
Back to the cabin height; I used, quite arbitrary, a standing height of 2m (6.6ft), which translates to 27,7mm (1.1") on the scale of the YQ design. Based on this requirement I prepared a tool to mark the position of the clamps on the frames.
The tool to mark the vertical position of the clamps. I had to remove the center part of the lower part to allow for the keelson and sister keelsons.
View attachment 304649
The upper edge of the marking tool supported on the deck clamps, providing me a constant distance from the deck to the clamps.
View attachment 304650
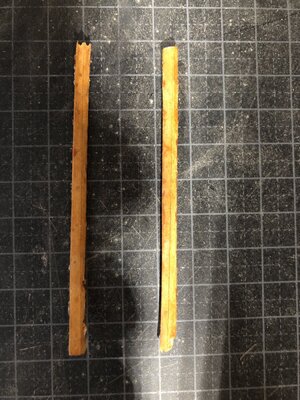
After marking all nine frames, I used a popsicle stick to mark the lateral distance between the pencil marks on the frames.
View attachment 304645
After some fiddling, I had my measures
View attachment 304646
I transferred those measures to a piece of paper and by connecting the dots, I obtained the curves for the clamps.
View attachment 304651
Using a pin, I transferred the points to two pieces of scrap wood of the same thickness as the other clamps, connected the dots and used my dremel to remove the excess material.
For one of the clamps it didn't work out too well, but since I don't have enough material left, I unfortunately have to declare it "use as is".
View attachment 304652
And now up to the next challenge, manufacturing of the beams...

Good news JohanAnd the Admiral was discharged from hospital this morning!
The empty space filled again.

- Joined
- Sep 3, 2021
- Messages
- 5,198
- Points
- 738

Yep, the only drawback is that my hands won't accomplish what my mind wants...Perfectionist?
Hi Johan, just catching up on build logs. Glad to hear your Admiral is doing well and home again. Great work on the BN so far! 
- Joined
- Sep 3, 2021
- Messages
- 5,198
- Points
- 738

Thanks Dean, it's good to have her home again.Hi Johan, just catching up on build logs. Glad to hear your Admiral is doing well and home again. Great work on the BN so far!
The BN. build is challenging, to say the least.
Agreed, however some of the challenges are self imposed because we do embellishments!Thanks Dean, it's good to have her home again.
The BN. build is challenging, to say the least.
- Joined
- Sep 3, 2021
- Messages
- 5,198
- Points
- 738

So true!Agreed, however some of the challenges are self imposed because we do embellishments!

- Joined
- Sep 3, 2021
- Messages
- 5,198
- Points
- 738

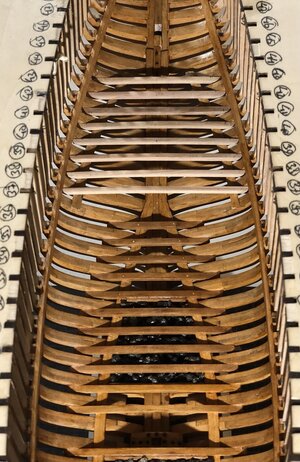
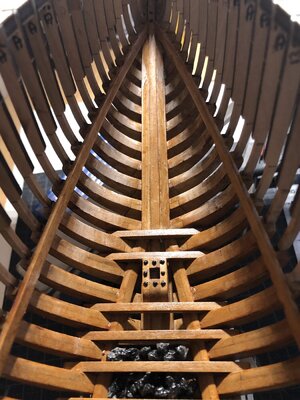
After some more handiwork, I now have eight scratch-made floorbeams for the aft cabin.
Not throwing out the frame leftovers paid handsomely.
Next step in the build is to add the partial floors for the focsle, the fishhold and the aft cabin, followed by planking the left hand inbd side panel. Coming Friday I'll be picking up the necessary planks at Henk's (@Henk Liebre ), he kindly offered to order those from one of his contacts.
The eight floorbeams dry fitted:

That’s a nicely build foundation for the cabin floor, Johan. Just in time for catching up the wood by Henk.After some more handiwork, I now have eight scratch-made floorbeams for the aft cabin.
Not throwing out the frame leftovers paid handsomely.
Next step in the build is to add the partial floors for the focsle, the fishhold and the aft cabin, followed by planking the left hand inbd side panel. Coming Friday I'll be picking up the necessary planks at Henk's (@Henk Liebre ), he kindly offered to order those from one of his contacts.
The eight floorbeams dry fitted:
View attachment 305494
Regards, Peter
Well done!After some more handiwork, I now have eight scratch-made floorbeams for the aft cabin.
Not throwing out the frame leftovers paid handsomely.
Next step in the build is to add the partial floors for the focsle, the fishhold and the aft cabin, followed by planking the left hand inbd side panel. Coming Friday I'll be picking up the necessary planks at Henk's (@Henk Liebre ), he kindly offered to order those from one of his contacts.
The eight floorbeams dry fitted:
View attachment 305494
- Joined
- Sep 3, 2021
- Messages
- 5,198
- Points
- 738

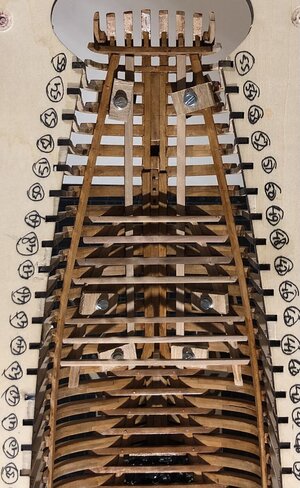
Prior to fabricating the aft cabin floorbeams, I made the two aft cabin clamps and bonded those to the hull at the appropriate locations. What still needed to be added were the two aft stringers, as indicated in the "Saga". Those stringers are positioned 3ft off centerline. When positioning these stringers I found them interfering with the aft cabin clamps...  That's unfortunately a definite no-go. So it was time to remove the clamps. Luckily I used non-waterproof adhesive; just applied a little water, let it soak for a few minutes and off they came and in one piece.
After cleaning up, I did a dry fit of the clamps, the stringers and the floorbeam to check whether or not these elements would cause any further issues.
I still need to fine tune the position of the clamps, but to me it looks better than it did. Once I finish trimming the two clamps, I'll perform a dry fit again, after which I hope to be able to install the clamps and the stringers permanently..
I still haven't made up my mind about the focsle clamps...
Dry fit of the aft cabin clamps and beans ánd the two so-called stringers.

- Joined
- Jan 9, 2020
- Messages
- 10,566
- Points
- 938

Hello Johan. This is a methodical approach that will have the desired results. Embellishments do cause major re-thinks and extra work - but once finished, brings with them a tremendous sense of accomplishment.
- Joined
- Sep 3, 2021
- Messages
- 5,198
- Points
- 738

Hello Johan. This is a methodical approach that will have the desired results. Embellishments do cause major re-thinks and extra work - but once finished, brings with them a tremendous sense of accomplishment.
Dear Mark and Heinrich,When you put that much thought and considertation into your work Johan, you are sure to succeed. Looking very good so far
- Mark
Thank you so much for your kind and motivating words. For me these events start with that I don't like what I see and the desire to add some additional authenticity. (Also inspired by quite a few companion builders here on SOS.) The second stage takes me some time to come to terms with the fact I have to remove parts I already installed, planning the required changes and after dragging my feet a little longer, I finally can't stand it anymore and enter the third stage; implementation of the embellishments.
An old Dutch proverb:What still needed to be added were the two aft stringers, as indicated in the "Saga". Those stringers are positioned 3ft off centerline. When positioning these stringers I found them interfering with the aft cabin clamps...That's unfortunately a definite no-go. So it was time to remove the clamps. Luckily I used non-waterproof adhesive; just applied a little water, let it soak for a few minutes and off they came and in one piece.
After cleaning up, I did a dry fit of the clamps, the stringers and the floorbeam to check whether or not these elements would cause any further issues.
“Met passen en meten wordt te meeste tijd versleten.”
“Fitting and measuring is where most of the time is wasted.”
And if you know everything in advance ……..

- Joined
- Sep 3, 2021
- Messages
- 5,198
- Points
- 738

Another one, often used as well: "meten is weten, gissen is missen" (measuring is knowing, guessing is missing).An old Dutch proverb:
“Met passen en meten wordt te meeste tijd versleten.”
“Fitting and measuring is where most of the time is wasted.”
And if you know everything in advance ……..
And if I would have known everything in advance, I wouldn't be building a POF Bluenose. (Although I then would have missed out on the companionship of my fellow builders, hmm, that would be a rather bad thing...)
For me it goes more like this...I do something and later discover that it's been done wrong. I tell myself, "Whatever. Its good enough" and then every time I walk past the ship my eye is drawn to the mistake like a heat-seeking missile. Eventually I have to fix it as a concession to self-preservation and restoring a modicum of peace back into my life...Dear Mark and Heinrich,
Thank you so much for your kind and motivating words. For me these events start with that I don't like what I see and the desire to add some additional authenticity. (Also inspired by quite a few companion builders here on SOS.) The second stage takes me some time to come to terms with the fact I have to remove parts I already installed, planning the required changes and after dragging my feet a little longer, I finally can't stand it anymore and enter the third stage; implementation of the embellishments.
- Joined
- Sep 3, 2021
- Messages
- 5,198
- Points
- 738

And now I did it. Not only did I rip out my self made aft cabin clamps, I also ripped out the focsle clamps.
As it has been pointed out by both Peter, @Peter Voogt, and Lawrence, @Canoe21, the YQ focsle configuration is supposedly quite different from the original Bluenose focsle.
After given this issue quite some thought and having studied the building instructions and drawings, I wanted to change the focsle configuration, resulting in a reconfigured bow of my Bluenose...
The ripped out clamps, no going back.

The emptied bowsection.

As it has been pointed out by both Peter, @Peter Voogt, and Lawrence, @Canoe21, the YQ focsle configuration is supposedly quite different from the original Bluenose focsle.
After given this issue quite some thought and having studied the building instructions and drawings, I wanted to change the focsle configuration, resulting in a reconfigured bow of my Bluenose...
The ripped out clamps, no going back.

The emptied bowsection.

- Joined
- Sep 3, 2021
- Messages
- 5,198
- Points
- 738

That's also rather familiar and to great amusement of the Admiral.For me it goes more like this...I do something and later discover that it's been done wrong. I tell myself, "Whatever. Its good enough" and then every time I walk past the ship my eye is drawn to the mistake like a heat-seeking missile. Eventually I have to fix it as a concession to self-preservation and restoring a modicum of peace back into my life...
Last edited:

