Ditto - if my ratlines came out like this I would have a party! Cheers GrantCan't see much fault in your ratlines Johan, they look spot on
-

Win a Free Custom Engraved Brass Coin!!!
As a way to introduce our brass coins to the community, we will raffle off a free coin during the month of August. Follow link ABOVE for instructions for entering.
-

PRE-ORDER SHIPS IN SCALE TODAY!
The beloved Ships in Scale Magazine is back and charting a new course for 2026!
Discover new skills, new techniques, and new inspirations in every issue.
NOTE THAT OUR FIRST ISSUE WILL BE JAN/FEB 2026
- Home
- Forums
- Ships of Scale Group Builds and Projects
- Bluenose PoF Group Build
- Bluenose Group Build Logs
You are using an out of date browser. It may not display this or other websites correctly.
You should upgrade or use an alternative browser.
You should upgrade or use an alternative browser.
- Joined
- Sep 3, 2021
- Messages
- 5,197
- Points
- 738

Johan, this looks like a well-constructed set of shrouds with ratlines. The shroud lines themselves have stayed nice and straight which is no easy feat (at least for me). Trying to pull every ratline tight while not putting a curve in the shroud, is well impossible I say.
Can't see much fault in your ratlines Johan, they look spot on
Thank you all for your compliments and support.Ditto - if my ratlines came out like this I would have a party! Cheers Grant
Although your opinions do matter to me, I am still very apprehensive about those ratlines.
Initially I tried the clove hitch for the knot at the middle shroud and cow hitches for the outer shrouds.
The latter didn't give me to much trouble though, other than trying not to put too much tension on the ratlines, thus keeping the shrouds straight. The clove hitch was a different story altogether. I suspect that it is possible for this hitch to slip, resulting in one of the parts of the ratline coming under additional tension, disturbing the visual. Using the 0,12mm serafil makes it almost impossible to check whether or not the hitch slipped. So after some trials, I decided to go for the reef knot, because it seems less suspect to slipping. So far it works, kind of.
Now work on the starboard main mast ratlines is in progress, proceeding with caution...
- Joined
- Sep 3, 2021
- Messages
- 5,197
- Points
- 738

There are a few things I'm no fan of, one, that's doing ratlines, two, that'll be making sails. That's why I am alternating between doing both; when I'm fed up with the monotonous ratline work, I switch to making sails and vice versa.
The reason why I'm not comfortable with the whole sail making thing is based on the sail making I did for the other Bluenose, where I made the fisherman's stay sail which took quite some effort and time before anything satisfactory came out of that exercise.
So prior to starting up the Admiral's sewing machine, I first had to make a drawing of the sails. That was done some time ago and required some validation. Furthermore I did some research on how sails for model ships may be made. Various methods exist and I guess most are based on personal preferences.
Some involve heavy needlemanship, sowing ropes to the edge of the sail, others apply adhesive, before folding over the edge to prevent unraveling of the fabric. Another option is to order custom made sails.
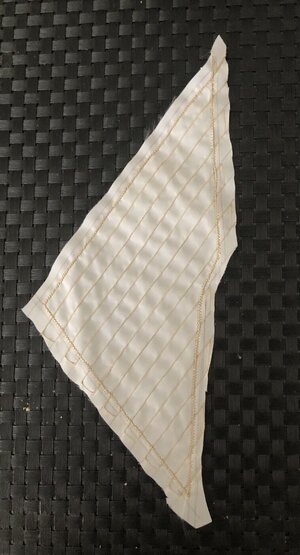
A while ago I purchased some cloth, I think it was from Mantua, and I decided to go for a very slightly off-white color, using heavily diluted stain. After some experimentation I opted to first stitch the edges of the sail with the smallest possible straight stitch. Next was the simulation of the sown together strips of the sails, which I extended over the nett edges of the sail. After completing this step, I selected the smallest possible zigzag stitch and very carefully fed the sail through the machine, making sure the neddle went exactly left and right of the earlier sown straight edge stitch.
Below the result, after completing all sewing and prior to applying glue and trimming:
Next was to apply diluted wood glue to the sail, to prevent fraying of the edge as much as possible.
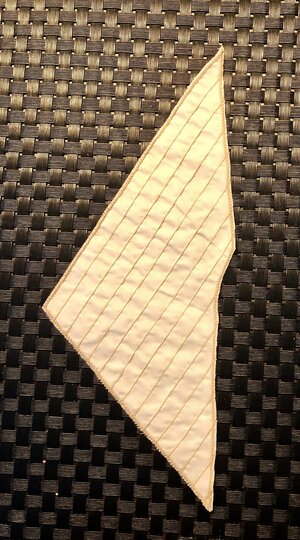
Once the concoction was dry, the edge was trimmed. I find the end result quite satisfactory; minimal distortion of the sails appearance, especially with back light:
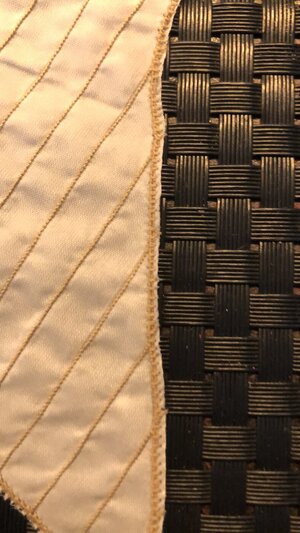
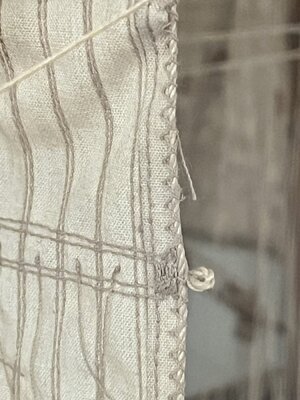
Below a detail of the completed edge; with some good will the first straight stitches can be seen underneath the final zigzag stitch. It is highly experimental and I don't have a clou about its robustness or longevity, I'll have to wait and see how this unravels, pun intended.
The reason why I'm not comfortable with the whole sail making thing is based on the sail making I did for the other Bluenose, where I made the fisherman's stay sail which took quite some effort and time before anything satisfactory came out of that exercise.
So prior to starting up the Admiral's sewing machine, I first had to make a drawing of the sails. That was done some time ago and required some validation. Furthermore I did some research on how sails for model ships may be made. Various methods exist and I guess most are based on personal preferences.
Some involve heavy needlemanship, sowing ropes to the edge of the sail, others apply adhesive, before folding over the edge to prevent unraveling of the fabric. Another option is to order custom made sails.
A while ago I purchased some cloth, I think it was from Mantua, and I decided to go for a very slightly off-white color, using heavily diluted stain. After some experimentation I opted to first stitch the edges of the sail with the smallest possible straight stitch. Next was the simulation of the sown together strips of the sails, which I extended over the nett edges of the sail. After completing this step, I selected the smallest possible zigzag stitch and very carefully fed the sail through the machine, making sure the neddle went exactly left and right of the earlier sown straight edge stitch.
Below the result, after completing all sewing and prior to applying glue and trimming:

Next was to apply diluted wood glue to the sail, to prevent fraying of the edge as much as possible.
Once the concoction was dry, the edge was trimmed. I find the end result quite satisfactory; minimal distortion of the sails appearance, especially with back light:

Below a detail of the completed edge; with some good will the first straight stitches can be seen underneath the final zigzag stitch. It is highly experimental and I don't have a clou about its robustness or longevity, I'll have to wait and see how this unravels, pun intended.

Last edited:
- Joined
- Sep 3, 2021
- Messages
- 5,197
- Points
- 738

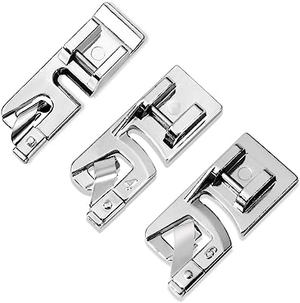
Hey Dan,That sail looks pretty good Johan. Hems are something I have had a terrible time at. There are special feet that fold the material just prior to sewing together that I have been considering. Ever hear or seen such an animal?
View attachment 384749
Can't say I ever saw or heard from them. That looks like a workable solution.
I'll have to check if they're available for the Admiral's sewing machine, might be worth pursuing.
You can check out you tube videos on it, I am going to try it once I get to that point. It roles that fabric right over just slick as all get-out. Of course, I didn't find out about it until I had finished the Vasa sails.
I feel your pain Johan. Ratlines and sails, now there's a combination worthy of a nightmare or two. That said, everything you've done so far looks pretty good to me. Hang in there and good luck with the rest, I'm sure you'll be pleased with the result in the end.
That’s a very nice looking sail, Johan. Born with a lot of dedication.There are a few things I'm no fan of, one, that's doing ratlines, two, that'll be making sails. That's why I am alternating between doing both; when I'm fed up with the monotonous ratline work, I switch to making sails and vice versa.
The reason why I'm not comfortable with the whole sail making thing is based on the sail making I did for the other Bluenose, where I made the fisherman's stay sail which took quite some effort and time before anything satisfactory came out of that exercise.
So prior to starting up the Admiral's sewing machine, I first had to make a drawing of the sails. That was done some time ago and required some validation. Furthermore I did some research on how sails for model ships may be made. Various methods exist and I guess most are based on personal preferences.
Some involve heavy needlemanship, sowing ropes to the edge of the sail, others apply adhesive, before folding over the edge to prevent unraveling of the fabric. Another option is to order custom made sails.
A while ago I purchased some cloth, I think it was from Mantua, and I decided to go for a very slightly off-white color, using heavily diluted stain. After some experimentation I opted to first stitch the edges of the sail with the smallest possible straight stitch. Next was the simulation of the sown together strips of the sails, which I extended over the nett edges of the sail. After completing this step, I selected the smallest possible zigzag stitch and very carefully fed the sail through the machine, making sure the neddle went exactly left and right of the earlier sown straight edge stitch.
Below the result, after completing all sewing and prior to applying glue and trimming:
View attachment 384744
Next was to apply diluted wood glue to the sail, to prevent fraying of the edge as much as possible.
Once the concoction was dry, the edge was trimmed. I find the end result quite satisfactory; minimal distortion of the sails appearance, especially with back light:
View attachment 384745
Below a detail of the completed edge; with some good will the first straight stitches can be seen underneath the final zigzag stitch. It is highly experimental and I don't have a clou about its robustness or longevity, I'll have to wait and see how this unravels, pun intended.
View attachment 384746
I know the feet that Daniel shows. But have in mind those feet made a double or trippel layer or roll of fabric at the edge. Then it’s ‘heavy stuff’.
Regards, Peter
Last edited:
On my Mirage I folded the edge 1x and pressed it together with an iron:
The inner edge of the fold then with a straight stitch and on the outside a zig-zag with which the outside rope is immediately secured.
And yes, it took ‘some time’ and ‘some samples’ before I got a OK from my Admiral.
PS: It all depends on the thickness and amount of lines per inch of the fabric.
I think (it’s almost 40 years ago) it was the finest linnen for embroidery.
Regards, Peter
Last edited:
- Joined
- Sep 3, 2021
- Messages
- 5,197
- Points
- 738

I feel your pain Johan. Ratlines and sails, now there's a combination worthy of a nightmare or two. That said, everything you've done so far looks pretty good to me. Hang in there and good luck with the rest, I'm sure you'll be pleased with the result in the end.
That’s a very nice looking sail, Johan. Born with a lot of dedication.
I know the feet that Daniel shows. But have in mind those feet made a double or trippel layer or roll of fabric at the edge. Then it’s ‘heavy stuff’.
Regards, Peter
Thanks for all your remarks on my sailmaking endeavors.On my Mirage I folded the edge 1x and pressed it together with an iron:
View attachment 384805
The inner edge of the fold then with a straight stitch and on the outside a zig-zag with which the outside rope is immediately secured.
And yes, it took ‘some time’ and ‘some samples’ before I got a OK from my Admiral.
PS: It all depends on the thickness and amount of lines per inch of the fabric.
I think (it’s almost 40 years ago) it was the finest linnen for embroidery.
Regards, Peter
Like I said, I've been experimenting a bit, based on personal experiences and the experience of others.
What I am looking for us a sail with two sides being presentable. That's not easily achieved and the scale (1:72) is not helping me either.
The method I used for this example is presentable from both sides, so that's a big plus for me as well.
The method @Peter Voogt describes was experimented with, but met catastrophic failure. I might try this again on a coupon, see if I can make it work...
- Joined
- Sep 3, 2021
- Messages
- 5,197
- Points
- 738

One of the things I'm after is sails with two possible display sides; our Bluenoses are worth to be seen from all sides. Having the hem folded gives a rather "coarse" edge from one side. Especially the 1:72 scale we're working with appears to be rather sensitive in terms of scale-proportionate detailing.You can check out you tube videos on it, I am going to try it once I get to that point. It roles that fabric right over just slick as all get-out. Of course, I didn't find out about it until I had finished the Vasa sails.
If you want a hem, you obviously need to fold it in one of two directions or sew a narrow strip that is (itself) folded in half onto the edge. I suppose you could sew a bolt rope to a plain edge, even bolt ropes are sewn more to one side if I remember correctly. I look forward to your final solution Johan.One of the things I'm after is sails with two possible display sides; our Bluenoses are worth to be seen from all sides. Having the hem folded gives a rather "coarse" edge from one side. Especially the 1:72 scale we're working with appears to be rather sensitive in terms of scale-proportionate detailing.
Happy Birthday/Van Harte Gefeliciteerd met je Verjaardag, Johan.
Maak er een Mooie dag van.
Gr. Peter
Maak er een Mooie dag van.
Gr. Peter
- Joined
- Sep 3, 2021
- Messages
- 5,197
- Points
- 738

Thanks so much Peter for both your well wishes as your compliments!Happy Birthday Johan! Time to blow out the candles and to make a wish, may it come true.
That's some serious stitching done on the first sail. It's looking great so far!
Peter
- Joined
- Sep 3, 2021
- Messages
- 5,197
- Points
- 738

Thanks, Peter. A beautiful day for making beautiful memories!Happy Birthday/Van Harte Gefeliciteerd met je Verjaardag, Johan.
Maak er een Mooie dag van.
Gr. Peter
- Joined
- Oct 11, 2021
- Messages
- 740
- Points
- 403

Like being behind a sewing machine and making sails?Thanks, Peter. A beautiful day for making beautiful memories!
- Joined
- Sep 3, 2021
- Messages
- 5,197
- Points
- 738

Like being behind a sewing machine and making sails?
 No, not today; the Admiral has different plans...
Hallo my friend @RDN1954And there it is! Today at 10:29 a very friendly FedEx guy delivered an eagerly expected package from China.
Unfortunately, this is my first and also last post for this year on this Bluenose POF build log, since the Admiral put the package under lock and key; it's her Christmas present for me this year, so I'll have to sit on my hands for a while...
Having said that, now I'll have to come up with a rather impressive Christmas present for the Admiral as well, which is a challenge in itself, but rest assured I'm up to it, years of experience under my belt.
Here some pictorial evidence of today's event:
View attachment 258876View attachment 258877View attachment 258878
we wish you all the BEST and a HAPPY BIRTHDAY

Enjoy your special day
Hey Happy Birthday Johan!


