YES RICH I ALSO USED THIS IT IS THE FIRST PAGE OF THE FRAME DRAWINGS MADE 2 COPIES. GOD BLESS STAY SAFE YOU AND YOURS DON
-

Win a Free Custom Engraved Brass Coin!!!
As a way to introduce our brass coins to the community, we will raffle off a free coin during the month of August. Follow link ABOVE for instructions for entering.
-

PRE-ORDER SHIPS IN SCALE TODAY!
The beloved Ships in Scale Magazine is back and charting a new course for 2026!
Discover new skills, new techniques, and new inspirations in every issue.
NOTE THAT OUR FIRST ISSUE WILL BE JAN/FEB 2026
- Home
- Forums
- Ships of Scale Group Builds and Projects
- Bluenose PoF Group Build
- Bluenose Group Build Logs
You are using an out of date browser. It may not display this or other websites correctly.
You should upgrade or use an alternative browser.
You should upgrade or use an alternative browser.
Now, with your lead I found it. Previously went straight to the frame(s) drawing page in my haste. Now I can add your annotations. Thanks. Rich (I apologize for my sidetrack deviation of your time.)@PT-2 Hi rich. It is the very first page in the frame instruction manual - it is actually separate from the rest of the frame-drawings.
- Joined
- Jan 9, 2020
- Messages
- 10,566
- Points
- 938

As promised here is the actual construction of the ribs. Please note that I will illustrate THE PROCESS with both Ribs #8 and # 20 simply because during the construction of Rib #8, I neglected to take some pictures of the process. Even though the rib numbers may vary the PROCESS is the same and follows a chronological, step-by step layout of what I have done. Once again - I am by no means saying that you should follow this to the letter - just that is what I used, I worked for me and I will continue to do so.
1. Carefully remove the ribs from their sheeting and immediately mark them not only FRONT and REAR but also FRONT and REAR of each part. The bevel lines will in this instance indicate FRONT and the non-beveled side REAR. YuanQing advises only to sand the little nodes or tabs (where the frames were joined to the back-up sheeting) but not to remove the char. I have done this on Frame #8, but found it difficult to remove the char later. On frame #20, I first removed the char - your choice!
2. The next step is to lay out the frame parts in their designated place on the rib plans.
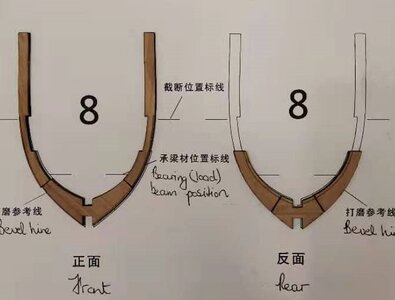
Please note that the left side as we look at it, is the FRONT part of the frame. In the above picture nothing is glued and parts just lie freely on top of the paper.
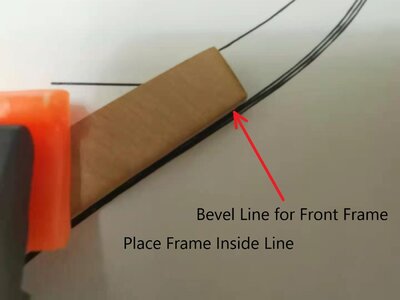
3. The centre portion of the Rear Frame is placed in its position. Make sure that it conforms to the inside line. You will notice the bevel line is left uncovered - that portion will be filled by the front part of the frame once that is in position.
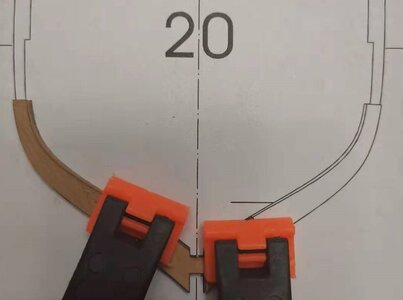
4. With the centre section of the assembly firmly clamped, glue the one rib-arm into position and clamp over the joint. @donfarr Don, throw away the pins and get clamps!
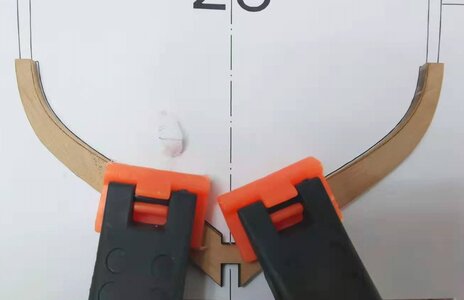
5. Repeat the process and do exactly the same on the other side. As the frame parts are only joined by means of a butt-joint, I leave these in the clamps for at least two hours.
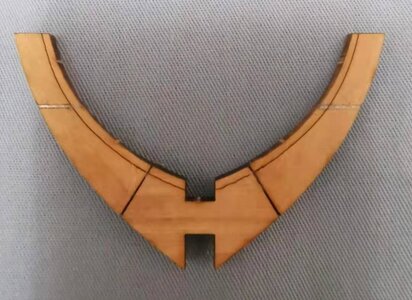
Once assembled, this is what the rear half of the frame construction looks like. Make sure that you mark the rear of this assembly. Once again, the bevel lines indicate the front of the frame. Please note that for illustrative purposes, I use Frame #8 to show the finished rear part.
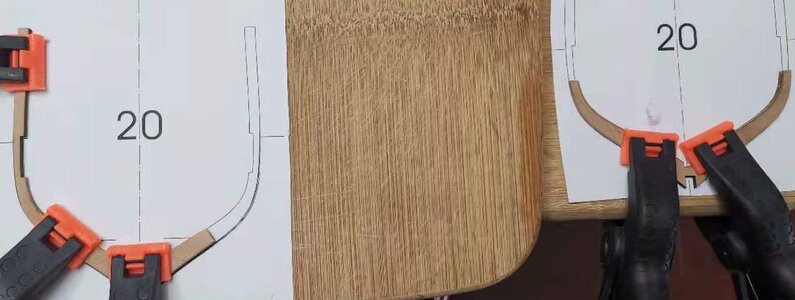
Here you can see the finished rear half of Frame #20 on the right, while the front half of Frame #20 is being assembled on the left.
6. When both halves are completed, they are placed on the drawings again to verify that they match up and are accurate. If you are happy with how they align with the drawings/ plans we can proceed to the next stage.
7. The two halves are now glued together BACK TO BACK. In other words - once glued - the bevel lines on BOTH sides need to be visible.
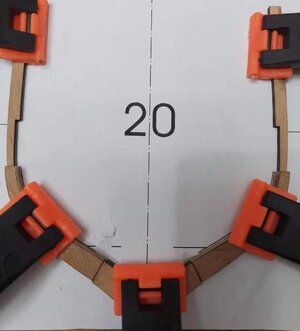
Both halves being glued together.
8. Once the rib is fully assembled, I do the final check against the drawings.
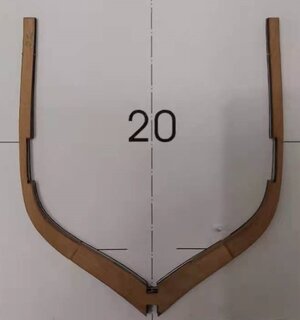
Front section of the rib-assembly checked.
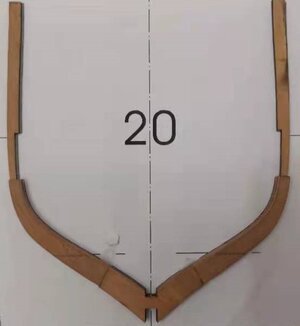
Rear half of the rib-assembly checked.
9. With all of that done, do your beveling and give the rib a light sanding (I use 360-grit sandpaper for this).
10. Write the number of the rib on the top part of one or both of the ribs.
With this done, you have one rib completed. Now go for it !!! There are 57 more!
1. Carefully remove the ribs from their sheeting and immediately mark them not only FRONT and REAR but also FRONT and REAR of each part. The bevel lines will in this instance indicate FRONT and the non-beveled side REAR. YuanQing advises only to sand the little nodes or tabs (where the frames were joined to the back-up sheeting) but not to remove the char. I have done this on Frame #8, but found it difficult to remove the char later. On frame #20, I first removed the char - your choice!
2. The next step is to lay out the frame parts in their designated place on the rib plans.

Please note that the left side as we look at it, is the FRONT part of the frame. In the above picture nothing is glued and parts just lie freely on top of the paper.

3. The centre portion of the Rear Frame is placed in its position. Make sure that it conforms to the inside line. You will notice the bevel line is left uncovered - that portion will be filled by the front part of the frame once that is in position.

4. With the centre section of the assembly firmly clamped, glue the one rib-arm into position and clamp over the joint. @donfarr Don, throw away the pins and get clamps!

5. Repeat the process and do exactly the same on the other side. As the frame parts are only joined by means of a butt-joint, I leave these in the clamps for at least two hours.

Once assembled, this is what the rear half of the frame construction looks like. Make sure that you mark the rear of this assembly. Once again, the bevel lines indicate the front of the frame. Please note that for illustrative purposes, I use Frame #8 to show the finished rear part.

Here you can see the finished rear half of Frame #20 on the right, while the front half of Frame #20 is being assembled on the left.
6. When both halves are completed, they are placed on the drawings again to verify that they match up and are accurate. If you are happy with how they align with the drawings/ plans we can proceed to the next stage.
7. The two halves are now glued together BACK TO BACK. In other words - once glued - the bevel lines on BOTH sides need to be visible.

Both halves being glued together.
8. Once the rib is fully assembled, I do the final check against the drawings.

Front section of the rib-assembly checked.

Rear half of the rib-assembly checked.
9. With all of that done, do your beveling and give the rib a light sanding (I use 360-grit sandpaper for this).
10. Write the number of the rib on the top part of one or both of the ribs.
With this done, you have one rib completed. Now go for it !!! There are 57 more!

And who said model ship building isn't a spectator sport!! I could watch this all day. Thanks Heinrich
HI HEINRICH, ONCE AGAIN FANTASTIC EXPLANATIONS, ONE QUESTION SO FAR THE FRONT AND REAR PLACEMENT ARE ALL THE FRONTS POSISTIONED TO THE BOW, AND IS IT NECESSARY TO HAVE THE MIDSHIP FRAME NO. GOD BLESS YOU AND YOURS DON
Hi Heinrich,
Your log is absolutely great, easy to follow and VERY INFORMATIVE. I’m curious, what surface are you clamping your work to?
Jan
Your log is absolutely great, easy to follow and VERY INFORMATIVE. I’m curious, what surface are you clamping your work to?
Jan
- Joined
- Jan 9, 2020
- Messages
- 10,566
- Points
- 938

@Pathfinder65 Hi Jan. Great to hear from you. Yes, the log serves a dual purpose - on the one hand it is a build log, on the other, it is an instruction manual for our aspirant builders.  I use two wooden cheese/bread boards and have also modified the Leudo's building jig to serve as a surface. The cheese/bread boards are too wide - hence I can only clamp the centre section and one side at a time. With the Leudo's jig, I can clamp both sides and the centre section all at once. There are going to be some frames that are too big (wide) for my specially modified Leudo jig though!
Hi Heinrich,@Pathfinder65 Hi Jan. Great to hear from you. Yes, the log serves a dual purpose - on the one hand it is a build log, on the other, it is an instruction manual for our aspirant builders.I use two wooden cheese/bread boards and have also modified the Leudo's building jig to serve as a surface. The cheese/bread boards are too wide - hence I can only clamp the centre section and one side at a time. With the Leudo's jig, I can clamp both sides and the centre section all at once. There are going to be some frames that are too big (wide) for my specially modified Leudo jig though!

Excellent, my curiosity was peaked because of the need to have a good flat surface while working with frames.
Jan
Last edited:
Canoe21
Lawrence
Hello Jan, I like to use a piece of glass with the edges sanded down to avoid cuts, most glue will not stick to glass.Hi Heinrich,
Excellent, my curiosity was peaked because of the need to have a good flat surface while working with frames.
Jan
Regards Lawrence
Hey all you awesome Bluenose builders. Here is a link to the Flags sheet I put together. It's posted in my Bluenose build log I recently created.
Bluenose Flags
Bluenose Flags
Kurt Konrath
Kurt Konrath
So the frames are double thick on bottom, but single thickness at top of frames?
Just trying to understand without kit or instructions in front of me.
Keep up the great instructional build for all of us bound to follow behind you when we get our kit out for work.
Just trying to understand without kit or instructions in front of me.
Keep up the great instructional build for all of us bound to follow behind you when we get our kit out for work.
That is the same as the bulkhead "frames" in MS2130 where we are instructed and shown to cut/file away the after/rear face creating a more narrow station at the deck level. The inward face of these are also shaped to parallel the outer curve of the side. The remaining thicker bulkhead portion which crosses the schooner becomes the deck beam. The YQ frames eliminate this removal process.So the frames are double thick on bottom, but single thickness at top of frames?
Just trying to understand without kit or instructions in front of me.
Keep up the great instructional build for all of us bound to follow behind you when we get our kit out for work.
Rich (PT-2)
Heinrich,
Just a question about the parts 20 and 21.
On your the picture I made them grey:
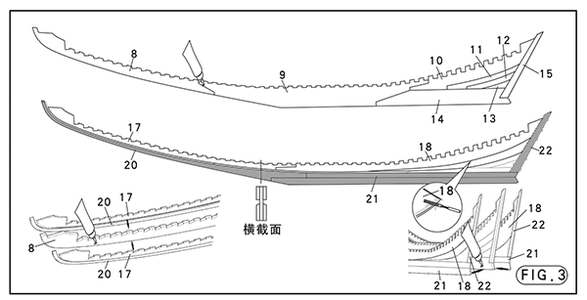
Are this cover planks for the keel or are they intended to strengthen the keel. To give it its strength by the 3 layers with overlapping seams and give it body?
Because, when the port side is planked, these parts are still in sight.
In fig.20 I made them also grey.
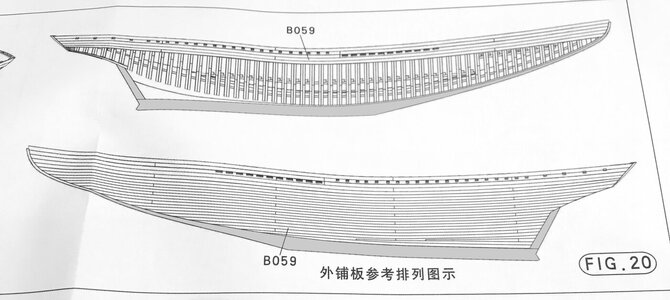
In a other way: is the wood of the keel covered with (protection) planks?
Perhaps @PT-2 Rich ore somebody else can say something about this question?
Regards, Peter
Just a question about the parts 20 and 21.
On your the picture I made them grey:

Are this cover planks for the keel or are they intended to strengthen the keel. To give it its strength by the 3 layers with overlapping seams and give it body?
Because, when the port side is planked, these parts are still in sight.
In fig.20 I made them also grey.

In a other way: is the wood of the keel covered with (protection) planks?
Perhaps @PT-2 Rich ore somebody else can say something about this question?
Regards, Peter
Last edited:
I don't want to interfere, and I apologise, but to me these pieces do in fact add to the strength but also form the deadwood area of the stern. This would help with the planking making it lay flatter. Just my thoughts
- Joined
- Jan 9, 2020
- Messages
- 10,566
- Points
- 938

Hello Gentlemen
I have to start by saying that it is wonderful to see how the kits are arriving and how the build logs are being started. I don't have too much report from my side as I have been making frames - and the process is exactly the same as I have described in my previous post. However, I have finished 10 x frames and have test-fitted them out of curiosity! Please note that I have just removed the char prior to assembly. After assembly, absolutely nothing has been done to the frames - no sanding/polishing or finishing of any kind.
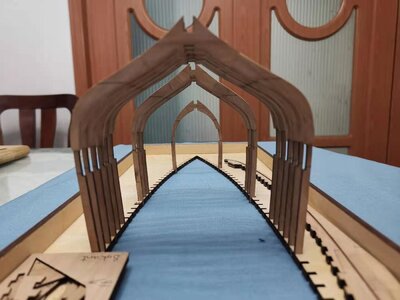
There is still a v-e-r-y long way to go until there is light at the end of that tunnel!
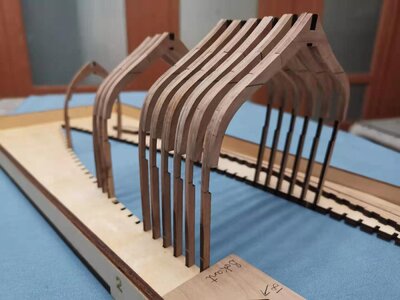
If we use PLENTY of imagination, we can already see a hull shape developing.
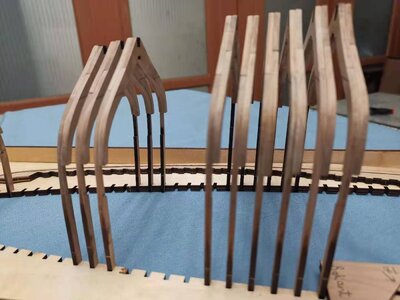
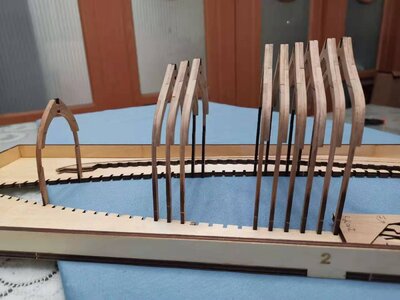
So in the coming week the goal remains churning out more frames - and like Don said - at the end of each week, we hope to have filled that jig some more!
Thank you all for following and for supporting Bluenose! Stay safe out there, look after yourselves and enjoy your building!
I have to start by saying that it is wonderful to see how the kits are arriving and how the build logs are being started. I don't have too much report from my side as I have been making frames - and the process is exactly the same as I have described in my previous post. However, I have finished 10 x frames and have test-fitted them out of curiosity!

There is still a v-e-r-y long way to go until there is light at the end of that tunnel!

If we use PLENTY of imagination, we can already see a hull shape developing.


So in the coming week the goal remains churning out more frames - and like Don said - at the end of each week, we hope to have filled that jig some more!
Thank you all for following and for supporting Bluenose! Stay safe out there, look after yourselves and enjoy your building!
Heinrich,Hello Gentlemen
I have to start by saying that it is wonderful to see how the kits are arriving and how the build logs are being started. I don't have too much report from my side as I have been making frames - and the process is exactly the same as I have described in my previous post. However, I have finished 10 x frames and have test-fitted them out of curiosity!Please note that I have just removed the char prior to assembly. After assembly, absolutely nothing has been done to the frames - no sanding/polishing or finishing of any kind.
View attachment 201397
There is still a v-e-r-y long way to go until there is light at the end of that tunnel!
View attachment 201398
If we use PLENTY of imagination, we can already see a hull shape developing.
View attachment 201400
View attachment 201401
So in the coming week the goal remains churning out more frames - and like Don said - at the end of each week, we hope to have filled that jig some more!
Thank you all for following and for supporting Bluenose! Stay safe out there, look after yourselves and enjoy your building!
It looks like a giant 3D Jig-(no)saw puzzle.
Regards Peter
The keel is exposed as you have shaded it along with the stem post for the rudder. The bow stem should eventually begin to be tapered from a square edge to one less wide as it progresses form the point of departure from the straight keel bottom to the upward curve and then at the very end under the boom again be wider for a gammoning metal connection. You can see some of this in the old photos of Bluenose and supplemented by me MS2130 vetted kit. .. . I cannot say what YQ instructs as I have not begun my build, just watched. Rich (PT-2)Heinrich,
Just a question about the parts 20 and 21.
On your the picture I made them grey:
View attachment 201342
Are this cover planks for the keel or are they intended to strengthen the keel. To give it its strength by the 3 layers with overlapping seams and give it body?
Because, when the port side is planked, these parts are still in sight.
In fig.20 I made them also grey.
View attachment 201343
In a other way: is the wood of the keel covered with (protection) planks?
Perhaps @PT-2 Rich ore somebody else can say something about this question?
Regards, Peter


