Very clean, precise and accurate work Peter. I can't see much difference between your bowsprit and the one in the historical picture (black & white) - very nice indeed. I think your eyes deserve a rest after thatAnd all with clove-hitches. For safety, all knots have been given a tip of glue. The eyes now get a rest.
-

Win a Free Custom Engraved Brass Coin!!!
As a way to introduce our brass coins to the community, we will raffle off a free coin during the month of August. Follow link ABOVE for instructions for entering.
-

PRE-ORDER SHIPS IN SCALE TODAY!
The beloved Ships in Scale Magazine is back and charting a new course for 2026!
Discover new skills, new techniques, and new inspirations in every issue.
NOTE THAT OUR FIRST ISSUE WILL BE JAN/FEB 2026
- Home
- Forums
- Ships of Scale Group Builds and Projects
- Bluenose PoF Group Build
- Bluenose Group Build Logs
You are using an out of date browser. It may not display this or other websites correctly.
You should upgrade or use an alternative browser.
You should upgrade or use an alternative browser.
YUANQING BLUENOSE - Peter Voogt [COMPLETED BUILD]
- Thread starter Peter Voogt
- Start date
- Watchers 74
- Joined
- Sep 3, 2021
- Messages
- 5,197
- Points
- 738

The shrouds, backstays and bobstays in white: you struck gold with that! Adding the footropes just enhances the effects.The last work on the bowsprit. A nerve-racking tying knots with 2 tweezers: the foot ropes along the bowsprit:
View attachment 313852
Let's add the example:
View attachment 313849
Use the blue arrows to point to the 2 foot ropes themselves and the cross ropes to stabilize them. The cross ropes are attached to both shrouds.
View attachment 313851
From some other positions:
View attachment 313850
View attachment 313848
And all with clove-hitches. For safety, all knots have been given a tip of glue. The eyes now get a rest.
(Yes, as mentioned before, the inside of the vault holes are still being finished.)
Regards, Peter

Thanxs, Mark. Old pictures are inspiration.Very clean, precise and accurate work Peter. I can't see much difference between your bowsprit and the one in the historical picture (black & white) - very nice indeed. I think your eyes deserve a rest after that
Regards, Peter
Thanxs, Johan. I saw it on the old pictures and though …… let’s do it. I also really like the outcome.The shrouds, backstays and bobstays in white: you struck gold with that! Adding the footropes just enhances the effects.
Regards, Peter
Last edited:
Thanxs, Heinrich. Luckily there are a lot of old pictures and books. It took hours, but it’s fun to interpret the typical details. And then dig in the boxes with spare parts.The footropes look superb and just keep adding to the overall effect of authenticity.
Regards, Petet
For the next part I had to put both parts back together:
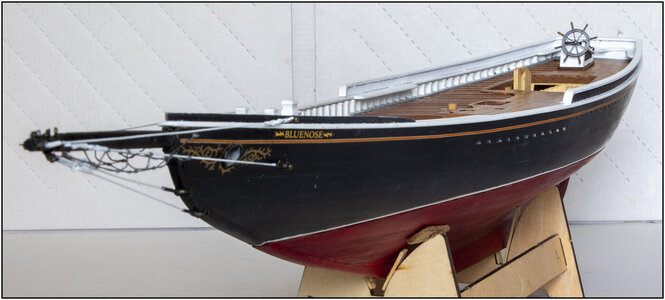
And it can already be seen on the aft deck.
It's DEAN TIME! Because finally I can start using the by Dean @Dean62 in 3D designed steering wheel and steering mechanism. With air-brush work by Henk @Henk Liebre . And print work by an acquaintance of Henk.
And for those 3: A BIG THANKS!

As 1st part on the deck I started making the wheelhouse. Also gained inspiration from 2 old photos:
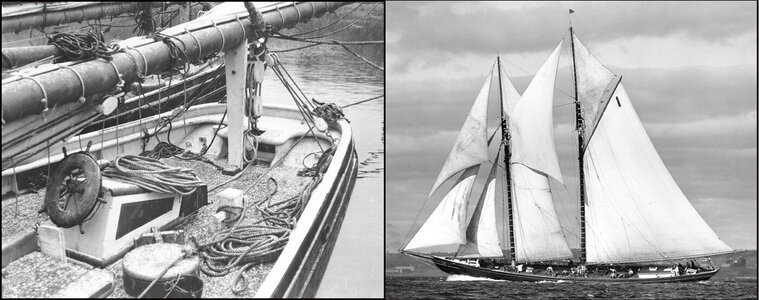
The front and rear are at an angle.
With this as a result:
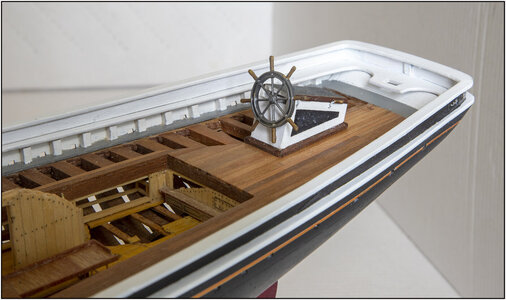
For the sides of the top I saw quarters of 3mm beech round timber. Scraped some small profiles for the connection to the deck.
To cover the top side I used P240 sandpaper, with a coating to prevent attracting dirt. The reason for this will become apparent later in the construction of the cabin. There is that roofing good to see.
The top hatch of the original is secured with 4 hooks. I made it hinged. More soon.......
I still need to get some dust and dirt out.
The hull and interior below the deck are half open. I will also implement that theme for the parts on the deck. With occasional minor variations.
So the port side was closed, but the starboard side is open:
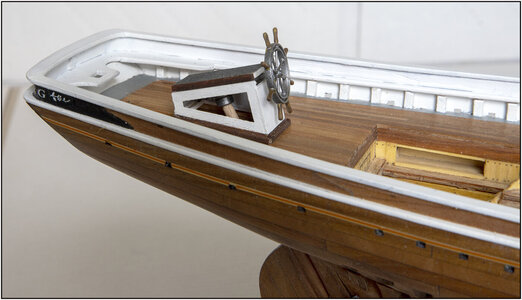
But then the steering mechanism is not yet clearly visible. Everything is still dry-fit, because the piece of visible rudder shaft also needs to be aligned further.
That is why the top has been made hinged:
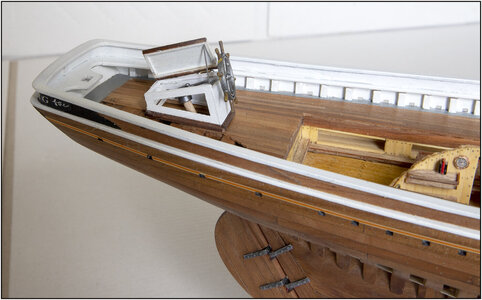
So that it can remain open.
Then you have a view of it from above:
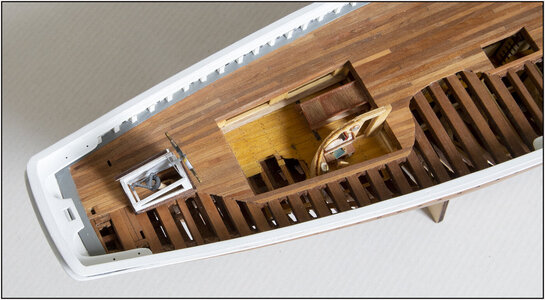
You may have noticed that the steering wheel with steering shaft is not in the center of the front. That's correct.
These drawings in the Saga make that clear:
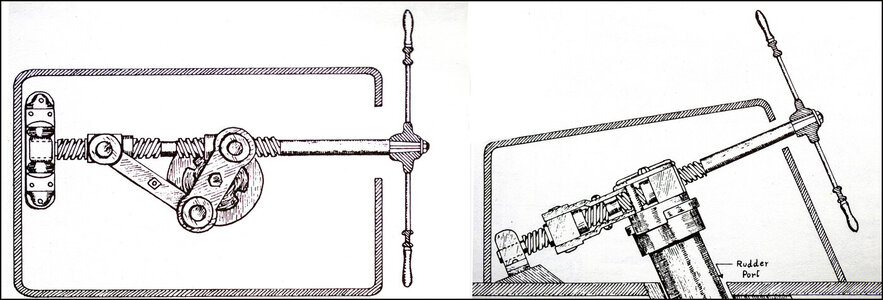
On the steering shaft are 2 pieces of screw thread that are opposite of each other. By turning the handlebars to the left or right, the 2 bushes on those threaded pieces are turned towards or away from each other. This causes the pivoting levers to turn the rudder shaft to the left or right.
Because the foot of the steering shaft is fixed in a bearing and the rudder shaft is also centrally secured, it is inevitable that the steering shaft moves left and right when turning.
That is why there is also a slot at the front of the steering box where the steering shaft can move left and right..
Small detail differences with the BN-II:
- the rear of the steering box is slanted with the original;
- the groove has been carried over the entire width of the original to the side walls.
I am considering spraying the steering wheel bronze. Because the steering wheel of the original is also made of bronze. But I haven't gotten the paint yet.
Regards, Peter

And it can already be seen on the aft deck.
It's DEAN TIME! Because finally I can start using the by Dean @Dean62 in 3D designed steering wheel and steering mechanism. With air-brush work by Henk @Henk Liebre . And print work by an acquaintance of Henk.
And for those 3: A BIG THANKS!


As 1st part on the deck I started making the wheelhouse. Also gained inspiration from 2 old photos:

The front and rear are at an angle.
With this as a result:

For the sides of the top I saw quarters of 3mm beech round timber. Scraped some small profiles for the connection to the deck.
To cover the top side I used P240 sandpaper, with a coating to prevent attracting dirt. The reason for this will become apparent later in the construction of the cabin. There is that roofing good to see.
The top hatch of the original is secured with 4 hooks. I made it hinged. More soon.......
I still need to get some dust and dirt out.
The hull and interior below the deck are half open. I will also implement that theme for the parts on the deck. With occasional minor variations.
So the port side was closed, but the starboard side is open:

But then the steering mechanism is not yet clearly visible. Everything is still dry-fit, because the piece of visible rudder shaft also needs to be aligned further.
That is why the top has been made hinged:

So that it can remain open.
Then you have a view of it from above:

You may have noticed that the steering wheel with steering shaft is not in the center of the front. That's correct.
These drawings in the Saga make that clear:

On the steering shaft are 2 pieces of screw thread that are opposite of each other. By turning the handlebars to the left or right, the 2 bushes on those threaded pieces are turned towards or away from each other. This causes the pivoting levers to turn the rudder shaft to the left or right.
Because the foot of the steering shaft is fixed in a bearing and the rudder shaft is also centrally secured, it is inevitable that the steering shaft moves left and right when turning.
That is why there is also a slot at the front of the steering box where the steering shaft can move left and right..
Small detail differences with the BN-II:
- the rear of the steering box is slanted with the original;
- the groove has been carried over the entire width of the original to the side walls.
I am considering spraying the steering wheel bronze. Because the steering wheel of the original is also made of bronze. But I haven't gotten the paint yet.
Regards, Peter
Last edited:
This level of detail and craftsmanship at scale is quite amazing Peter! Bravo!
Last edited:
Thanks, Paul.This level of detail and craftsmanship at this scale is quite amazing Peter! Bravo!
This is best expressed in this version:
I really love that hinged top, and I am so glad the steering mechanism turned out as we planned! It adds a lot of realism! I know we played with the layout, and had to make a few assumptions on angles, based on pictures you used along with the model itself.
Overall, with some final minor adjustments, I call it a success! I have been waiting in anticipation for this! And of course the windlass motor and box that will be added in the future! This is going to be a real museum piece in the end! And I am glad to have been a part of it. Seeing you succeed warms my heart! Best wishes my friend!
Overall, with some final minor adjustments, I call it a success! I have been waiting in anticipation for this! And of course the windlass motor and box that will be added in the future! This is going to be a real museum piece in the end! And I am glad to have been a part of it. Seeing you succeed warms my heart! Best wishes my friend!
Canoe21
Lawrence
Hello Peter, That truly is a great idea with the hinged wheel house cover. This I have been thinking of for some time now and you have answered all of my questions so very nicely. Have not worked in my Old Ship Yard much this last week as I have been preparing and gathering up stuff for my Admirals Birthday get away up at the Bryers Lodge on the French river for a week. This is a much needed rest for us both. So with that said we hope to be back working on the week of 26 of June.For the next part I had to put both parts back together:
View attachment 314297
And it can already be seen on the aft deck.
It's DEAN TIME! Because finally I can start using the by Dean @Dean62 in 3D designed steering wheel and steering mechanism. With air-brush work by Henk @Henk Liebre . And print work by an acquaintance of Henk.
And for those 3: A BIG THANKS!
As 1st part on the deck I started making the wheelhouse. Also gained inspiration from 2 old photos:
View attachment 314298
The front and rear are at an angle.
With this as a result:
View attachment 314299
For the sides of the top I saw quarters of 3mm beech round timber. Scraped some small profiles for the connection to the deck.
To cover the top side I used P240 sandpaper, with a coating to prevent attracting dirt. The reason for this will become apparent later in the construction of the cabin. There is that roofing good to see.
The top hatch of the original is secured with 4 hooks. I made it hinged. More soon.......
I still need to get some dust and dirt out.
The hull and interior below the deck are half open. I will also implement that theme for the parts on the deck. With occasional minor variations.
So the port side was closed, but the starboard side is open:
View attachment 314300
But then the steering mechanism is not yet clearly visible. Everything is still dry-fit, because the piece of visible rudder shaft also needs to be aligned further.
That is why the top has been made hinged:
View attachment 314301
So that it can remain open.
Then you have a view of it from above:
View attachment 314302
You may have noticed that the steering wheel with steering shaft is not in the center of the front. That's correct.
These drawings in the Saga make that clear:
View attachment 314303
On the steering shaft are 2 pieces of screw thread that are opposite of each other. By turning the handlebars to the left or right, the 2 bushes on those threaded pieces are turned towards or away from each other. This causes the pivoting levers to turn the rudder shaft to the left or right.
Because the foot of the steering shaft is fixed in a bearing and the rudder shaft is also centrally secured, it is inevitable that the steering shaft moves left and right when turning.
That is why there is also a slot at the front of the steering box where the steering shaft can move left and right..
Small detail differences with the BN-II:
- the rear of the steering box is slanted with the original;
- the groove has been carried over the entire width of the original to the side walls.
I am considering spraying the steering wheel bronze. Because the steering wheel of the original is also made of bronze. But I haven't gotten the paint yet.
Regards, Peter
Regards Lawrence
- Joined
- Jan 9, 2020
- Messages
- 10,566
- Points
- 938

This is lovely work Peter and what is even more heartening is the level of co-operation that exists among Bluenose builders. This what gives proper definition to the words "Group Build" as it really was a team effort. My hats go off to all those were involved.
- Joined
- Jan 9, 2020
- Messages
- 10,566
- Points
- 938

Lawrence my friend I am not sure if I want to "like" your post about going to Bryers Lodge - not if I think of what happened in the past. Keep your admiral chained up and take care at all times!Hello Peter, That truly is a great idea with the hinged wheel house cover. This I have been thinking of for some time now and you have answered all of my questions so very nicely. Have not worked in my Old Ship Yard much this last week as I have been preparing and gathering up stuff for my Admirals Birthday get away up at the Bryers Lodge on the French river for a week. This is a much needed rest for us both. So with that said we hope to be back working on the week of 26 of June.
Regards Lawrence
Thanxs for the reply, Dean. For several months the parts where staring to me, with acclaim from AL-FI: use me, use me.I really love that hinged top, and I am so glad the steering mechanism turned out as we planned! It adds a lot of realism! I know we played with the layout, and had to make a few assumptions on angles, based on pictures you used along with the model itself.
Overall, with some final minor adjustments, I call it a success! I have been waiting in anticipation for this! And of course the windlass motor and box that will be added in the future! This is going to be a real museum piece in the end! And I am glad to have been a part of it. Seeing you succeed warms my heart! Best wishes my friend!
And there is more to do on the hull, f.i. the cain plates. But now I don’t need to turn the hull anymore upside down and I could align the rudder.
And now the windlass motor starts to sputter: how about me? So, I have to look what‘s next.
Regards, Peter
Hi Lawrence. I am pleased that similar ideas exist among the BN builders. And that I provide a bit of inspiration with my construction. In any case, I enjoy what I see in all the construction reports, your BN included. What you and Johan are doing whit those LED’s …… I call you both for myself the Buzz Lightyears Boys.Hello Peter, That truly is a great idea with the hinged wheel house cover. This I have been thinking of for some time now and you have answered all of my questions so very nicely. Have not worked in my Old Ship Yard much this last week as I have been preparing and gathering up stuff for my Admirals Birthday get away up at the Bryers Lodge on the French river for a week. This is a much needed rest for us both. So with that said we hope to be back working on the week of 26 of June.
Regards Lawrence
I also hope that some 'temporarily silent' BNs will be restarted. It doesn't matter in whatever form. A BN deserves to be phased out. But that applies to any ship under construction.
Enjoy your rest and your Admiral's birthday.
 We all need a break from time to time.
Regards, Peter
Last edited:
Thanx, Heinrich. You are so right whit the words “Group Build”. I saw your post after I was answering Lawrence. Some lines belongs also here in this answer.This is lovely work Peter and what is even more heartening is the level of co-operation that exists among Bluenose builders. This what gives proper definition to the words "Group Build" as it really was a team effort. My hats go off to all those were involved.
I really hope some ‘resting BN’s’ get a wakeup call and the BN Group Build will be very active again.
When we're ‘busy’ in the mountains, we have an expression: “What happens on the mountens, stays on the mountains.”Lawrence my friend I am not sure if I want to "like" your post about going to Bryers Lodge - not if I think of what happened in the past. Keep your admiral chained up and take care at all times!
So, ‘What happens in the Logde (in the past), stays in the Logde (in the past)”.
Regards, Peter
Last edited:
- Joined
- Oct 28, 2018
- Messages
- 760
- Points
- 403

Very nice work Peter, very nicely done the open roof, and the added details
I knew this would come out very nicely with you on your deck
I agree with the words of Dean and Heinrich
The wheel , saw that there was on the deck metal part brown come out with your camera, I read it wants you to make the bronze, otherwise it could have been touched up for you at the next meeting
I know plans change during construction and nothing is more changeable than a person ( read model builder)
Regards
Henk
- Joined
- Oct 28, 2018
- Messages
- 760
- Points
- 403

Enjoy your holiday Laurence, I'll keep following youHave not worked in my Old Ship Yard much this last week as I have been preparing and gathering up stuff for my Admirals Birthday get away up at the Bryers Lodge on the French river for a week. This is a much needed rest for us both. So with that said we hope to be back working on the week of 26 of June.
This “silent BN” will be restarted, but it will take some time before I can update my report again
Regards
Henk
Thanxs, Henk. And for your understanding in terms of “changing colors”. I let the wheel for now and can paint the 2nd. Then I (we?) can see what I (we?) liked the best.Very nice work Peter, very nicely done the open roof, and the added details
I knew this would come out very nicely with you on your deck
I agree with the words of Dean and Heinrich
The wheel , saw that there was on the deck metal part brown come out with your camera, I read it wants you to make the bronze, otherwise it could have been touched up for you at the next meeting
I know plans change during construction and nothing is more changeable than a person ( read model builder)
Regards
Henk
Regards, Peter
Last edited:
- Joined
- Sep 3, 2021
- Messages
- 5,197
- Points
- 738

Your solutions to the wheelhouse are very inspirational. Since I am also the proud owner of a steering mechanism, thanks to a well-known mutual friend of ours, I just can't permanently close the wheelhouse. So I was already tossing around some ideas on how to either have a hinged cover or some form of an open side. You did both.
It's very tempting to follow your example.
A big thank-you by the way for your very nice words on the lights Lawrence and I are trying to incorporate in our build.
I don't know what Lawrence experience is, but for me it's a real struggle. The lights are small enough, but the wires, resistors and connections take up a lot of non-existent space. A cable duct is now in the making...
Thanks to the many customizations here on SOS, I am now lured deep into unknown territory, very anxious to see how it all turns out.
Luckily we have examples like your exemplary Bluenose...


