YUANQING BLUENOSE - Peter Voogt [COMPLETED BUILD]

You know, that I love your work, but here I have some "problems" with your knees, so sorry for this comment:
- due to the fact, that the width of the beams are wider than in the original plan (not in scale), the resulted space between two deck beams is much smaller (original appr. 3 times the width of a beam, in model only 1 times the width of a beam) and because of this the knees are much shorter than in the original
- For me they (the knees) are looking a little bit unrealistic small - but this is my personal subjective taste
Peter,
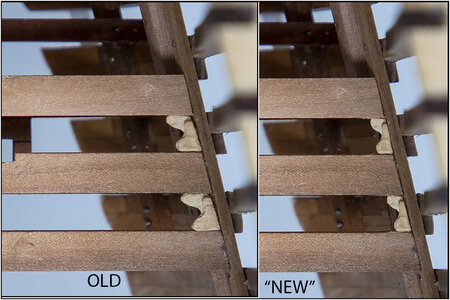
If you make the large portion of the knee smaller, not as wide and a little shorter, it will make it appear longer. It’s an illusion at that point, but more pleasing visually. ;)
Digital adjusted. Is this with you both has in mind:
312 Knien.jpg
It does seem better. But .....
But after milling it still has to fit between fingers to further file into shape. ;)
Holding with pliers or tweezers quickly gives dirty impressions :(
Regards, Peter
 
Digital adjusted. Is this with you both has in mind:
View attachment 253363
It does seem better. But .....
But after milling it still has to fit between fingers to further file into shape. ;)
Holding with pliers or tweezers quickly gives dirty impressions :(
Regards, Peter
New definitely looks better and more in scale, even if only visually. Good revision. Rich (PT-2)
 
Not that you care what I think - but could you mill this as a single piece and then just stain the 'lower' one (or paint) to create the illusion of layering. Might be easier than making two tiny bits. Of course you would need to modify as you went along as they would fit differently at different frame stations...
 
Personally I do not care for the knees. This is one of those cases where you simply have to realize the limitations that the scale of the model imposes. It is commendable that you want to include as much detail and be as accurate as possible, but at the size in which they need to be made you have to ask yourself whether they have the potential to add to the visual appeal from the model or detract from it. The risk of the latter is simply too great - this is one of those instances in which "less is more". And if you HAVE to have them, make them from a wood that is much darker in colour - not as light in colour as the current renderings.
 
Not that you care what I think - but could you mill this as a single piece and then just stain the 'lower' one (or paint) to create the illusion of layering. Might be easier than making two tiny bits. Of course you would need to modify as you went along as they would fit differently at different frame stations...
Paul, I do care what you think. I appreciate any input!
The 2 knees are one part. The top knee is half the thickness of the board. After I've milled it, I cut it loose. Then I have a small parallelogram. And I file the recess in the middle and I file both curves.
I'll post the steps tomorrow.
But I'm very happy with all the input and thinking along!
Regards, Peter
 
Personally I do not care for the knees. This is one of those cases where you simply have to realize the limitations that the scale of the model imposes. It is commendable that you want to include as much detail and be as accurate as possible, but at the size in which they need to be made you have to ask yourself whether they have the potential to add to the visual appeal from the model or detract from it. The risk of the latter is simply too great - this is one of those instances in which "less is more". And if you HAVE to have them, make them from a wood that is much darker in colour - not as light in colour as the current renderings.
Thanks for the input, Heinrich. Look at the added details on the Duc and you know I am a mad Dutch-man.
Do you see them ..... no. Are they there ........ yes. Do I have to cut the BN ........ no.
And my motto: Size does not matter. The Lee was 1:96. Challenges are there to take on.
About the wood to be made off ..... This afternoon I saw the pile of rest planks from which the deck beams come out. Several have the correct thickness as the width for the knees. Beautifully fine structure. Tomorrow a new attempt. Perhaps that might be a nice combination.
Regards, Peter
I think the adjustment is a step in the right direction. I also agree a darker wood would look better. You could always stain the wood you are using now, unless you don't want to use stain. But as you said, you have to put the detail that makes you happy, because it is your ship. ;)
 
There had been some questions and comments about making the double knees.
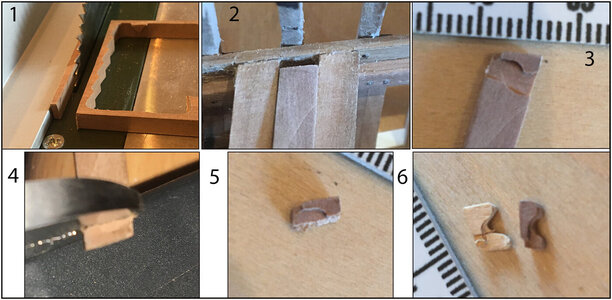
So here's how I'm going to make them in 6 steps:
313 Knien.jpg
1: saw strips of 2mm from the remains of the planks of the deck beams. So, the same wood colors the beams;
2: sand the strip to size and the correct angle;
3: mill the top knee to half the thickness of the strip;
4: cut off at a good height;
5: sanding to the correct height;
6: File away the middle part and form the lower knee. The result, along with the old 'rotten tooth'.

Here are 2 new ones that have passed the water test:
314 Knien.jpg
To approximate the color when they are in the oil.

I'm waiting a while to make the other knees because I'm not sure yet how I'm going to plank the deck. So I don't know yet what I will or will not see. Waterways will be built on the closed side, but how wide, to where is the planking and where the view of the beams?

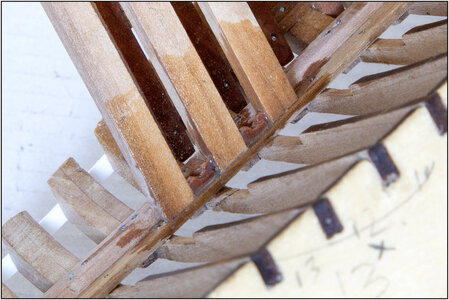
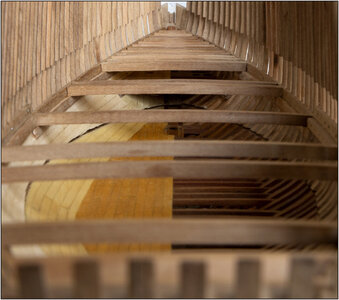
Therefore the foredeck closed with deck beams up to beam 12:
315 12 - 01.jpg
I have to sand the top of the clamps to the above of the beams.
Because from this beam 12 starts the front cabin: the ForeCastle.
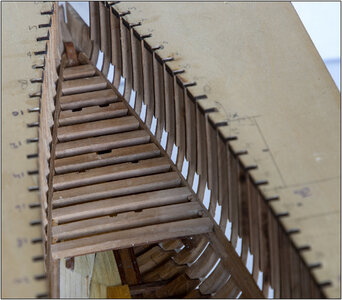
With a view over the beams:
316 12 - 01.jpg

The front cabin is located between beams 12 and 19. I had already installed 18, so 19 behind it. Below beam 19 is the wall between the cabin and the IceHold, the part where the ice for preserving the fish is stored.
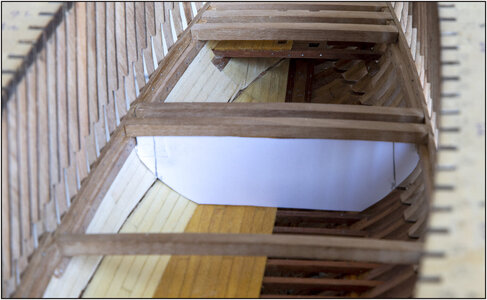
A mold made in the closed hull:
317 1ewall.jpg

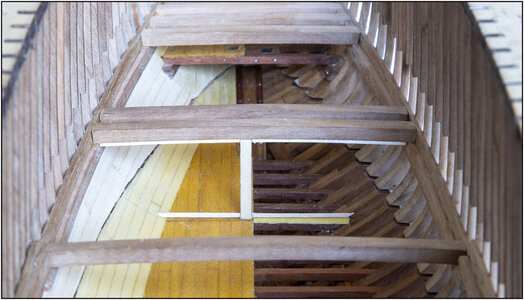
Started with the frame. I cut a few pieces of 3x1mm wood strips for the walls in 3rd so that I got 1x1mm beams. Custom made bottom and top beam:
318 1ewall.jpg
With halfway the last plank of the half wall for reinforcement.

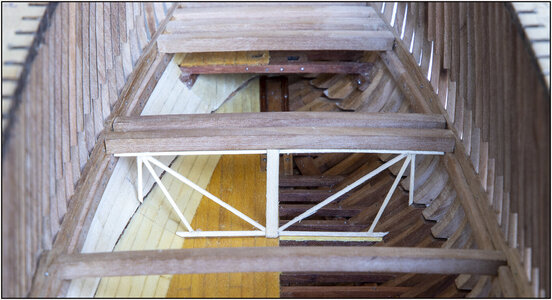
The frame was built up step by step with a few braces to give the bottom and top beam the curve of the floor beams and to keep it in shape:
319 1ewall.jpg

Because there is a piece of the curve of the hull in the upper part of the hull, I can't make the entire wall in 1 piece. I have to cut off the side pieces. They will be in the top section soon:
320 1ewall.jpg
At the arrows 'the ears' come off. The intersection between the two bars is slightly slanted inwards. They will soon (if all goes well) slide past each other when I show the hull closed.

The wall itself comes in the lower part, minus the 2 'ears':
321 1ewall.jpg


I'll have to play around with that some more …….
Regards, Peter
 
Last edited:
There had been some questions and comments about making the double knees.
So here's how I'm going to make them in 6 steps:
View attachment 254154
1: saw strips of 2mm from the remains of the planks of the deck beams. So, the same wood colors the beams;
2: sand the strip to size and the correct angle;
3: mill the top knee to half the thickness of the strip;
4: cut off at a good height;
5: sanding to the correct height;
6: File away the middle part and form the lower knee. The result, along with the old 'rotten tooth'.

Here are 2 new ones that have passed the water test:
View attachment 254155
To approximate the color when they are in the oil.

I'm waiting a while to make the other knees because I'm not sure yet how I'm going to plank the deck. So I don't know yet what I will or will not see. Waterways will be built on the closed side, but how wide, to where is the planking and where the view of the beams?

Therefore the foredeck closed with deck beams up to beam 12:
View attachment 254156
I have to sand the top of the clamps to the above of the beams.
Because from this beam 12 starts the front cabin: the ForeCastle.
With a view over the beams:
View attachment 254157

The front cabin is located between beams 12 and 19. I had already installed 18, so 19 behind it. Below beam 19 is the wall between the cabin and the IceHold, the part where the ice for preserving the fish is stored.
A mold made in the closed hull:
View attachment 254158

Started with the frame. I cut a few pieces of 3x1mm wood strips for the walls in 3rd so that I got 1x1mm beams. Custom made bottom and top beam:
View attachment 254159
With halfway the last plank of the half wall for reinforcement.

The frame was built up step by step with a few braces to give the bottom and top beam the curve of the floor beams and to keep it in shape:
View attachment 254160

Because there is a piece of the curve of the hull in the upper part of the hull, I can't make the entire wall in 1 piece. I have to cut off the side pieces. They will be in the top section soon:
View attachment 254161
At the arrows 'the ears' come off. The intersection between the two bars is slightly slanted inwards. The will soon (if all goes well) slide past each other.

The wall itself comes in the lower part, minus the 2 'ears':
View attachment 254162
The idea is that the parts slide past each other if I want to show the hull closed.

I'll have to play around with that some more …….
Regards, Peter
This is very precise work that you have done. Side question, did you see the Bluenose 110 latest Facebook on the model builders club with the 1/2 open framed and highly detailed model of the interior of BN? I think I put it in the resources thread of our group. You may find it interesting in the very large model. RIch
 
There had been some questions and comments about making the double knees.
So here's how I'm going to make them in 6 steps:
View attachment 254154
1: saw strips of 2mm from the remains of the planks of the deck beams. So, the same wood colors the beams;
2: sand the strip to size and the correct angle;
3: mill the top knee to half the thickness of the strip;
4: cut off at a good height;
5: sanding to the correct height;
6: File away the middle part and form the lower knee. The result, along with the old 'rotten tooth'.

Here are 2 new ones that have passed the water test:
View attachment 254155
To approximate the color when they are in the oil.

I'm waiting a while to make the other knees because I'm not sure yet how I'm going to plank the deck. So I don't know yet what I will or will not see. Waterways will be built on the closed side, but how wide, to where is the planking and where the view of the beams?

Therefore the foredeck closed with deck beams up to beam 12:
View attachment 254156
I have to sand the top of the clamps to the above of the beams.
Because from this beam 12 starts the front cabin: the ForeCastle.
With a view over the beams:
View attachment 254157

The front cabin is located between beams 12 and 19. I had already installed 18, so 19 behind it. Below beam 19 is the wall between the cabin and the IceHold, the part where the ice for preserving the fish is stored.
A mold made in the closed hull:
View attachment 254158

Started with the frame. I cut a few pieces of 3x1mm wood strips for the walls in 3rd so that I got 1x1mm beams. Custom made bottom and top beam:
View attachment 254159
With halfway the last plank of the half wall for reinforcement.

The frame was built up step by step with a few braces to give the bottom and top beam the curve of the floor beams and to keep it in shape:
View attachment 254160

Because there is a piece of the curve of the hull in the upper part of the hull, I can't make the entire wall in 1 piece. I have to cut off the side pieces. They will be in the top section soon:
View attachment 254161
At the arrows 'the ears' come off. The intersection between the two bars is slightly slanted inwards. The will soon (if all goes well) slide past each other.

The wall itself comes in the lower part, minus the 2 'ears':
View attachment 254162
The idea is that the parts slide past each other if I want to show the hull closed.

I'll have to play around with that some more …….
Regards, Peter
Good work on the knees for the beams Peter. However I am more excited about the wall, and the Engineering behind it! I agree with your approach to have the sides at an angle for separation, as that will allow it to come apart easily and also to self center when lowered. They have draft angles on castings, to allow the molds halves to come apart easily. You are accomplishing the same thing. My applause to your well thought out approach! Keep up the good work! ;)
 
Dear Peter. I concur with Dean as to the wall part - that has me excited as well.

I have just realized that there is one build that I would love :)to see you do - the Luhaiqingkong Royal Caroline in 1:30 scale. I regard this kit as the best in the world - period! (and you must know that for me to say that about a British ship, takes a lot). The detail in that kit is simply astounding and lends itself perfectly to your extremely detailed approach. It has one design issue though which makes it a real challenge - but it is exactly that challenge that I would love to see you tackle.
 
This is very precise work that you have done. Side question, did you see the Bluenose 110 latest Facebook on the model builders club with the 1/2 open framed and highly detailed model of the interior of BN? I think I put it in the resources thread of our group. You may find it interesting in the very large model. RIch
Yes Rich, I have seen the video (now already twice). Posted 2 nice stills in the support-page. Very inspiring!
Regards, Peter
 
Good work on the knees for the beams Peter. However I am more excited about the wall, and the Engineering behind it! I agree with your approach to have the sides at an angle for separation, as that will allow it to come apart easily and also to self center when lowered. They have draft angles on castings, to allow the molds halves to come apart easily. You are accomplishing the same thing. My applause to your well thought out approach! Keep up the good work! ;)

Thanxs Dean. After the ‘thinking off’, its now creating and building. The ‘angle approach’ came up during te fitting. I had it in mind, because when building the Duc there were also parts with angled sides that slid into place. Better borrowed wisely than poorly conceived (if that is a good translation of “Beter goed geleend dan slecht bedacht”).
Regards, Peter
 
Last edited:
Dear Peter. I concur with Dean as to the wall part - that has me excited as well.

I have just realized that there is one build that I would love :)to see you do - the Luhaiqingkong Royal Caroline in 1:30 scale. I regard this kit as the best in the world - period! (and you must know that for me to say that about a British ship, takes a lot). The detail in that kit is simply astounding and lends itself perfectly to your extremely detailed approach. It has one design issue though which makes it a real challenge - but it is exactly that challenge that I would love to see you tackle.
Heinrich, thank you very much for the nice words.
I have seen several Royal Caroline’s passing by. Challenging indeed. But ....... There are so many decorations, IMHO a bit over the top. I'm curious about what that 'real challenge' is.
But I have still a lot of challenges with this BN.
Regards, Peter
 
This is very precise work that you have done. Side question, did you see the Bluenose 110 latest Facebook on the model builders club with the 1/2 open framed and highly detailed model of the interior of BN? I think I put it in the resources thread of our group. You may find it interesting in the very large model. RIch
Seen the video
Woow
 
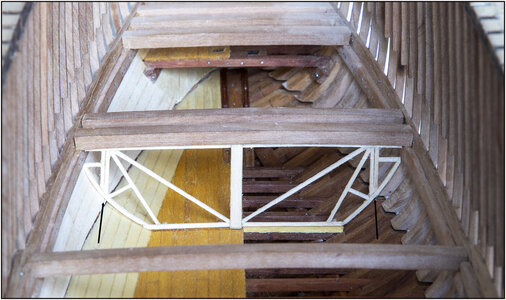
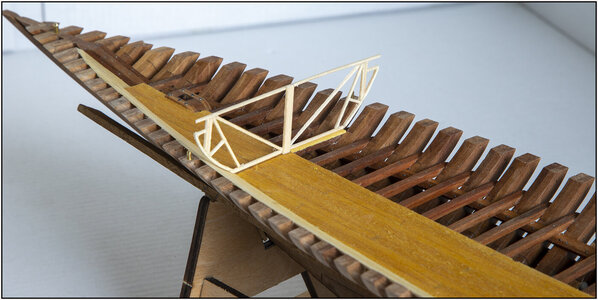
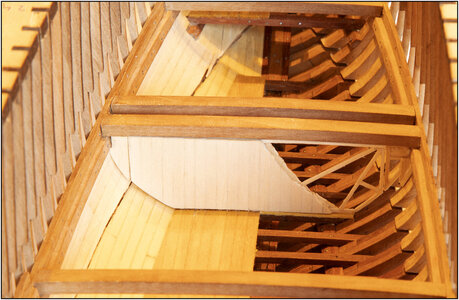
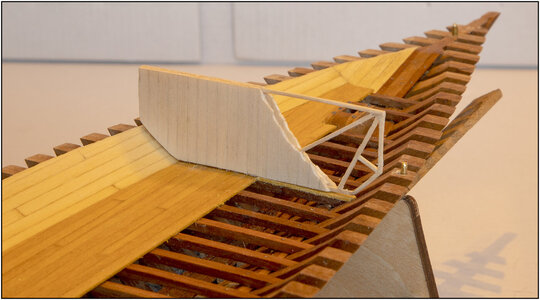
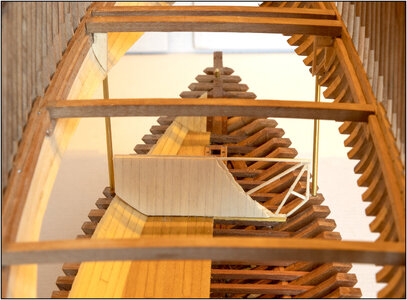
The 1st wall is placed:
322 1ewall.jpg
With the 2 cut 'ears'.
A small plinth still has to go along the wall ;) to get the connection tight at the bottom.

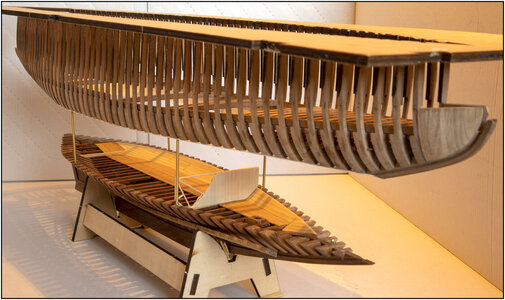
And I can separate the 2 halves leaving everything in place:
323 1ewall.jpg
I didn't think a straight cut wall would suit all shapes of the BN. Therefore let the two wall parts, each with their own pattern, nibble away to nothing. With a large piece of frame still visible.
The top side of the wall is therefore equal to the bottom side of the deck beam.

A 1st view with the 2 halves on the 50mm supports:
324 1ewall.jpg
You can see the 2 'ears' hanging in the top part below the deck beam.

With the view from the front:
325 1ewall.jpg
When all interior work is in place, all tops should show the shape of the main deck.

Still, it's nice that what came up in my mind has worked again.
Gr. Peter
 
Last edited:
Back
Top