Is the galley stove and pipe a 3-D printer model or hand built? It is very well done in this scale. You are testing the skills of the Nova Scotia model builders posted in the BN YouTube video. RichThanxs Uwe. And my wife doesn't even have a dollhouse on scale.
Regards, Peter
-

Win a Free Custom Engraved Brass Coin!!!
As a way to introduce our brass coins to the community, we will raffle off a free coin during the month of August. Follow link ABOVE for instructions for entering.
-

PRE-ORDER SHIPS IN SCALE TODAY!
The beloved Ships in Scale Magazine is back and charting a new course for 2026!
Discover new skills, new techniques, and new inspirations in every issue.
NOTE THAT OUR FIRST ISSUE WILL BE JAN/FEB 2026
- Home
- Forums
- Ships of Scale Group Builds and Projects
- Bluenose PoF Group Build
- Bluenose Group Build Logs
You are using an out of date browser. It may not display this or other websites correctly.
You should upgrade or use an alternative browser.
You should upgrade or use an alternative browser.
YUANQING BLUENOSE - Peter Voogt [COMPLETED BUILD]
- Thread starter Peter Voogt
- Start date
- Watchers 74
- Joined
- Oct 28, 2018
- Messages
- 760
- Points
- 403

Beautiful Peter,
I like the phase you are now with the details
Regards
Henk
I like the phase you are now with the details
Regards
Henk
No Rich, the 3D (printing) artist is Dean. Just a piece of wood, 3 plywood sheets (base plate and 2 doors), 2 little spacers and 2 diameters of brass rod.Is the galley stove and pipe a 3-D printer model or hand built? It is very well done in this scale. You are testing the skills of the Nova Scotia model builders posted in the BN YouTube video. Rich
Regards, Peter
Thanks Henk. A nice distraction next to the construction.Beautiful Peter,
I like the phase you are now with the details
Regards
Henk
Regards, Peter
I really love that stove! I assume the pipe will line up with the vent on the deck. This is already taking shape nicely!And the stove / oven:
View attachment 254679
The pans must of course not slide off when a ship is pitching and rolling.
View attachment 254680
Of course, the floor still needs to be cleaned. And extend 1 leg slightly.
Regards, Peter
Correct Dean. The pipe ends between the deck beams. The stove isn’t glued yet and if needed I can bent the pipe in every shape I want.I really love that stove! I assume the pipe will line up with the vent on the deck. This is already taking shape nicely!
Regards, Peter
Then it is what I call a scratch built by excellent hands. RichNo Rich, the 3D (printing) artist is Dean. Just a piece of wood, 3 plywood sheets (base plate and 2 doors), 2 little spacers and 2 diameters of brass rod.
Regards, Peter
Thanxs Rich. I love scratch building.Then it is what I call a scratch built by excellent hands. Rich
Regards, Peter
The next part in the forecastle are the bunks. But in order to determine the height, I first had to make the deck beams 13 to 17 to size.
These beams are an assembly with 4 cross beams.

The beams 15 to 17 have a recess for the stairs to the forecastle. Beam 16 concerns 2 half beams that I will cut to size later.
13 to 15 have a recess for the foremast. Bar 14 also concerns 2 half bars.
The two thin beams 15 are rejoined with a 3rd thin beam in between.
When the bunks are made, I glue this beams together and in place. So now still loose to be able to fit and measure properly.
First let's start with some tinkering out of 180gr paper:

With a certain flat line as a starting point. It looks nice from this position.
But if I take the camera to the waterline:

Then some lines don't match. And if I also get too close with the camera, it distorts even more.
So I have to take into account different curves and sightlines:

-from the side of the hull where it was cut;
- the upper and lower deck slopes slightly upwards;
-where the hull and lower floor meet.
With some cutting and re-pasting, I'm on my way:

The crew must sleeping a bit flat. And that is also the intention of a waterline.
The outlined blue area serves as a bench on either side of the table. Because on the starboard side were also berths.
A good starting point for further tinkering.
(I still have to straighten 1 shelf in the galley.)
Regards, Peter
These beams are an assembly with 4 cross beams.

The beams 15 to 17 have a recess for the stairs to the forecastle. Beam 16 concerns 2 half beams that I will cut to size later.
13 to 15 have a recess for the foremast. Bar 14 also concerns 2 half bars.
The two thin beams 15 are rejoined with a 3rd thin beam in between.
When the bunks are made, I glue this beams together and in place. So now still loose to be able to fit and measure properly.
First let's start with some tinkering out of 180gr paper:

With a certain flat line as a starting point. It looks nice from this position.
But if I take the camera to the waterline:

Then some lines don't match. And if I also get too close with the camera, it distorts even more.
So I have to take into account different curves and sightlines:

-from the side of the hull where it was cut;
- the upper and lower deck slopes slightly upwards;
-where the hull and lower floor meet.
With some cutting and re-pasting, I'm on my way:

The crew must sleeping a bit flat. And that is also the intention of a waterline.
The outlined blue area serves as a bench on either side of the table. Because on the starboard side were also berths.
A good starting point for further tinkering.
(I still have to straighten 1 shelf in the galley.)
Regards, Peter
Last edited:
The ship's carpenter burned his buttock on the stove and had it put away for a while.And the stove?
Regards, Peter
- Joined
- Sep 3, 2021
- Messages
- 5,190
- Points
- 738

Wie z'n billen brandt...The ship's carpenter burned his buttock on the stove and had it put away for a while.
Regards, Peter
But seriously, I'm really curious how all your hard and meticulous work on the focsle will turn out.
Not even having ordered the kit (yet), I'm thinking on how I want to deal with at least adding bulkheads and lower decks floors...
Good luck!
Thanxs, Johan. Very nice that you are already ‘working’ on your BN.Wie z'n billen brandt...
But seriously, I'm really curious how all your hard and meticulous work on the focsle will turn out.
Not even having ordered the kit (yet), I'm thinking on how I want to deal with at least adding bulkheads and lower decks floors...
Good luck!
On this forum, there are many PF fans. So ‘The Lunatic is in My (Your) Head ....’
Regards, Peter
- Joined
- Jan 9, 2020
- Messages
- 10,566
- Points
- 938

What I actually meant is whether there will be enough space for the stove between the bunk and the kitchen zinc.The ship's carpenter burned his buttock on the stove and had it put away for a while.
Regards, Peter
Aha ..... The carpenter says Yes. So, I believe himWhat I actually meant is whether there will be enough space for the stove between the bunk and the kitchen zinc.
I will show it .......
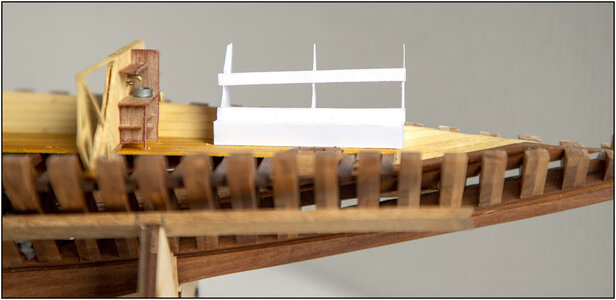
Because I couldn't visualize everything for myself yet how I could cut the bunks lengthwise to fit both hull parts, I made a 2nd paper model:

With bench, floors and storage shelves. The whole has been pushed 5mm forward slightly and will connect more to the center floor in the hull. Not visible here, because it is in the upper part of the hull. I still have to extend the floor a bit forward for that.
And to Heinrich @Heinrich : You have a good eye for room spacing!
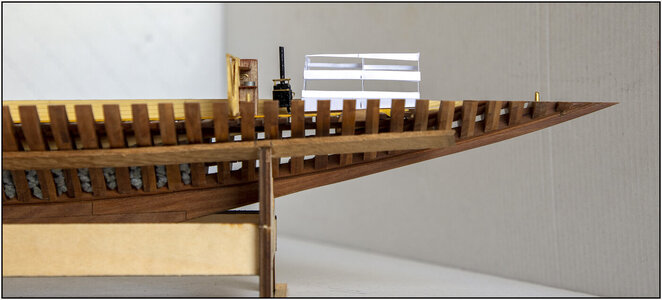
To also check the room layout and horizontal lines:

I still have to adjust the top bar slightly, because it will follow the line of the deck and the deck beams at the top.
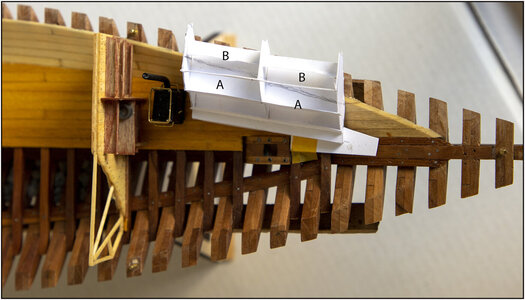
And viewed from above with the intended line of cut:

The front part A-A will then be placed on the floor and wall of the lower part of the hull. The rear part B-B then comes against the wall and under de deck beams in the upper part of the hull.
And when taking the two hull parts in and out, everything should slide past each other again. Just like I did with the wall.
Yep, I like challenges!
Regards, Peter

With bench, floors and storage shelves. The whole has been pushed 5mm forward slightly and will connect more to the center floor in the hull. Not visible here, because it is in the upper part of the hull. I still have to extend the floor a bit forward for that.
And to Heinrich @Heinrich : You have a good eye for room spacing!
To also check the room layout and horizontal lines:

I still have to adjust the top bar slightly, because it will follow the line of the deck and the deck beams at the top.
And viewed from above with the intended line of cut:

The front part A-A will then be placed on the floor and wall of the lower part of the hull. The rear part B-B then comes against the wall and under de deck beams in the upper part of the hull.
And when taking the two hull parts in and out, everything should slide past each other again. Just like I did with the wall.
Yep, I like challenges!
Regards, Peter
Last edited:
- Joined
- Sep 3, 2021
- Messages
- 5,190
- Points
- 738

Oh, bugger, you're definitely not making things easy for yourself.Because I couldn't visualize everything for myself yet how I could cut the cages lengthwise to fit both hull parts, I made a 2nd paper model:
View attachment 256489
With bench, floors and storage shelves. The whole has been pushed 5mm forward slightly and will connect more to the center floor in the hull. Not visible here, because it is in the upper part of the hull. I still have to extend the floor a bit forward for that.
And to Heinrich @Heinrich : You have a good eye for room spacing!
To also check the room layout and horizontal lines:
View attachment 256490
I still have to adjust the top bar slightly, because it will follow the line of the deck and the deck beams at the top.
And viewed from above with the intended line of cut:
View attachment 256491
The front part A-A will then be placed on the floor and wall of the lower part of the hull. The rear part B-B then comes against the wall and under de deck beams in the upper part of the hull.
And when taking the two hull parts in and out, everything should slide past each other again. Just like I did with the wall.
Yep, I like challenges!
Regards, Peter
I'm assuming you are intending a vertical cut between A-A and B-B? Makes me wonder what the most visual attractive option is though; can't really visualize it (the power of mock-ups).
Veel succes!
Johan
Hi Johan.Oh, bugger, you're definitely not making things easy for yourself.
I'm assuming you are intending a vertical cut between A-A and B-B? Makes me wonder what the most visual attractive option is though; can't really visualize it (the power of mock-ups).
Veel succes!
Johan
This is in my mind the most visual attractive position:

But when I put both halfs together, or lift them back again, all the inside builds must have a vertical cut at the intersection of both halves.
As you can see by this wall:

I can fit the bunks in their entirety in the above part, but then you can only see if you bend down and look inside. Or through the beams.
But it is easier to cut through a wall with only height, than a piece of furniture with length, height and width.
That's exactly what I think the challenge is to get it done properly.
Regards, Peter
Fascinating, you’re “out of the box” thinking is incredible.Hi Johan.
This is in my mind the most visual attractive position:
View attachment 256520
But when I put both halfs together, or lift them back again, all the inside builds must have a vertical cut at the intersection of both halves.
As you can see by this wall:
View attachment 256522
I can fit the bunks in their entirety in the above part, but then you can only see if you bend down and look inside. Or through the beams.
But it is easier to cut through a wall with only height, than a piece of furniture with length, height and width.
That's exactly what I think the challenge is to get it done properly.
Regards, Peter
Jan
- Joined
- Sep 3, 2021
- Messages
- 5,190
- Points
- 738

I can see where you're coming from; I think your bulkhead shows your intent quite clearly.Hi Johan.
This is in my mind the most visual attractive position:
View attachment 256520
But when I put both halfs together, or lift them back again, all the inside builds must have a vertical cut at the intersection of both halves.
As you can see by this wall:
View attachment 256522
I can fit the bunks in their entirety in the above part, but then you can only see if you bend down and look inside. Or through the beams.
But it is easier to cut through a wall with only height, than a piece of furniture with length, height and width.
That's exactly what I think the challenge is to get it done properly.
Regards, Peter
What I'm having difficulty with is visualizing the vertical split, given the mix between horizontal, vertical and oblique/curved parts. I'm really not sure, but I'm imagining that for the innocent spectator it is hard to understand what he/she is seeing. Mind you, a horizontal split would have the same issue...
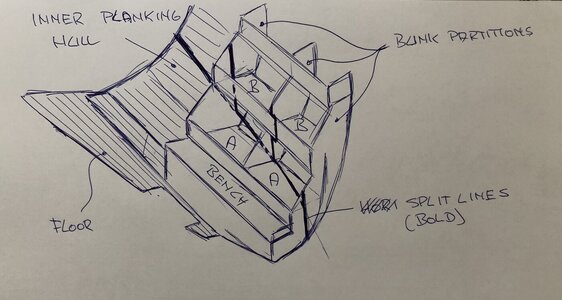
I made a sketch, trying to capture your intent, see attachment. Is that what your aim is?
Kind regards,
Johan


