YUANQING BLUENOSE - Peter Voogt [COMPLETED BUILD]

Thanxs, Henk. It is the color of the wood, right out of the YQ-kit. :) Some part are a little dirty of pushing and pulling to get them in place. That will level out a bit during sanding. And yes, just with the linseed oil it would be great. But that's on the starboard side.
First the D.B.B.S. meeting next week, there we can choose a day. ROTF
 
The planking has become nice and tight.
The color differs, are these the slats themselves?
It's a shame to give them a color
Johan and I will come to you for a workshop soon ROTF
I think it's a splendid idea, honestly, I've been looking around for something like a beginners modeling workshop. There's so much you have to learn and process as a rookie modeler, I mean, just a brief browsing session on SOS and the amount of information and examples of superb builds is overwhelming.
 
Between the treenail sessions, to have a different mind-set during the monotonous work, also looked ahead.
Before I can paint the port side of the hull, the stern must also be planked. Otherwise, I'll keep updating parts with sanding and oiling.
Because the top has only 5 rows of planks on the starboard side, an irregular recess will be created at the planked stern:
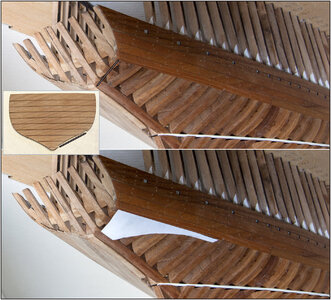
617 Stern.jpg
The arrow shows the recess between the planks on the hull. I have expressed this in the sheet that YQ provides with the kit. Because I don't use it anyway, I also made the recess in it. To also show that this is not done, IMHO.
It does not matter how the planks are installed: first the side and then the back or vice versa. It continues to show the gap.

That's why I decided to fill the back with nibbling planks. First made a template for the image with paper:
618 Stern.jpg
What can now also be clearly seen is that the ends of the treenails have dried up and give lighter accents. With the paint tests for the port side, they give darker accents. A nice extra contrast between the two sides.

The planks were made to measure, closed, sanded slightly in the curve and the holes drilled for the treenails:
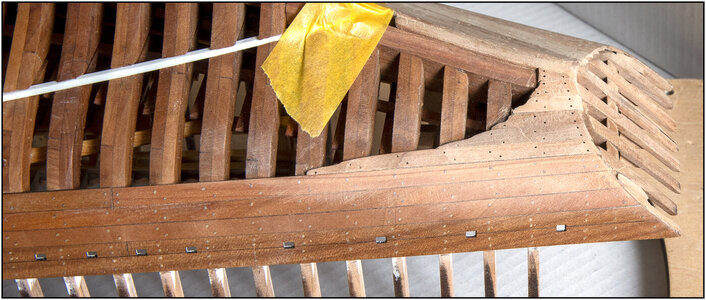
619 Stern.jpg
And then the old oil layer is damaged. :oops:

Installed the Treenails, sanded into the curve, polished and coated with linseed oil:
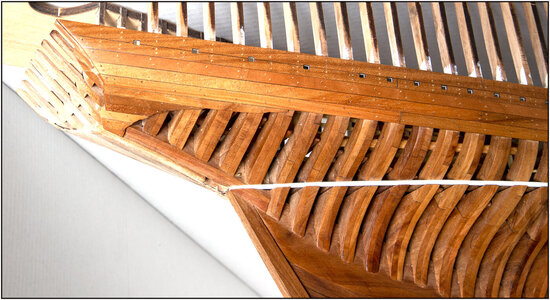
620 Stern.jpg
Soon another layer and then it will show as 1 part again. :)

Because I have also installed extra boards at the 2 places where the chainplates come, the extra boards at the back are not disturbing:
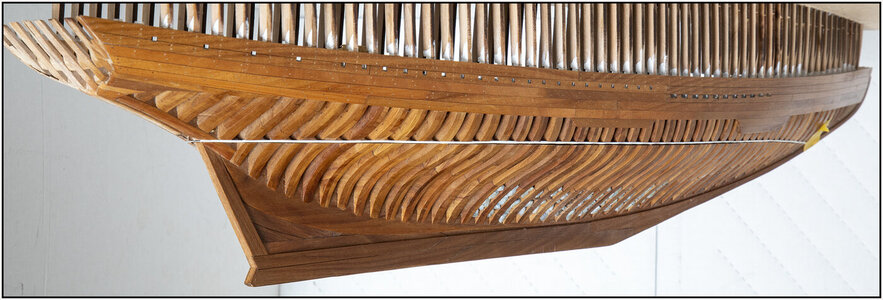
621 Stern.jpg
In my view, they reinforce my theme that I have also used in the interior design and which will soon also be reflected in the deck planking: supporting extra pieces of plank where this is necessary in terms of construction and visibility.
Regards, Peter.
 
In my view, they reinforce my theme that I have also used in the interior design and which will soon also be reflected in the deck planking: supporting extra pieces of plank where this is necessary in terms of construction and visibility.
Regards, Peter.
Looking great Peter! Good idea to add the cutout planks at the stern. That always bothered me too! I am looking forward to the hull being dyed or colored, it should look nice, and the treenails will be more subtle. ;)
 
Looking great Peter! Good idea to add the cutout planks at the stern. That always bothered me too! I am looking forward to the hull being dyed or colored, it should look nice, and the treenails will be more subtle. ;)
You also thanxs, Dean.
As you say, those are the things you keep seeing.
Now just keep going with the treenails.
Regards, Peter
 
Another bundle of treenails placed with another job in between:
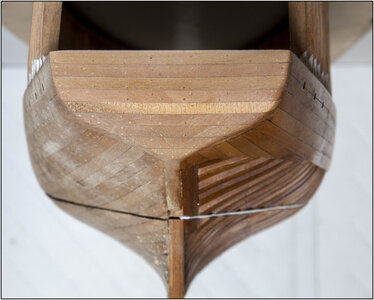
622 Stern.jpg
The stern planked and finished with the treenails. There were also about 130 in it.
To get it symmetrical I had to restore a little bit. On starboard I had to sand a little too far and went through a tip of a plank end.

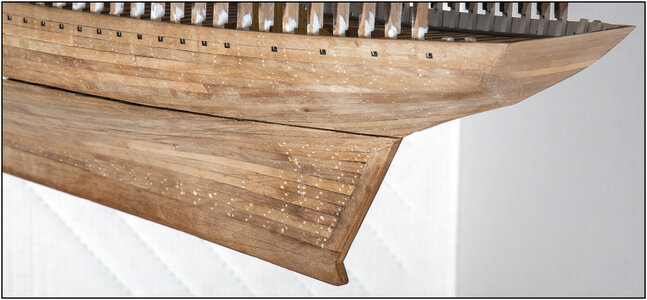
Then her rear gets a bit more shape:
623 Stern.jpg
With the pimples still a lot of open holes in the lower part of the hull. Just keep going on with the pointed toothpicks.
Regards, Peter
 
Last edited:
The added cut-out planks on the starboard side are a definite improvement/necessary add-on.
Trennels/toothpicks looking good.
When looking at the stern, I can't help but wondering how a split rudder (see space shuttle ;)) is going to be designed ánd realized...
 
The added cut-out planks on the starboard side are a definite improvement/necessary add-on.
Trennels/toothpicks looking good.
When looking at the stern, I can't help but wondering how a split rudder (see space shuttle ;)) is going to be designed ánd realized...
Yet another obstacle, that would lend itself to a solution like the masts! ;)
 
The nibbed planks at the stern is an excellent idea and lends cohesion and synergy to the whole picture.
 
Another bundle of treenails placed with another job in between:
View attachment 291508
The stern planked and finished with the treenails. There were also about 130 in it.
To get it symmetrical I had to restore a little bit. On starboard I had to sand a little too far and went through a tip of a plank end.

Then her rear gets a bit more shape:
View attachment 291509
With the pimples still a lot of open holes in the lower part of the hull. Just keep going on with the pointed toothpicks.
Regards, Peter

Hi Peter, did you use the piece provided in the kit, or some strips. From the color and grain of the stern they look like separate strips ...
 
When looking at the stern, I can't help but wondering how a split rudder (see space shuttle ;)) is going to be designed ánd realized...
Yet another obstacle, that would lend itself to a solution like the masts! ;)
I'm sitting on the edge of my chair, looking forward to a true PV solution. ;)
Well Johan, then you have to wait a little longer ..... :) ...... and Dean is (again) in the right direction ......
But also with the masts, when the hull is closed you wont see it and but open you will see the nibbling and pin.
With another small point of attention: I lift the hull parts upright from and into each other. The rudder is at an angle ........ but there is also a solution. I’ll show it later.
Regards, Peter
 
Last edited:
Another bundle of treenails placed with another job in between:
View attachment 291508
The stern planked and finished with the treenails. There were also about 130 in it.
To get it symmetrical I had to restore a little bit. On starboard I had to sand a little too far and went through a tip of a plank end.

Then her rear gets a bit more shape:
View attachment 291509
With the pimples still a lot of open holes in the lower part of the hull. Just keep going on with the pointed toothpicks.
Regards, Peter
Hello Peter, I ask: why don't you color your toothpicks? In my opinion, you will have a better look on the nailing
 
Hi Peter, did you use the piece provided in the kit, or some strips. From the color and grain of the stern they look like separate strips ...
Hi Piero. It are the strips of the YQ-kit. There are more than enough. It is a matter of incidence of light and angle of view and the different angles of the strips.
Regards, Peter
 
Last edited:
Hello Peter, I ask: why don't you color your toothpicks? In my opinion, you will have a better look on the nailing
Well, Frank. This is what I tested and what I like. On the oiled side they show lighter and later on the side with the Ecoline they show (if it is still correct) darker.
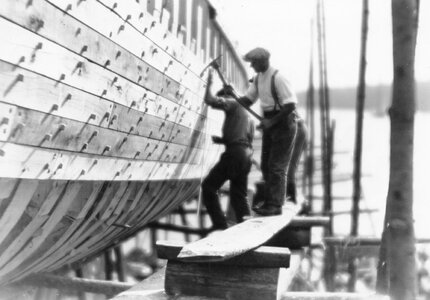
And by the original they did not paint them either:
3A3117B8-BFE1-4865-ADB2-8D6A2781CB74.jpeg
But painted the hull. It’s all a matter of taste and AL-FI.
Regards, Peter
 
Last edited:
Back
Top