-

Win a Free Custom Engraved Brass Coin!!!
As a way to introduce our brass coins to the community, we will raffle off a free coin during the month of August. Follow link ABOVE for instructions for entering.
-

PRE-ORDER SHIPS IN SCALE TODAY!
The beloved Ships in Scale Magazine is back and charting a new course for 2026!
Discover new skills, new techniques, and new inspirations in every issue.
NOTE THAT OUR FIRST ISSUE WILL BE JAN/FEB 2026
- Home
- Forums
- Ships of Scale Group Builds and Projects
- Bluenose PoF Group Build
- Bluenose Group Build Logs
You are using an out of date browser. It may not display this or other websites correctly.
You should upgrade or use an alternative browser.
You should upgrade or use an alternative browser.
YUANQING BLUENOSE - Peter Voogt [COMPLETED BUILD]
- Thread starter Peter Voogt
- Start date
- Watchers 74
Awesome job Peter! This is going to be a beautiful ship when you are done! 
That's right, Johan. Every time I put the saw back on a few planks, I had to align the saw with great concentration.By the looks of it: this was by no means an easy, straightforward job.
Respect!
Thanxs, Dean. 'Done' is still far away, but it's a nice journey to that end.Awesome job Peter! This is going to be a beautiful ship when you are done!
I know the feeling, as I’m currently on a few journeys!Thanxs, Dean. 'Done' is still far away, but it's a nice journey to that end.
I would assume it is to have less length to be cut, that way you can see your cut line better and have the best chance of staying on it. So a big yes to risk mitigation!By no means ment as criticism, but what's your rationale behind cutting the planks one by one? Risk mitigation?
We will see if Peter shares that logic.
Well ........... Dean came with this .........By no means ment as criticism, but what's your rationale behind cutting the planks one by one? Risk mitigation?

....... and he is right, because I wrote this when I started planking over the second part of the seam:I would assume it is to have less length to be cut, that way you can see your cut line better and have the best chance of staying on it. So a big yes to risk mitigation!
We will see if Peter shares that logic.
It was hidden halfway in the post.But wouldn't I start sawing a half hull? Still, I wanted to try whether my first option of sawing per plank was also possible. Then you have a better view and direction of the already existing saw cut. Because in the first part I had lightly tapped a few frames with the saw. I do get that flat and neat again, but what doesn't need to be updated is always included.
So, no problem, Johan. I know that under the glorious sun with a delicious glass of wine, it is sometimes difficult to keep up with everything that happens outside the island.
 Enjoy the remaining days!
Regards, Peter.
Last edited:
Yes, Heinrich, this triggy part is done.So ... is the sawing part now finished?

Now relaxing with planking the last part.
For some time ……. The rest of the attacks on the hull are less intense.
Last edited:
Another step that makes me happy. Because it worked (again) what I had in mind.
Started closing the remaining part.
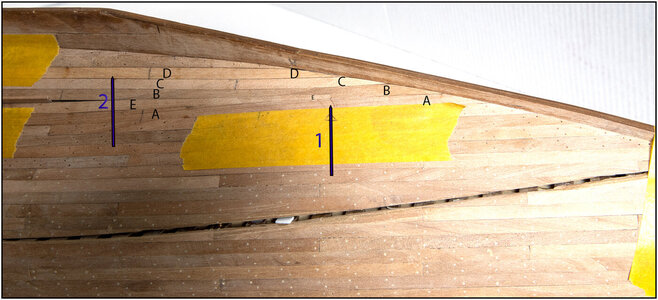
First at the front 4 planks of 4.15 mm chamfered to 3.5 mm so that they filled the front up into the rabbet of the keel:

Those are the planks A-A to D-D
Then made a recess in plank B, at arrow 1.
Then sanded the bevelled plank E to size so that it fits in the recess and forms the transition from 4 planks to 5 planks.
At arrow 2 comes plank F which is let into plank D and will form the transition to 6 planks.
There is now a gap and wedge between E and B, but that is to clamp everything.
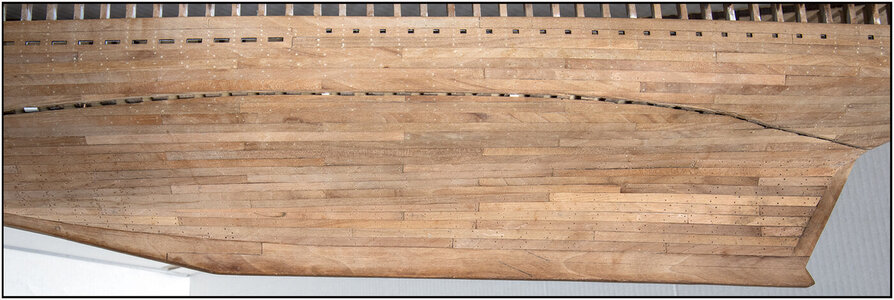
Everything is still Dry Fit. Because here, too, no continuous long planks, but planks over a maximum of 12 frames. The pencil marks are where I will cut the planks again so that I have plank connections with different grains. With the 3-frames stagger the seams.
Why do it easy when you can do it difficult.
Renards, Peter
Started closing the remaining part.
First at the front 4 planks of 4.15 mm chamfered to 3.5 mm so that they filled the front up into the rabbet of the keel:

Those are the planks A-A to D-D
Then made a recess in plank B, at arrow 1.
Then sanded the bevelled plank E to size so that it fits in the recess and forms the transition from 4 planks to 5 planks.
At arrow 2 comes plank F which is let into plank D and will form the transition to 6 planks.
There is now a gap and wedge between E and B, but that is to clamp everything.
Everything is still Dry Fit. Because here, too, no continuous long planks, but planks over a maximum of 12 frames. The pencil marks are where I will cut the planks again so that I have plank connections with different grains. With the 3-frames stagger the seams.
Why do it easy when you can do it difficult.
Renards, Peter
- Joined
- Sep 3, 2021
- Messages
- 5,199
- Points
- 738

Yeah, yeah, the sun and the wine are playing with my brains...Well ........... Dean came with this .........
....... and he is right, because I wrote this when I started planking over the second part of the seam:
It was hidden halfway in the post.
So, no problem, Johan. I know that under the glorious sun with a delicious glass of wine, it is sometimes difficult to keep up with everything that happens outside the island.Enjoy the remaining days!
Regards, Peter.
You can be sure we're enjoying this glorious weather over here, cloudless skies, light breeze.
My rather simplistic approach was that the fewer (saw) cuts I have to make, the better the quality of the cut is.
I think you already mentioned it somewhere, but would this point in the build not be the best moment to put the saw at work? All elements to be cut present, one cut?
(The Admiral still "mildly" pushing for a sectioned Bluenose, me scared out of my wits to let even a saw in the vicinity of my Bluenose... But still contemplating, evaluating. Alternatively, finish this one close to build instructions and then proceed with a next POF build and prepare for a cut over the waterline.)
But first, after the POF-journey, definitely an airplane.
Last edited:
Yes to the airplane…why float when you can fly!Yeah, yeah, the sun and the wine are playing with my brains...
You can be sure we're enjoying this glorious weather over here, cloudless skies, light breeze.
My rather simplistic approach was that the fewer (saw) cuts I have to make, the better the quality of the cut is.
I think you already mentioned it somewhere, but would this point in the build not be the best moment to put the saw at work? All elements to be cut present, one cut?
(The Admiral still "mildly" pushing for a sectioned Bluenose, me scared out of my wits to let even a saw in the vicinity of my Bluenose... But still contemplating, evaluating. Alternatively, finish this one close to build instructions and then proceed with a next POF build and prepare for a cut over the waterline.)
But first, after the POF-journey, definitely an airplane.
But both are nice.
Hi Johan.My rather simplistic approach was that the fewer (saw) cuts I have to make, the better the quality of the cut is.
I think you already mentioned it somewhere, but would this point in the build not be the best moment to put the saw at work? All elements to be cut present, one cut?
That was also the intention and reasoning behind the first long cut through the planks at the front. I also thought that the earlier cut in the frames would guide the saw.
So did the saw, only on the first starts. But then the saw started to find its way into the planks.
Then made the start from the other side with the idea to have a good alignment with the start at the other end.
But over such a great distance is any deviation of a fraction of a mm already reason to continue this deviation. Where you also have the curve of the hull in both the longitudinal and transverse direction. The saw was then also tilted on the planks.
Thanks to the length and width of the saw, I was still able to align it visually.
The saw did hit a few frames at the edges in the first cut. But I can smooth that out again and in the upper part the waterline strip will be placed there.
Hence the next step to start sawing over shorter distances. I had better control over the position of the saw and the direction, whereby the steering through the first saw cut worked better. But then there where the dangerous pointed end of the planks. I need to update one of those.
So, Theory and practice did not work by this second saw-stage for 100%
The best choise: first planking and the sawing.
Puttings here back in the hanging jig with the metal profile guides as by the first sawing was perhaps a option. But also with a lot of pro’s en con’s.
But it is now behind me with a nice learning moment and experience that others can possibly use.
Regards, Peter
- Joined
- Sep 3, 2021
- Messages
- 5,199
- Points
- 738

Hello Peter,Hi Johan.
That was also the intention and reasoning behind the first long cut through the planks at the front. I also thought that the earlier cut in the frames would guide the saw.
So did the saw, only on the first starts. But then the saw started to find its way into the planks.
Then made the start from the other side with the idea to have a good alignment with the start at the other end.
But over such a great distance is any deviation of a fraction of a mm already reason to continue this deviation. Where you also have the curve of the hull in both the longitudinal and transverse direction. The saw was then also tilted on the planks.
Thanks to the length and width of the saw, I was still able to align it visually.
The saw did hit a few frames at the edges in the first cut. But I can smooth that out again and in the upper part the waterline strip will be placed there.
Hence the next step to start sawing over shorter distances. I had better control over the position of the saw and the direction, whereby the steering through the first saw cut worked better. But then there where the dangerous pointed end of the planks. I need to update one of those.
So, Theory and practice did not work by this second saw-stage for 100%
The best choise: first planking and the sawing.
Puttings here back in the hanging jig with the metal profile guides as by the first sawing was perhaps a option. But also with a lot of pro’s en con’s.
But it is now behind me with a nice learning moment and experience that others can possibly use.
Regards, Peter
Thanks for your extensive explanation.
I think in order for a second saw cut to work might need a real bulky jig for proper hull positioning ánd saw guidance. Even then, chances of a near perfect second cut are slim. I think your methodological approach and craftmanship saved the day, my compliments for a splendid job.
Kind regards,
Johan
A little putty and sanding and it's done.Another planking job:
View attachment 290851


