YUANQING BLUENOSE - Peter Voogt [COMPLETED BUILD]

…..I am now lured deep into unknown territory, very anxious to see how it all turns out.
Thanks for your kind words, Johan.
And about the quote I replied: It’s almost like Captain Angus, when he goes fishing in unknown territories. Then he trusted on his skills, build up by years. But no guarantees.
You are also building up your skills. Trust them. You can more then you are thinking. There are planes, still flying and staying in the air, with items you where working on. Unbelievable! That’s very “Fokker”!
Regards, Peter
 
Lawrence my friend I am not sure if I want to "like" your post about going to Bryers Lodge - not if I think of what happened in the past. Keep your admiral chained up and take care at all times!
Thanks Heinrich, I do thank for you concerns, Yes I will be keeping a very close watch on my Admiral this trip, this is a very difficult thing to do as she is so very independent these days.
Regards Lawrence .
 
Yes I will be keeping a very close watch on my Admiral this trip, this is a very difficult thing to do as she is so very independent these days.
Unfortunately, I know how this works.
And we, poor sods, worry way too much about the wellbeing of our Admirals, at least, that's how they perceive our watchful eyes.
Nevertheless, I wish you and your Admiral a lovely time at Bryers Lodge.
 
For the next part I had to put both parts back together:
View attachment 314297
And it can already be seen on the aft deck.

It's DEAN TIME! Because finally I can start using the by Dean @Dean62 in 3D designed steering wheel and steering mechanism. With air-brush work by Henk @Henk Liebre . And print work by an acquaintance of Henk.
And for those 3: A BIG THANKS! OkayThumbs-Up

As 1st part on the deck I started making the wheelhouse. Also gained inspiration from 2 old photos:
View attachment 314298
The front and rear are at an angle.
With this as a result:
View attachment 314299
For the sides of the top I saw quarters of 3mm beech round timber. Scraped some small profiles for the connection to the deck.
To cover the top side I used P240 sandpaper, with a coating to prevent attracting dirt. The reason for this will become apparent later in the construction of the cabin. There is that roofing good to see.
The top hatch of the original is secured with 4 hooks. I made it hinged. More soon.......
I still need to get some dust and dirt out. ;)

The hull and interior below the deck are half open. I will also implement that theme for the parts on the deck. With occasional minor variations.
So the port side was closed, but the starboard side is open:
View attachment 314300
But then the steering mechanism is not yet clearly visible. Everything is still dry-fit, because the piece of visible rudder shaft also needs to be aligned further.

That is why the top has been made hinged:
View attachment 314301
So that it can remain open.
Then you have a view of it from above:
View attachment 314302

You may have noticed that the steering wheel with steering shaft is not in the center of the front. That's correct.
These drawings in the Saga make that clear:
View attachment 314303
On the steering shaft are 2 pieces of screw thread that are opposite of each other. By turning the handlebars to the left or right, the 2 bushes on those threaded pieces are turned towards or away from each other. This causes the pivoting levers to turn the rudder shaft to the left or right.
Because the foot of the steering shaft is fixed in a bearing and the rudder shaft is also centrally secured, it is inevitable that the steering shaft moves left and right when turning.
That is why there is also a slot at the front of the steering box where the steering shaft can move left and right..
Small detail differences with the BN-II:
- the rear of the steering box is slanted with the original;
- the groove has been carried over the entire width of the original to the side walls.
I am considering spraying the steering wheel bronze. Because the steering wheel of the original is also made of bronze. But I haven't gotten the paint yet.
Regards, Peter
That is simply next-level modelling Peter. The wheelhouse mechanism is superb and I love the hinged top. Great to watch, well done Thumbsup
 
From the trip to the rear, I now go back to the front: The combination Anchorwinch - Windlass.
Before I build it, I'm looking for all the parts together. YQ offers a simplified form with acceptable parts, but I want to build it (of course) with a little more detail.
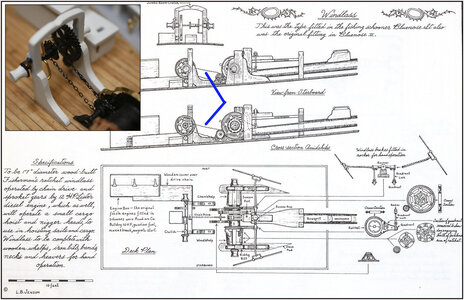
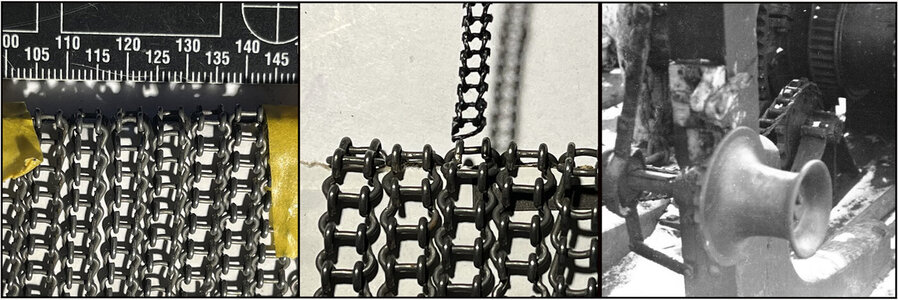
What I was looking at from the start was the chain that drives the motor to both parts of the windlass, but mainly the chain that sits between the two parts.
Pointed to this drawing from the Saga with 2 blue arrows:
780 Windlass.jpg
Many models use a 'quarter turn' ring chain, as can be seen on the 'Suburban Ship Modeler' insirt. But that's not a drive chain running over sprockets. This is possible as an anchor chain with a specific windlass.

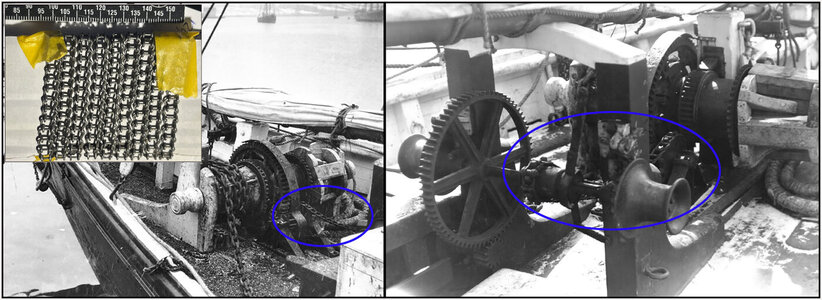
I also found some old photos:
781 Windlass.jpg
It is clear to see that an old fashioned flat chain is used. When I saw it I immediately thought of the chain I used to play with the old Meccano, many many years ago.:) See the insert at the top left. In England I could buy a piece for a fair price. But this one is way too big.
Small detail: The top of the chain has a kink downwards. Apparently there is still a tensioner in between.

A 2nd attempt was this 1:12 motorcycle chain from Tamiya:
782 Chain.jpg
A nice kit that gives 18 links per 5 cm / 2 ". It comes close in scale, but that chain is too modern.

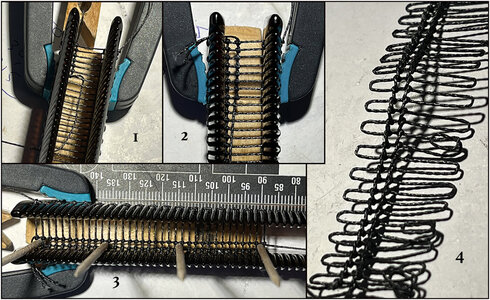
Then the weaving of foot ropes plays into the back of your mind. Because if you use half knots, the line between 2 knots will be a bit skewed. That's exactly what both sides of the old chain do. Then some sprockets in my head did their job:
783 Chain.jpg
1: Bought two of the same hair combs, clamped them with the half clothespin in between, weaved threads between the teeth and tied the first knots. They didn't become knots, that was too thick. It became 1 turn, from the inside to the outside, fixed after every 2 or 3 turns with a drop of thinned glue;
2: after the first row, started with the second row. The turns in mirror image. The wire is distorted downwards, it is always secured between the teeth of the comb;
3: the 2nd row complete, distance equalized all over with a few toothpicks;
4: released from both hair combs.

Then this is the result:
784 Chain.jpg
This gives 26 links per 5 cm / 2".
The sides needs some finishing a little more with the scalpel, but that's tiny mm work.

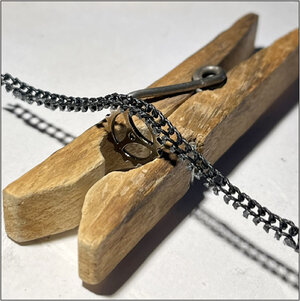
With a little more comparative research:
785 Chain.jpg
Perhaps a little too large for the primary transmission from the enige in the enige box. A matter of buying 2 finer combs and thinner wire...... ;)
I can continue collecting the parts.
This part has past the quality control. :)
Regards, Peter
 
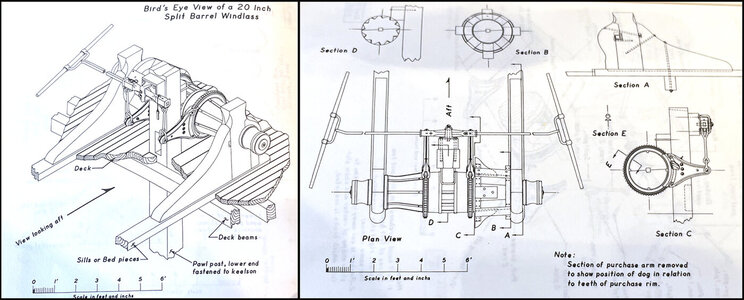
In addition to the drawings in The Saga, Howard Chapelle's book also contains 2 clear drawings:
786 Windlass.jpg
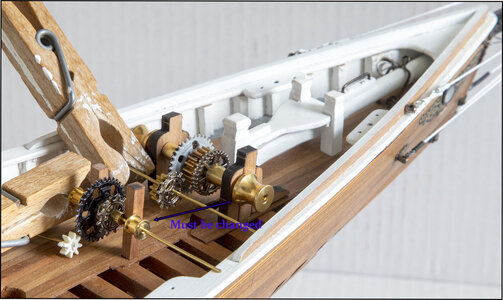
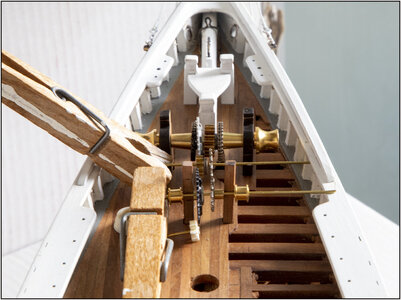
With the parts from YQ, a collection of cogs from Alieexpress and my own 'stock', both parts dry-fit put together:
787 Windlass.jpg
788 Windlass.jpg
Then I can now sand everything into shape, paint it, 'blacken' metal parts, provide the two anchor wind barrels (for both the rope and the chain) with their wooden and metal 'fittings' etc etc etc etc etc
Regards, Peter
 
Last edited:
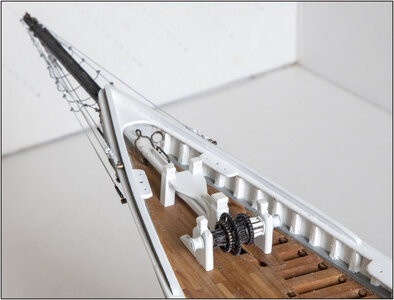
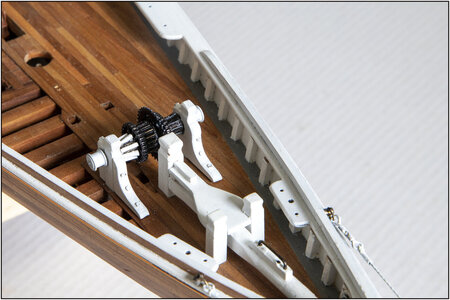
The base of the windlass is ready:
789 Windlass.jpg
790 Windlass.jpg
Now I can add the following parts to it:
-braking system with levers that will be placed on the block on the table at the front of the samson. And with 2 blades on either side of the samson is connected to the 2 gears intended for that purpose;
-the pawl on the front of the samson that engages the center sprocket.

I can then align the small bridge with small gear on the floor in front of the drive. The sprocket for the chain drive is also on the shaft.
A safety hazard bracket is fitted over the drive gears, which runs from the floor towards samson.
Regards, Peter
 
Last edited:
Back
Top