ZHL Black Pearl 2019 Golden Edition-Newbie build [COMPLETED BUILD]

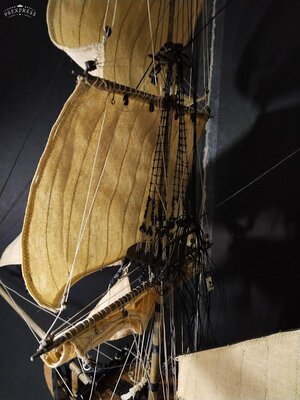
Getting ready to step my masts onto the deck. So far, this is what i have done so far prior to stepping: a) I rigged the lower shrouds (i.e.attached to the mastheads). I am just letting these hang down for now waiting for later attaching to the deadeyes on the channels. b) I rigged all upper shrouds to the mast heads. c) I attached the topmast shrouds to the deadeyes on the mast tops using lanyards d) I put the ratlines on the topmast shrouds e) I attached the topgallant and royal futtock shrouds to the shrouds below them f) I attached all the blocks and deadeyes onto the masts g) I attached all the blocks, stirrups and footropes on the yards h) I mounted the yards to the masts using truss pendants, parrels and slings.

Now, I am ready to step my masts. In order to gain a bit more strength to the masts, I drilled and glued some cutoff nails down into the bulkhead where the masts sit (this is necessary especially for the main mast because the base is only a few mm deep).

PSX_20201029_205034.jpg

I didn't use any special alignment tools or jigs for the masts... basically just eyeballed them. Probably not the smartest or correct way to do it, but I gave myself a pass on this nasty bout of laziness.

PSX_20201029_203038.jpg
PSX_20201029_203131.jpg
PSX_20201029_203155.jpg

Next up I worked on the standing rigging. For the stays, I used black 0.8mm rope. I started from the bowsprit and worked myself aft.

Following the instructions, I attached a couple of deadeyes on the bowsprit for attaching the fore stay, fore topmast stay, fore topgallant stay and the main stay.

From the mast side, I looped the stay around the mast by forming an eye at the end of the rope. The other end of the rope went thru the eye to form a loop around the mast. I was supposed to make a mouse near the loop, like a stopper to keep the rope from tightening too much. There is a precise way of forming the mouse, but with the small scale, it will hardly be noticeable, so I just formed the stopper by tying a double knot and stiffening it with some CA glue.

PSX_20201029_202823.jpg
PSX_20201029_202845.jpg
PSX_20201029_203359.jpg

On the bowsprit:
I followed the instructions as below.

PSX_20201029_203520.jpg

I attached the deadeyes as follows:
PSX_20201023_082935.jpg
PSX_20201029_203007.jpg

Then connected the stays to the deadeyes on the bowsprit. Notice that I left the ropes untrimmed for now, in case I need to adjust later for sag.

PSX_20201029_203335.jpg
PSX_20201029_203308.jpg

Next was the crows feet.

PSX_20201029_221804.jpg

This comes off of the holes in front of the mast tops. The rope is theaded from a multi-holed piece called a euphroe. The euphroe is linked to a block which is connected to another block which is then tied to the stay.

I started by attaching a block to the stay.

PSX_20201029_203745.jpg

I then stropped the euphroe to another block. I left a small opening at the edge of the euphroe where I will attach the rope which will be where the threading starts.

PSX_20201029_203844.jpg
PSX_20201029_203759.jpg

Then I start winding the rope through the holes in the prescribed sequence.

PSX_20201029_203919.jpg

And here is the finished product. This process is repeated in the crows nest for the main mast.

PSX_20201029_204002.jpg

Disclaimer: I am not sure if this method is 100% correct. I tried to follow the drawings in the instructions but I don't know if I did it all correctly.

Next was the other stays on the main and mizzen masts. The mizzen stay is connected to the lower main mast using deadeyes.
PSX_20201029_204112.jpg

The mizzen back stay is attached to an eyebolt on the mizzen deck.
PSX_20201029_204137.jpg

The main and fore back stays were rigged but are still loose for later rigging to the deadeyes on the channel.

PSX_20201029_204137.jpg

That's it for now. Thank you for dropping in. As always, comments, corrections and suggestions are always welcome.
 
By the way, you'll probably notice that the yards appear to be lopsided. They are just hanging loose on the masts right now. They will straighten out once I put some of the running rigging later on.
 
Another post script...Note to admin.....did we lose the preview function before we finalize our posts? That was a very helpful function that we had in the past to give us a chance to review our work. Thanks.
 
Another post script...Note to admin.....did we lose the preview function before we finalize our posts? That was a very helpful function that we had in the past to give us a chance to review our work. Thanks.
No - we have it still , but not any more at the bottom, now you have to look at the right top of your new post
Unbenannt.JPG
 
I have done as much as I can on the standing rigging. Still left to do later on are the backstays and lower shrouds (rigged but not yet reeved to the deadeyes on the channel), the lower ratlines and braces.

It's now time to start working on the running rigging. I am using tan colored rope (mainly 0.5mm).

Looking at the diagrams and instructions for the running rigging, it's easy to be overwhelmed by what seems like a daunting task. But if you take it a step at a time and begin to realize the basic patterns for certain aspects of the rigging, it becomes much more manageable.

I focused on two basic patterns...one for the lifts(blue) and the other for the clew lines (red). These patterns just repeat with various masts.

PSX_20201115_211333.jpg

The lifts are tied to the mast, then passed thru a block at the end of the yard, then back towards the mast thru another block... from there it goes down to the deck and tied to a belaying pin.

PSX_20201115_210445.jpg
PSX_20201115_205827.jpg

Rookie mistake....as I was threading the rope downwards towards the deck, I mistakenly ran the rope on the front (fore) side of the mast and yard. This became a problem later on when I attached the sails to the yards because the ropes were in the way. I was scratching my head as I was undoing my mistake. Note to my future self: all lift lines and clew lines should be AFT of the yards and masts!

PSX_20201115_211242.jpg

On the deck, the lines were tied to belaying pins using the figure 8 approach then secured by a dab of CA gel glue. I like this glue because it dries colorless and sets much faster than white glue but slightly slower setting than regular CA glue.

To finish the look, I fashioned some rope hanks (I think that's what they're called).
PSX_20201115_205959.jpg
PSX_20201115_210019.jpg
PSX_20201115_210039.jpg

These are the first batch of rope hanks that I finished... not my best work.

PSX_20201115_210222.jpg

But hey, with practice I got better at it. These are my later products.

PSX_20201115_210204.jpg
PSX_20201115_210418.jpg

So, I finished the lift lines and belayed them to the deck. I also finished the clew lines by following the instructions (red line). The instructions appear to show the clew line attached to a double block on the yard below. But later on, you will see that I had this redone so that the clew line attached to the clew loop on the sail, then a fake leech line was the one attached to the block on the yard below.

PSX_20201115_211333.jpg

Tying the lines to the belaying pins was quite tricky at times because of the cramped spaces. I was really glad that I did not yet rig the lower shrouds and ratlines, because it would have been doubly difficult to work on the belay pins.

In the end, I was quite pleased with my work.
PSX_20201116_204459.jpg
PSX_20201116_204518.jpg

But wait. There's the matter of the lines being on the wrong side of the yards.

PSX_20201115_211125.jpg

To fix this, I had to cut the lines just below the mast tops then tie a square knot to connect a new line which I reattached to the blocks above.


Before proceeding any further, I realized I forgot to rig the futtock shrouds underneath the mast tops. It would have been a much easier task if I did this earlier before I stepped the masts on the deck. The futtocks will just be hanging temporarily until I rig the lower shrouds because that's where the futtocks will be attached to.

PSX_20201116_205053.jpg

Now, I am ready to work on the sails. The kit comes with pre cut sails. The fabric is thick and seems to be of good quality. I drew the pencil marks for the vertical lines. The Admiral was good enough to help me sew the hems and the lines. She did a fantastic job. I never in a million years would have been able to sew those lines and hems straight.

PSX_20201115_211145.jpg
PSX_20201115_211528.jpg
PSX_20201115_211509.jpg

To darken the cloth a bit, I soaked them in tea for a few hours. But I wanted them a bit darker still, so I added coffee to the liquid and soaked the sails some more. Now my whole workshop smells of coffee.

Here's what they look like.

PSX_20201115_212043.jpg

I attached bolt rope along the edges of the sail using CA gel. The lower corners had clew loops and the upper corners had cringles.

PSX_20201115_211927.jpg
PSX_20201116_211927.jpg
PSX_20201116_211941.jpg
PSX_20201116_211956.jpgPSX_20201115_212043.jpg

Dry fitted the sails on the ship just to take a glimpse of what it will look like.

PSX_20201116_212117.jpg

On my next post, I will be attaching the sails to the yards. I am almost at the finished line. Am trying very hard not to rush this and to remain faithful to my Black Pearl, knowing I have the 1:50 Royal Caroline sitting in a corner and calling out to me.

Thank you my friends for dropping in. Till next time.
 
I have done as much as I can on the standing rigging. Still left to do later on are the backstays and lower shrouds (rigged but not yet reeved to the deadeyes on the channel), the lower ratlines and braces.

It's now time to start working on the running rigging. I am using tan colored rope (mainly 0.5mm).

Looking at the diagrams and instructions for the running rigging, it's easy to be overwhelmed by what seems like a daunting task. But if you take it a step at a time and begin to realize the basic patterns for certain aspects of the rigging, it becomes much more manageable.

I focused on two basic patterns...one for the lifts(blue) and the other for the clew lines (red). These patterns just repeat with various masts.

View attachment 193012

The lifts are tied to the mast, then passed thru a block at the end of the yard, then back towards the mast thru another block... from there it goes down to the deck and tied to a belaying pin.

View attachment 193017
View attachment 193018

Rookie mistake....as I was threading the rope downwards towards the deck, I mistakenly ran the rope on the front (fore) side of the mast and yard. This became a problem later on when I attached the sails to the yards because the ropes were in the way. I was scratching my head as I was undoing my mistake. Note to my future self: all lift lines and clew lines should be AFT of the yards and masts!

View attachment 193019

On the deck, the lines were tied to belaying pins using the figure 8 approach then secured by a dab of CA gel glue. I like this glue because it dries colorless and sets much faster than white glue but slightly slower setting than regular CA glue.

To finish the look, I fashioned some rope hanks (I think that's what they're called).
View attachment 193030
View attachment 193031
View attachment 193032

These are the first batch of rope hanks that I finished... not my best work.

View attachment 193033

But hey, with practice I got better at it. These are my later products.

View attachment 193034
View attachment 193035

So, I finished the lift lines and belayed them to the deck. I also finished the clew lines by following the instructions (red line). The instructions appear to show the clew line attached to a double block on the yard below. But later on, you will see that I had this redone so that the clew line attached to the clew loop on the sail, then a fake leech line was the one attached to the block on the yard below.

View attachment 193012

Tying the lines to the belaying pins was quite tricky at times because of the cramped spaces. I was really glad that I did not yet rig the lower shrouds and ratlines, because it would have been doubly difficult to work on the belay pins.

In the end, I was quite pleased with my work.
View attachment 193039
View attachment 193041

But wait. There's the matter of the lines being on the wrong side of the yards.

View attachment 193042

To fix this, I had to cut the lines just below the mast tops then tie a square knot to connect a new line which I reattached to the blocks above.


Before proceeding any further, I realized I forgot to rig the futtock shrouds underneath the mast tops. It would have been a much easier task if I did this earlier before I stepped the masts on the deck. The futtocks will just be hanging temporarily until I rig the lower shrouds because that's where the futtocks will be attached to.

View attachment 193047

Now, I am ready to work on the sails. The kit comes with pre cut sails. The fabric is thick and seems to be of good quality. I drew the pencil marks for the vertical lines. The Admiral was good enough to help me sew the hems and the lines. She did a fantastic job. I never in a million years would have been able to sew those lines and hems straight.

View attachment 193048
View attachment 193049
View attachment 193050

To darken the cloth a bit, I soaked them in tea for a few hours. But I wanted them a bit darker still, so I added coffee to the liquid and soaked the sails some more. Now my whole workshop smells of coffee.

Here's what they look like.

View attachment 193053

I attached bolt rope along the edges of the sail using CA gel. The lower corners had clew loops and the upper corners had cringles.

View attachment 193054
View attachment 193055
View attachment 193056
View attachment 193057View attachment 193053

Dry fitted the sails on the ship just to take a glimpse of what it will look like.

View attachment 193058

On my next post, I will be attaching the sails to the yards. I am almost at the finished line. Am trying very hard not to rush this and to remain faithful to my Black Pearl, knowing I have the 1:50 Royal Caroline sitting in a corner and calling out to me.

Thank you my friends for dropping in. Till next time.
Nice work, Reggie. The "hanks" look a lot neater than the ones I've seen on real ships. I learned the hard way to belay the lifts before yards, sails, and shrouds. I just leave them dangling from the top of the mast until I'm ready for them.
 
Nice work, Reggie. The "hanks" look a lot neater than the ones I've seen on real ships. I learned the hard way to belay the lifts before yards, sails, and shrouds. I just leave them dangling from the top of the mast until I'm ready for them.

You are right @Vfordyce....the later lines that I belayed started from the deck at the belay pins then went upwards towards the yards... picked up that tip from Kurt @DARIVS ARCHITECTVS...I wish I had learned sooner. It would have made the task a lot easier. Following your build too Vic. Thanks much.
 
This is great work Reggie.:) For a newcomer, your build speed - and far more important, quality of build - will put many seasoned builders to shame. Well done!
 
You are right @Vfordyce....the later lines that I belayed started from the deck at the belay pins then went upwards towards the yards... picked up that tip from Kurt @DARIVS ARCHITECTVS...I wish I had learned sooner. It would have made the task a lot easier. Following your build too Vic. Thanks much.
I got that tip from Kurt too.
 
I am very excited to start bending my sails. This aspect of the build is really a lot of fun, because the ship takes on a truly different (and more finished) look.

I am truly lucky and thankful that the Admiral helped me with the sails... sewing the hems and lines and teaching me how to sew the sails on the yards.

Attaching the sails to the yards is quite a challenge, especially since the yards are already attached to the masts with all kinds of things and standing rigging in the way of my fat hands, especially near the center where the yards meet the masts. I was debating whether I should have bent the sails earlier before I stepped the masts and yards. But then the sails would have been in the way when I was doing the lift and clew lines. I guess the saying "six of one half a dozen of the other" applies in this case.

One thing I am sure of, though. I am really glad that I deferred doing the lower shrouds and ratlines until after I finished the running rigging and sails. Otherwise I would have found myself trying to work through very cramped quarters, especially when belaying the lines to the pin racks.

Here I just wanted to share some pictures of the sails.

This is the stitching that the Admiral taught me. Very neat.

PSX_20201115_212256.jpg
PSX_20201119_081329.jpg
PSX_20201119_081350.jpg

The above method was used to attach the sails that go in the yards.

The other (staysails) that go on the standing rigging rope were attached using small rings. (I only had these tiny rings in my stash, and perhaps they are a bit undersized).
PSX_20201115_212407.jpg
PSX_20201115_212429.jpg
PSX_20201115_212445.jpg

One of the issues that I was ambivalent on is the way the clew lines are attached to the blocks on the yard below. The instructions appear to suggest that the clew lines are hard tied to the block as shown below.

PSX_20201119_081525.jpg

I initially rigged my sails as above, but after reading up on the subject, I elected to redo them and did it as below. The clew lines are run thru a block on the clew loop at the bottom corner of the sail. Then a fake sheet line is run from the clew loop to the block on the yard below. I am not quite sure if this is the proper way to do it, but it seems to make more sense to me.

PSX_20201119_080654.jpg

After much thought, I decided to furl my main and fore course, leaving all other sails unfurled. I am not sure if there is a technical basis for doing this, but I thought by doing it, one can have a better view of most of the deck details and rigging.

PSX_20201119_081412.jpg
PSX_20201119_080744.jpg
PSX_20201119_080503.jpg
PSX_20201119_080932.jpg

Here are some more pictures.

PSX_20201119_080322.jpg
PSX_20201119_080431.jpg
PSX_20201119_080859.jpg
PSX_20201119_080654.jpg
PSX_20201119_080549.jpg
PSX_20201119_080957.jpg
PSX_20201119_081041.jpg
PSX_20201119_081104.jpg

At this point, I think I am ready to finish reeving the lower shrouds to the deadeyes on the channels. Also the back stays for the main and fore masts. Will be working on that for the next few days.

I am yet unsure if I am going to be able to do the mast braces and bow lines. I tried, but with my limited proficiency, cannot fathom the instructions for the braces. Also, I am running out of blocks and rope. Will cross that bridge when I get there, I guess.

Thanks friends for dropping in.
 

Attachments

  • PSX_20201119_080839.jpg
    PSX_20201119_080839.jpg
    76.4 KB · Views: 3
Looking good WarrLight. Props to you for putting the sails on after the masts were installed. It would have been a disaster for me so I put the sails on before having the masts on the ship. Your explanations are first rate and new folks will learn a lot from you.
 
Been working on the lower shrouds and ratlines for the last few weeks. I can almost see the finish line, but I know that the remaining tasks will require a lot of time doing repetitive work.

If you recall, I had left all the lower shroud ropes hanging down from the mast until I have completed the running rigging and belaying the end of the ropes. I am so glad I did this because it would have been a bear trying to squeeze my fingers through the shrouds had I rigged the shrouds first.

The first thing I did was to attach the shrouds to the upper deadeyes. But in order to do this, I used a simple jig to more or less attain consistent spacing between the upper and lower deadeyes. It wasn't perfect but much better than just eyeballing the spacing.

PSX_20201217_104313.jpg

I applied a bit of glue to the deadeye to hold the rope in place, prior to seizing it with a thin black rope. I did this to the other deadeyes, at the same time making sure the spacing is more or less even (you have to make small allowances since some of the deadeyes come at an angle from the shrouds).

PSX_20201217_104247.jpg
PSX_20201217_101945.jpg

Then I seized the shrouds into the upper deadeyes. Again, I didn't trust my eyes so I prepared a measuring jig to more or less achieve consistent lengths to the seizing. Admittedly, I wish I could have done a better job at this. I seized the shroud in two places...once towards the deadeye, and second a few mm above, leaving a few mm in between unseized, for this is where the lanyard will pass thru later on.

PSX_20201217_102031.jpg

Now it is time to reeve the lanyard to connect the upper deadeye to the deadeyes on the channel. There is a specific order in threading the lanyard. My trusty old dental floss threader was invaluable in doing this task.

PSX_20201217_104414.jpg

After threading the lanyard thru the holes in the deadeyes, it is locked in place by threading it from the back of the upper deadeye, thru a small gap between the deadeye and the rope, then tied in place. Continue by winding the shroud a few times just above the deadeye, then tie another knot. Then run it thru the back of the shroud and through the unseized portion, then upwards were it is tied to the shroud using a thin rope. It sounds complicated, but it's really quite straightforward once you get the hang of it.

There is a great video tutorial by Donnie Driskell for rigging lanyards in youtube, and would like to share the link (hopefully with author's permission) here.


Here are some pictures.

PSX_20201217_102144.jpg
PSX_20201217_102813.jpg
PSX_20201205_073352.jpg

Then it was on to the ratlines. I initially dreaded doing this because I knew it will take a lot of patience in doing this repetitive task. But, call me strange, once I started doing it, I actually enjoyed it tremendously. There is something meditative and mystical in doing repetitive tasks, one can almost get lost in one's thoughts while doing it.

The challenge in doing ratlines is to make sure the spacing is consistent. I didn't trust my eyesight, so again, I used a simple jig... taking 2 strips of wood, approximately the same width as my desired spacing, and two clamps. This worked like a charm because I can align the ratlines against the straight edge of the wood strips.

PSX_20201205_073554.jpg

A bit of glue on the end knots.

PSX_20201217_103123.jpg

Then attach the futtocks to the lower shrouds.

PSX_20201217_103324.jpg
PSX_20201217_103539.jpg

Here are some pictures of the finished product.

PSX_20201217_103345.jpg
PSX_20201217_103654.jpg
PSX_20201217_103711.jpg
PSX_20201217_103634.jpg
PSX_20201217_103432.jpg
PSX_20201217_103345.jpg

I am heading to the homestretch friends. Just a few more things to wrap up to the finish line.

As always, thanks for your support.
 
Been working on the lower shrouds and ratlines for the last few weeks. I can almost see the finish line, but I know that the remaining tasks will require a lot of time doing repetitive work.

If you recall, I had left all the lower shroud ropes hanging down from the mast until I have completed the running rigging and belaying the end of the ropes. I am so glad I did this because it would have been a bear trying to squeeze my fingers through the shrouds had I rigged the shrouds first.

The first thing I did was to attach the shrouds to the upper deadeyes. But in order to do this, I used a simple jig to more or less attain consistent spacing between the upper and lower deadeyes. It wasn't perfect but much better than just eyeballing the spacing.

View attachment 199365

I applied a bit of glue to the deadeye to hold the rope in place, prior to seizing it with a thin black rope. I did this to the other deadeyes, at the same time making sure the spacing is more or less even (you have to make small allowances since some of the deadeyes come at an angle from the shrouds).

View attachment 199366
View attachment 199367

Then I seized the shrouds into the upper deadeyes. Again, I didn't trust my eyes so I prepared a measuring jig to more or less achieve consistent lengths to the seizing. Admittedly, I wish I could have done a better job at this. I seized the shroud in two places...once towards the deadeye, and second a few mm above, leaving a few mm in between unseized, for this is where the lanyard will pass thru later on.

View attachment 199370

Now it is time to reeve the lanyard to connect the upper deadeye to the deadeyes on the channel. There is a specific order in threading the lanyard. My trusty old dental floss threader was invaluable in doing this task.

View attachment 199371

After threading the lanyard thru the holes in the deadeyes, it is locked in place by threading it from the back of the upper deadeye, thru a small gap between the deadeye and the rope, then tied in place. Continue by winding the shroud a few times just above the deadeye, then tie another knot. Then run it thru the back of the shroud and through the unseized portion, then upwards were it is tied to the shroud using a thin rope. It sounds complicated, but it's really quite straightforward once you get the hang of it.

There is a great video tutorial by Donnie Driskell for rigging lanyards in youtube, and would like to share the link (hopefully with author's permission) here.


Here are some pictures.

View attachment 199375
View attachment 199374
View attachment 199376

Then it was on to the ratlines. I initially dreaded doing this because I knew it will take a lot of patience in doing this repetitive task. But, call me strange, once I started doing it, I actually enjoyed it tremendously. There is something meditative and mystical in doing repetitive tasks, one can almost get lost in one's thoughts while doing it.

The challenge in doing ratlines is to make sure the spacing is consistent. I didn't trust my eyesight, so again, I used a simple jig... taking 2 strips of wood, approximately the same width as my desired spacing, and two clamps. This worked like a charm because I can align the ratlines against the straight edge of the wood strips.

View attachment 199377

A bit of glue on the end knots.

View attachment 199379

Then attach the futtocks to the lower shrouds.

View attachment 199380
View attachment 199381

Here are some pictures of the finished product.

View attachment 199382
View attachment 199383
View attachment 199384
View attachment 199385
View attachment 199386
View attachment 199387

I am heading to the homestretch friends. Just a few more things to wrap up to the finish line.

As always, thanks for your support.
Looking good, Reggie. Mine came with three small boats. The wood is so tiny and fragile I’ll be lucky to be able to make two.
 
Back
Top