Your boat looks great! Why am I not surprised?Next up is the ships boat.
View attachment 215274
It was a nightmare it really needed a jig to hold the ribs in place while gluing and attaching the planks.
View attachment 215270
I used my magnetic blocks while the glue set. It worked but as it's a very delicate structure the seats any bow piece went in before planking. The planks are only 0.5mm and as it's single planked care must be taken only sand to a minimum. When the planking is complete it is surprisingly strong.
View attachment 215271
I tried rounding off the oars it broke straight away maybe I should have used a longitudinally sanding motion as the ply is fragile. As I didn't like the look of the oars and it would taken a lot of time to fix them up new ones where made. The rudder was attached as is, it would have been nice to sand it to shape but after what happened to the oar l thought best leave it alone.
View attachment 215272
This has been one of the most challenging parts to make so far, considering I nearly bined it a few times it doesn't look to bad.
View attachment 215273
-

Win a Free Custom Engraved Brass Coin!!!
As a way to introduce our brass coins to the community, we will raffle off a free coin during the month of August. Follow link ABOVE for instructions for entering.
-

PRE-ORDER SHIPS IN SCALE TODAY!
The beloved Ships in Scale Magazine is back and charting a new course for 2026!
Discover new skills, new techniques, and new inspirations in every issue.
NOTE THAT OUR FIRST ISSUE WILL BE JAN/FEB 2026
You are using an out of date browser. It may not display this or other websites correctly.
You should upgrade or use an alternative browser.
You should upgrade or use an alternative browser.
If you don't feel like throwing something away once in a while you're not trying hard enough. Bravo on the boat. She looks great!
I find there's always a fix to any problem I was looking at aftermarket boats the right size but it would have taken to long. Next best thing photograph it from its good side if that's no good try Photoshop.If you don't feel like throwing something away once in a while you're not trying hard enough. Bravo on the boat. She looks great!
I was checking the parts on the deck today and found there was a small problem with the skylight.
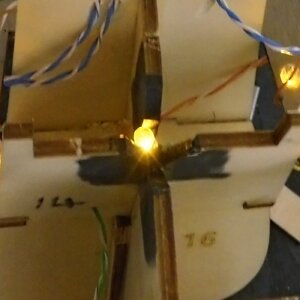
It was difficult to find a good location for the LED under the skylight. I didn't want to use four LEDs so l cut away the frame and bulkhead and placed one in the centre.
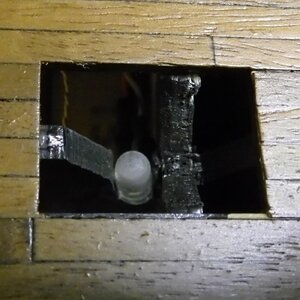
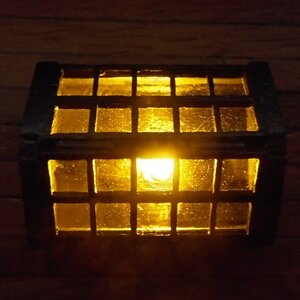
The problem is the light is to bright and doesn't look right
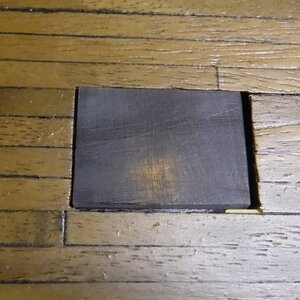
After playing with a few solutions I came up with a piece of Perspex (lightly sanded with a coat of thinned down black paint on it) over the LED. I also used medium wet and dry on the top of the LED to disperse the light better.
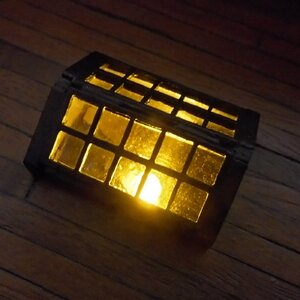
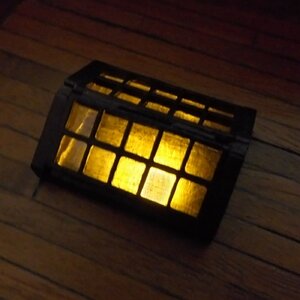
Before and after.

It was difficult to find a good location for the LED under the skylight. I didn't want to use four LEDs so l cut away the frame and bulkhead and placed one in the centre.


The problem is the light is to bright and doesn't look right

After playing with a few solutions I came up with a piece of Perspex (lightly sanded with a coat of thinned down black paint on it) over the LED. I also used medium wet and dry on the top of the LED to disperse the light better.


Before and after.
Nice. Not enough room to offset the light inside?
There was framework under the skylight, first I tried cutting it back but I still needed multiple LEDs which was overkill for a small opening. So I decided to go with just the one, once the deck was in place no changes could be made.Nice. Not enough room to offset the light inside?
Last edited:
Yep. Looks good.There was framework was under the skylight, first I tried cutting it back but I still needed multiple LEDs which was overkill for a small opening. So I decided to go with just the one, once the deck was in place no changes could be made.
Part 1
What's the most important part on a pirate ship? Not the rum unfortunately but the cannons. I started these while waiting for the LEDs to arrive at the beginning of the build.
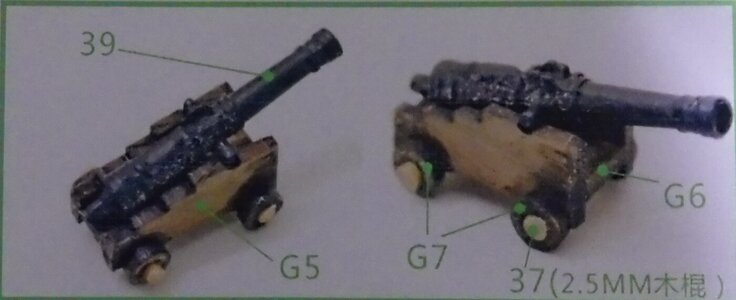
The instructions showed the taper on the carriage round the wrong way (wide at the front), I checked fitting the cannon both ways and it fitted better as shown so that's the way I assembled them.
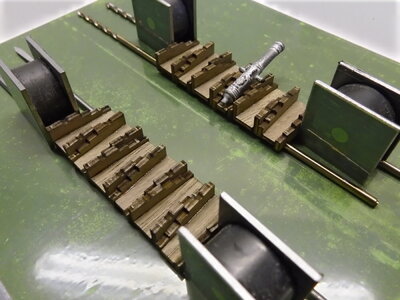
This is how I glued them, I used drills in the axel slots to line up the sides and the magnets keep them sqare.
I wanted to make a cap for the trunnions to do this I used some copper wire flattened down to 0.3mm.
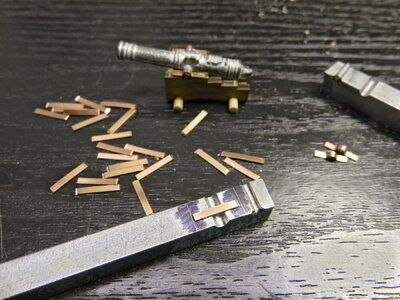
To make consistent parts I used two pieces of quarter inch key steel with two holes drilled in the centre of them. First hole with a pin attached was the same size as the trunnion (2mm) and the other twice the thickness of the cap plus trunnion (2.6mm).

Two lines have been marked as a guide to place the cap.
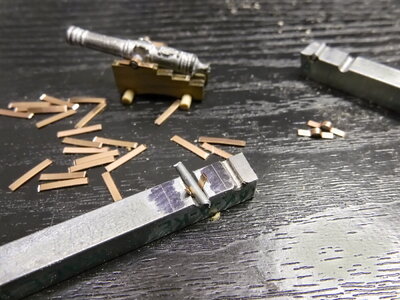
A 2mm pin was used to form the first bend.
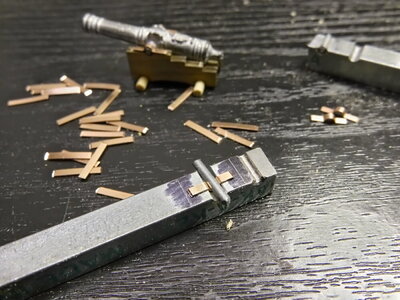
The ends where then pushed down by hand.
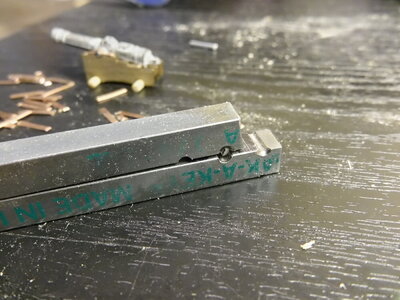
Press the other piece on top of the first one using a clamp this insures nice clean bends.
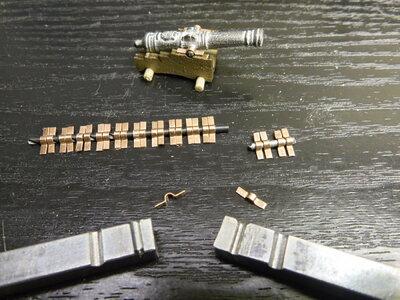
This is a bit of overkill but I wanted to experiment with making my own parts.
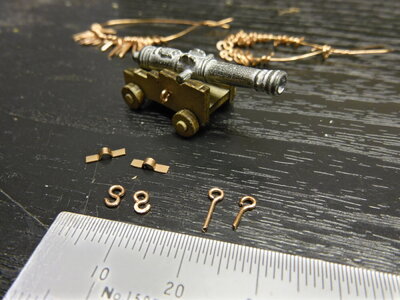
Finally I made the parts for the breaching ropes. I am not going to fit the other gun tackle due to the small size and my skill level, maybe next time.
Part 2
Now I'm preparing parts for installation on the ship and need to decide on what finish to put on the cannons. The more I looked at them I think I was wrong to make them back to front so in the end I took them apart and made them right.
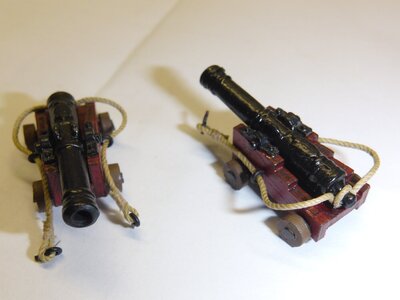
I went with a red stain on the carriage mainly because everything else is walnut and black the guns needed to stand out.
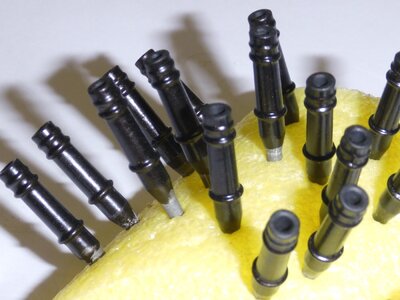
A mix of black and bronze for the cannons.
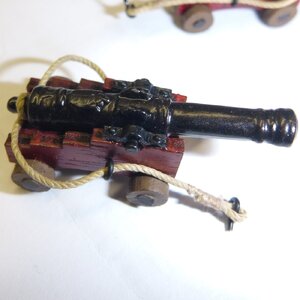
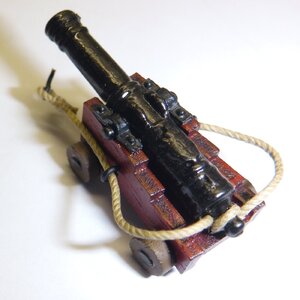
Ready for installation.
What's the most important part on a pirate ship? Not the rum unfortunately but the cannons. I started these while waiting for the LEDs to arrive at the beginning of the build.

The instructions showed the taper on the carriage round the wrong way (wide at the front), I checked fitting the cannon both ways and it fitted better as shown so that's the way I assembled them.

This is how I glued them, I used drills in the axel slots to line up the sides and the magnets keep them sqare.

I wanted to make a cap for the trunnions to do this I used some copper wire flattened down to 0.3mm.

To make consistent parts I used two pieces of quarter inch key steel with two holes drilled in the centre of them. First hole with a pin attached was the same size as the trunnion (2mm) and the other twice the thickness of the cap plus trunnion (2.6mm).

Two lines have been marked as a guide to place the cap.

A 2mm pin was used to form the first bend.

The ends where then pushed down by hand.

Press the other piece on top of the first one using a clamp this insures nice clean bends.

This is a bit of overkill but I wanted to experiment with making my own parts.

Finally I made the parts for the breaching ropes. I am not going to fit the other gun tackle due to the small size and my skill level, maybe next time.
Part 2
Now I'm preparing parts for installation on the ship and need to decide on what finish to put on the cannons. The more I looked at them I think I was wrong to make them back to front so in the end I took them apart and made them right.

I went with a red stain on the carriage mainly because everything else is walnut and black the guns needed to stand out.

A mix of black and bronze for the cannons.


Ready for installation.
A couple of us made the same mistake with the gun carriages. Unfortunately, I had already put them all together and some of them were in the gun deck and rigged up. I wasn't doing it all over again. But I learned my lesson for next time. They look good, Tony!Part 1
What's the most important part on a pirate ship? Not the rum unfortunately but the cannons. I started these while waiting for the LEDs to arrive at the beginning of the build.
View attachment 216881
The instructions showed the taper on the carriage round the wrong way (wide at the front), I checked fitting the cannon both ways and it fitted better as shown so that's the way I assembled them.
View attachment 216880
This is how I glued them, I used drills in the axel slots to line up the sides and the magnets keep them sqare.
View attachment 216882
I wanted to make a cap for the trunnions to do this I used some copper wire flattened down to 0.3mm.
View attachment 216887
To make consistent parts I used two pieces of quarter inch key steel with two holes drilled in the centre of them. First hole with a pin attached was the same size as the trunnion (2mm) and the other twice the thickness of the cap plus trunnion (2.6mm).
View attachment 216887
Two lines have been marked as a guide to place the cap.
View attachment 216890
A 2mm pin was used to form the first bend.
View attachment 216889
The ends where then pushed down by hand.
View attachment 216888
Press the other piece on top of the first one using a clamp this insures nice clean bends.
View attachment 216884
This is a bit of overkill but I wanted to experiment with making my own parts.
View attachment 216886
Finally I made the parts for the breaching ropes. I am not going to fit the other gun tackle due to the small size and my skill level, maybe next time.
Part 2
Now I'm preparing parts for installation on the ship and need to decide on what finish to put on the cannons. The more I looked at them I think I was wrong to make them back to front so in the end I took them apart and made them right.
View attachment 216895
I went with a red stain on the carriage mainly because everything else is walnut and black the guns needed to stand out.
View attachment 216896
A mix of black and bronze for the cannons.
View attachment 216897View attachment 216898
Ready for installation.
I would be one of those who screwed up on the first couple.A couple of us made the same mistake with the gun carriages. Unfortunately, I had already put them all together and some of them were in the gun deck and rigged up. I wasn't doing it all over again. But I learned my lesson for next time. They look good, Tony!
Tony, I am impressed with the way you made your caps for the trunnions. I have been thinking about that for a while. The instructions don't call for any, but I think they are needed at this scale. I may go with black construction paper to keep them thin enough.
I hammered out some copper wire for capsquares, but not with the precision you took it to.I would be one of those who screwed up on the first couple.
Tony, I am impressed with the way you made your caps for the trunnions. I have been thinking about that for a while. The instructions don't call for any, but I think they are needed at this scale. I may go with black construction paper to keep them thin enough.
Maybe it's not a mistake just the Chinese way of doing things.A couple of us made the same mistake with the gun carriages. Unfortunately, I had already put them all together and some of them were in the gun deck and rigged up. I wasn't doing it all over again. But I learned my lesson for next time. They look good, Tony!
I've seen some made from thin card and they look good. I just wanted to try making them from copper.I would be one of those who screwed up on the first couple.
Tony, I am impressed with the way you made your caps for the trunnions. I have been thinking about that for a while. The instructions don't call for any, but I think they are needed at this scale. I may go with black construction paper to keep them thin enough.
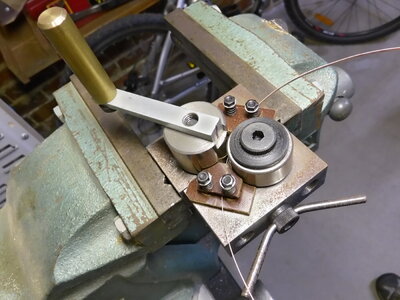
I like the way you flatten the wire to make a capsquare, I can see you have some die and tool-making skills, those self-made rollers looks simple enough to do a great job. Do you have a sketch\plans by chance?I wanted to make a cap for the trunnions to do this I used some copper wire flattened down to 0.3mm.
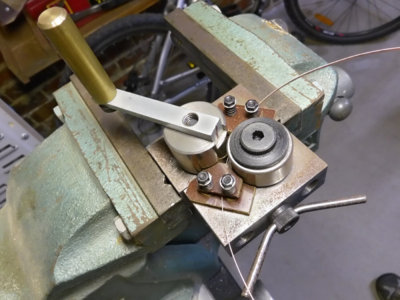
Hi Jimsky back in the late 90s I had access to a machine shop and made some tools for modelling which this is one. With everything I made I used whatever was to hand and back then CNC was uncommon. I do not have any plans\sketches, rather than make plans I can pull it apart and explain the concept, how it works the dimensions used are not really important.I like the way you flatten the wire to make a capsquare, I can see you have some die and tool-making skills, those self-made rollers looks simple enough to do a great job. Do you have a sketch\plans by chance?
View attachment 217022
Hello, Tony. I don't mean to create you trouble, but if this is not too much time and hassle,I do not have any plans\sketches, rather than make plans I can pull it apart and explain the concept, how it works the dimensions used are not really important.
No problem whatsoever to tell the truth it's been so long since I made it will be a nice refresher for myself. Is there a better forum for it to be put in or just add it to the build log?Hello, Tony. I don't mean to create you trouble, but if this is not too much time and hassle,Iwe would love to have an idea of how it works and possibly made similar one of our own needs.
Wow! That's great, Tony!! We have a dedicated forum for tools, techniques in such. You can start a new thread there, but...on your log show the link to your thread so everyone who follows your build log here will know about your new thread in the tools section.No problem whatsoever to tell the truth it's been so long since I made it will be a nice refresher for myself. Is there a better forum for it to be put in or just add it to the build log?

Tools, Lathes, Mills, Jigs and Techniques
This forum has combined all the Topics for Tools, Lathes, Mills, Jigs and Techniques
shipsofscale.com
Im glad with all the building logs of this black pearl. A lot useful information. Really want to build this one to. Thanks for all pictures and information. It's really useful
I can recommend this model the parts are accurately cut and go together well also the materials are good. The main downside are the poor instructions which makes it hard if it's your first model. I purchased mine direct from ZHL and found them very good to deal with.Im glad with all the building logs of this black pearl. A lot useful information. Really want to build this one to. Thanks for all pictures and information. It's really useful


