-

Win a Free Custom Engraved Brass Coin!!!
As a way to introduce our brass coins to the community, we will raffle off a free coin during the month of August. Follow link ABOVE for instructions for entering.
-

PRE-ORDER SHIPS IN SCALE TODAY!
The beloved Ships in Scale Magazine is back and charting a new course for 2026!
Discover new skills, new techniques, and new inspirations in every issue.
NOTE THAT OUR FIRST ISSUE WILL BE JAN/FEB 2026
You are using an out of date browser. It may not display this or other websites correctly.
You should upgrade or use an alternative browser.
You should upgrade or use an alternative browser.
ZHL Le Soleil Royal
- Thread starter Jay
- Start date
- Watchers 37
-
- Tags
- le soleil royal zhl
- Joined
- Dec 27, 2019
- Messages
- 551
- Points
- 308

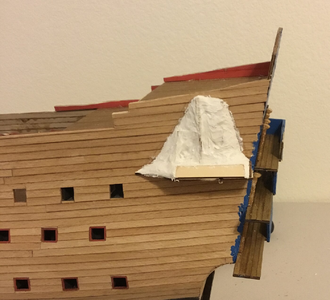
My original thinking as the pictures in the instructions you sent me looked even worse than what I had done.While I agree that it could have been sanded more, I think the bell will be covered with so much bling you might never notice. I used strips of wood, but you’d probably never notice it.
- Joined
- Dec 27, 2019
- Messages
- 551
- Points
- 308

Darivs, I did acquiesce and started planking the bell. I will let you know how it turns out.Perhaps. There’s a lot of carvings over the surface of the Soleil Royal’s side galleries. You would have to examine the decorations and judge whether or not laminating the putty surface is worth the effort based on what is visible in the end.
- Joined
- Dec 27, 2019
- Messages
- 551
- Points
- 308

True statement but the kit is reasonably affordable and is a fun build.The decor is kind of a nightmare. The manufacturer needs to be torn off for this))
Looking forward to seeing the results. Adding extra details is rarely regrettable.Darivs, I did acquiesce and started planking the bell. I will let you know how it turns out.
- Joined
- Dec 27, 2019
- Messages
- 551
- Points
- 308

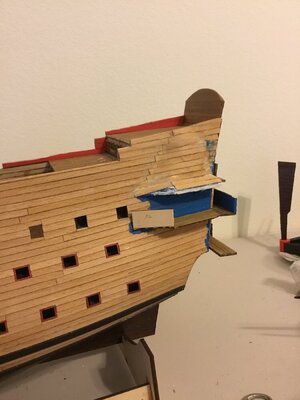
Trim the plank ends to remove the stepped line. The ends of the planks should form a single, curved, organic line around the bulge that is the side gallery. Use a NEW, SHARP razor knife, remove the scrap triangles. and use sanding sticks to remove all traces of glue or putty. You should see only wood. Using planks as wide at the hull planking made forming the wood over the curve of the gallery more difficult, I imagine. They were probably quite resistant to bending. Did you soak the strips in warm water thorough and pre-bend them before attempting to attach them to the ship? That makes the job so much easier.Started working on the port side balcony fences. Also planking the port side bell. Need a couple more places to put planking on it. I have to admit that it is smoother than without planks but now the planks have a great foundation. We will see how it looks when I paint it.
View attachment 401623
Cut the ends of the planks to the line where the hull planking ended and the putty began. And don't fret. This sort of thing gets better with practice!

Last edited:
- Joined
- Dec 27, 2019
- Messages
- 551
- Points
- 308

Oh lordy, I think I’m gonna be going down the rabbit hole here.Trim the plank ends to remove the stepped line. The ends of the planks should form a single, curved, organic line around the bulge that is the side gallery. Use a NEW, SHARP razor knife, remove the scrap triangles. and use sanding sticks to remove all traces of glue or putty. You should see only wood. Using planks as wide at the hull planking made forming the wood over the curve of the gallery more difficult, I imagine. They were probably quite resistant to bending. Did you soak the strips in warm water thorough and pre-bend them before attempting to attach them to the ship? That makes the job so much easier.
Cut the ends of the planks to the line where the hull planking ended and the putty began. And don't fret. This sort of thing gets better with practice!
View attachment 401645
Actually, model ship building is more akin to a black hole...Oh lordy, I think I’m gonna be going down the rabbit hole here.
- Joined
- Dec 27, 2019
- Messages
- 551
- Points
- 308

An adventure for sure. Something new around every corner.Actually, model ship building is more akin to a black hole...
- Joined
- Dec 27, 2019
- Messages
- 551
- Points
- 308

Kurt, if I might ask, how did you get in your signature where the name of your ship is in red and you can just touch the name and it will take you to the build?Actually, model ship building is more akin to a black hole...
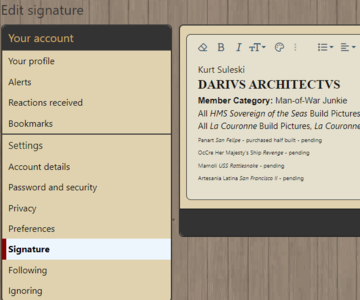
Click on your name at the top of the screen.Kurt, if I might ask, how did you get in your signature where the name of your ship is in red and you can just touch the name and it will take you to the build?
Highlight and click on "Account Details".
Click on "Signature".
Edit your signature however you like, including inserting links, which will appear as red text to others.
Profit!

- Joined
- Dec 27, 2019
- Messages
- 551
- Points
- 308

Thanks, tried but batting .000. No problem, no biggie.Click on your name at the top of the screen.
Highlight and click on "Account Details".
Click on "Signature".
Edit your signature however you like, including inserting links, which will appear as red text to others.
Profit!
View attachment 401747
True storyActually, model ship building is more akin to a black hole...
Good afternoon Jay. I’m with Kurt here. This would work. Remembering the amount of detail which will be added here, any deviation will get lost in all this detail. Cheers GrantTrim the plank ends to remove the stepped line. The ends of the planks should form a single, curved, organic line around the bulge that is the side gallery. Use a NEW, SHARP razor knife, remove the scrap triangles. and use sanding sticks to remove all traces of glue or putty. You should see only wood. Using planks as wide at the hull planking made forming the wood over the curve of the gallery more difficult, I imagine. They were probably quite resistant to bending. Did you soak the strips in warm water thorough and pre-bend them before attempting to attach them to the ship? That makes the job so much easier.
Cut the ends of the planks to the line where the hull planking ended and the putty began. And don't fret. This sort of thing gets better with practice!
View attachment 401645
To make it into a link to your threads, copy the url and paste it into the area indicated when you click on the symbol that looks a little like a chain link. If you need more detailed help, please feel free to pm me.Click on your name at the top of the screen.
Highlight and click on "Account Details".
Click on "Signature".
Edit your signature however you like, including inserting links, which will appear as red text to others.
Profit!
View attachment 401747
Where are you getting stuck, Jay? We'll walk you through it.
- Joined
- Dec 27, 2019
- Messages
- 551
- Points
- 308

Kurt, do I need a computer, I only have an iPad? Vic said I need to copy the url, where do I find that? Signed a not too bright old guy.Where are you getting stuck, Jay? We'll walk you through it.
- Joined
- Dec 27, 2019
- Messages
- 551
- Points
- 308

Thanks Vic. You may be hearing from me soon.To make it into a link to your threads, copy the url and paste it into the area indicated when you click on the symbol that looks a little like a chain link. If you need more detailed help, please feel free to pm me.
The URL Vic is referring to is the internet web address where you presumably have your build log or photos stored, if you have any. Most of us use computers, and we take the pictures stored on our computers and copy them to some site on the internet where others can access them. The link, or URL, is a text address that other people use with their internet browser to download or view those pictures or web pages.Kurt, do I need a computer, I only have an iPad? Vic said I need to copy the url, where do I find that? Signed a not too bright old guy.
For example, I copied all my build log pictures to a free file storage website called IMGBB.com. All my pictures are stored there where others can view them. The ULR or address is here: https://ibb.co/album/r3rs8m
Now, Instead of typing "https://ibb.co/album/r3rs8m" in my signature on this forum, I use the link
Here's how to create that for yourself.
First, you need to store your pictures on the internet somewhere like IMGBB or other service. Basically, I am storing copies of my pictures on someone's computer somewhere else on the planet. Then to create a TEXT that links to them either 1) in one of your posts, or 2) in the signature editor, click on the
This requestor window will pop up:

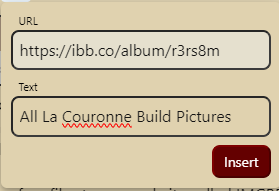
Paste the internet web address (URL) in the top, and the TEXT you want to name it in the bottom.
Now when other click on that TEXT, their internet browser will send them to the web address URL. That URL could be 1) a website, or 2) a link directly to a picture, which will then be displayed to them.


