On the All-Scenario Version, we got to make our own port hinges that actually work using two different pieces with ends curled and connected with a nail for a pin. It looks okay that way, but it's pretty rickety. I think you've done a great job with what they gave you. I've seen several that have a visible knot on the under side of the port cover.
-

Win a Free Custom Engraved Brass Coin!!!
As a way to introduce our brass coins to the community, we will raffle off a free coin during the month of August. Follow link ABOVE for instructions for entering.
-

PRE-ORDER SHIPS IN SCALE TODAY!
The beloved Ships in Scale Magazine is back and charting a new course for 2026!
Discover new skills, new techniques, and new inspirations in every issue.
NOTE THAT OUR FIRST ISSUE WILL BE JAN/FEB 2026
You are using an out of date browser. It may not display this or other websites correctly.
You should upgrade or use an alternative browser.
You should upgrade or use an alternative browser.
Thanks for the feedback I find with jigs simple is best, I was looking at ways to hold the lids in place while marking the holes. As the ports were different sizes making a block to fit didn't work then I saw the clothespeg on my bench job done. Just proves that a tidy bench isn't always a good idea.
very clever ideas with using these templates and jigs - very good work
It's time to do some of the parts I've been putting off for a while. I wasn't sure how to make them and they will stand out if not done properly, first one is the central staircase. Being curved and having to line up to the centre rail made it difficult, if they didn't turn out I was going to make them straight.
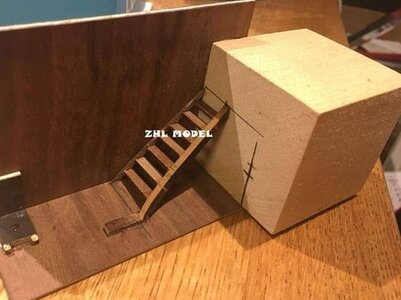
I have seen this method used but I couldn't make it work for me.
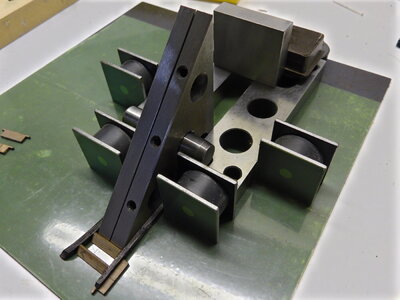
This is how I made the stairs luckily they are set at 45 degrees and I had a set square I could use if not a piece of wood (cut at 45 degrees and the same width as the stairs ) can be used. Firstly the ends of the stairs where cut at 45 degrees and placed either side of the set square held in place with magnets. As the sides of the stairs are different thicknesses one side was packed up to make them equal. The stairs are assembled bottom up.
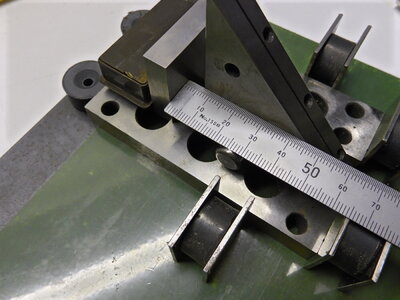
As the stairs where fitted the set square was moved back using a rule to keep the pitch the same.
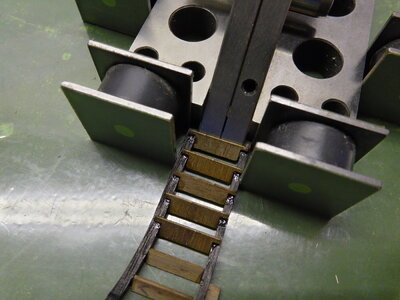
Last step fitted then the bannister uprights are glued in place.
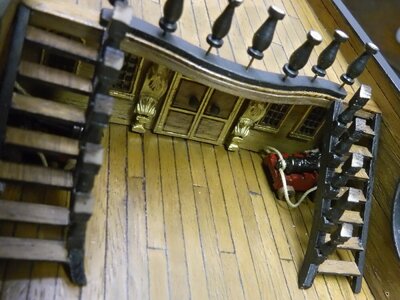
The two cannons under the stairs went in first while I still had access then the stairs. The bottom centre bannister rail was lined up to the stairs and the uprights pinned and glued in place.
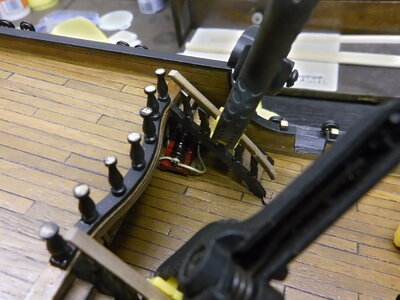
Side rails clamped to line up centre top rail.
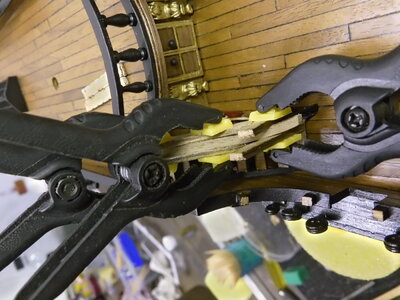
Side rails attached.
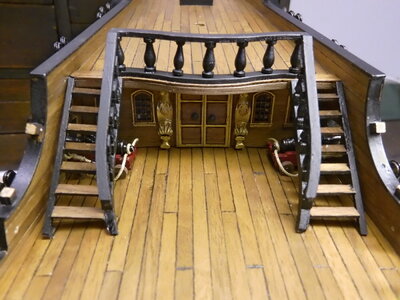
Finished most probably could have been done easier but I'm happy with the way they turned out. Next the side rails on ship.

I have seen this method used but I couldn't make it work for me.

This is how I made the stairs luckily they are set at 45 degrees and I had a set square I could use if not a piece of wood (cut at 45 degrees and the same width as the stairs ) can be used. Firstly the ends of the stairs where cut at 45 degrees and placed either side of the set square held in place with magnets. As the sides of the stairs are different thicknesses one side was packed up to make them equal. The stairs are assembled bottom up.

As the stairs where fitted the set square was moved back using a rule to keep the pitch the same.

Last step fitted then the bannister uprights are glued in place.

The two cannons under the stairs went in first while I still had access then the stairs. The bottom centre bannister rail was lined up to the stairs and the uprights pinned and glued in place.

Side rails clamped to line up centre top rail.

Side rails attached.

Finished most probably could have been done easier but I'm happy with the way they turned out. Next the side rails on ship.
It definitely was not an easy process. The All Scenario Version. Had spindles as well as supports for the railings, making the build even more complicated. I was glad when it was done.It's time to do some of the parts I've been putting off for a while. I wasn't sure how to make them and they will stand out if not done properly, first one is the central staircase. Being curved and having to line up to the centre rail made it difficult, if they didn't turn out I was going to make them straight.
View attachment 223802
I have seen this method used but I couldn't make it work for me.
View attachment 223803
This is how I made the stairs luckily they are set at 45 degrees and I had a set square I could use if not a piece of wood (cut at 45 degrees and the same width as the stairs ) can be used. Firstly the ends of the stairs where cut at 45 degrees and placed either side of the set square held in place with magnets. As the sides of the stairs are different thicknesses one side was packed up to make them equal. The stairs are assembled bottom up.
View attachment 223822
As the stairs where fitted the set square was moved back using a rule to keep the pitch the same.
View attachment 223823
Last step fitted then the bannister uprights are glued in place.
View attachment 223831
The two cannons under the stairs went in first while I still had access then the stairs. The bottom centre bannister rail was lined up to the stairs and the uprights pinned and glued in place.
View attachment 223848
Side rails clamped to line up centre top rail.
View attachment 223861
Side rails attached.
View attachment 223862
Finished most probably could have been done easier but I'm happy with the way they turned out. Next the side rails on ship.
Nicely accomplished Tony! The stairs really did turn out great!
Very good result - and clever idea with the "jig" you were using
Thanks for all the likes and encouragement, I hope everyone had a happy Easter and not to much chocolate. I have been pushing on with the rails and head timbers.
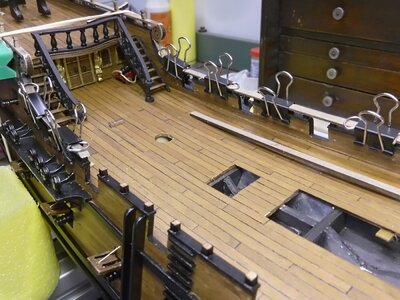
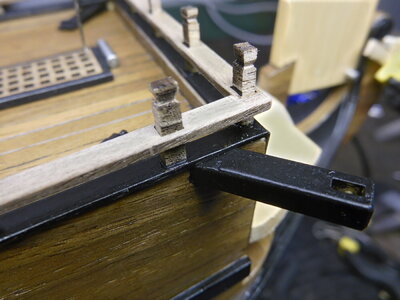
The rails are difficult to get right mainly because of the round joining pieces lots of dry fitting and fiddling with the parts. All the blocks are pinned and glued in place. The parts where painted after gluing for a stronger joint.
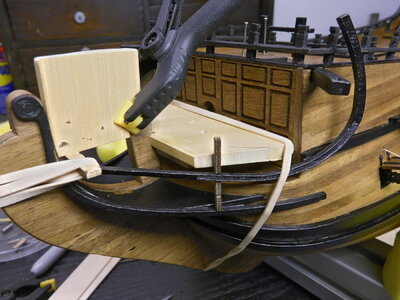
When l started the head timbers I had no idea how to make them, they needed to be bent around the bow as they stuck out to much.l couldn't find a way of assembling them off the ship. I began by making some wooden parts to insure that both sides are equal. With the rails held in place with rubber bands the vertical rails where fitted one by one.
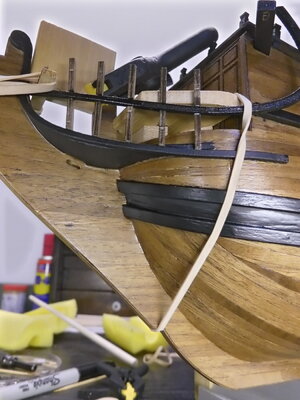
When all the vertical rails where fitted I removed the assembly and used it as a guide to assemble the other half.
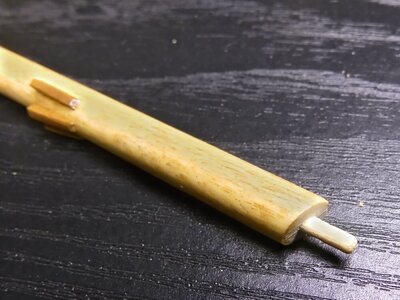
As it's easier to fit now I made up the bowsprit, the end is angled to match the front bulkhead and a dowel fitted for extra reinforcement.
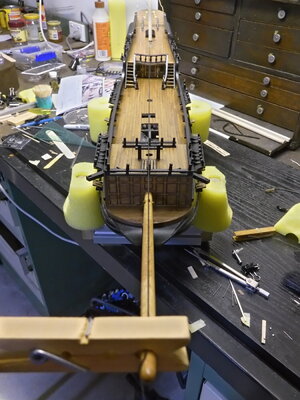
A piece of rope attached to the mizen mast was used to align the bowsprit.
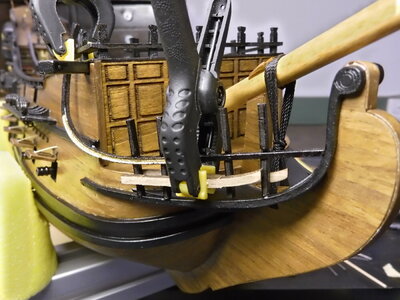
With the bowsprit in place I fitted the middle rail with the verticals attached then trimed the height of the vertical rails to suit the top rail.
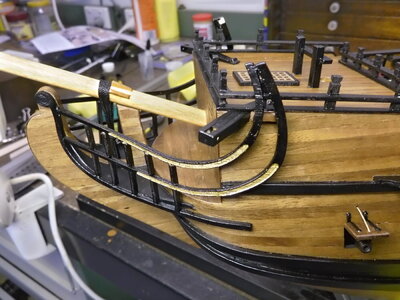
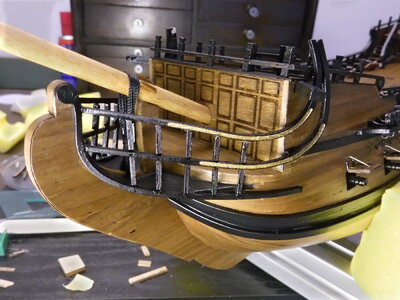
This is what I finished up with, its quite delicate and great care must taken when bending the rails.
Next up will be finishing the deck fittings then I'm saving the best for last the lanterns.
Any suggestions or questions please ask.


The rails are difficult to get right mainly because of the round joining pieces lots of dry fitting and fiddling with the parts. All the blocks are pinned and glued in place. The parts where painted after gluing for a stronger joint.

When l started the head timbers I had no idea how to make them, they needed to be bent around the bow as they stuck out to much.l couldn't find a way of assembling them off the ship. I began by making some wooden parts to insure that both sides are equal. With the rails held in place with rubber bands the vertical rails where fitted one by one.

When all the vertical rails where fitted I removed the assembly and used it as a guide to assemble the other half.

As it's easier to fit now I made up the bowsprit, the end is angled to match the front bulkhead and a dowel fitted for extra reinforcement.

A piece of rope attached to the mizen mast was used to align the bowsprit.

With the bowsprit in place I fitted the middle rail with the verticals attached then trimed the height of the vertical rails to suit the top rail.


This is what I finished up with, its quite delicate and great care must taken when bending the rails.
Next up will be finishing the deck fittings then I'm saving the best for last the lanterns.
Any suggestions or questions please ask.
A fiddly bit of work! Well done!
Stairway looks great, awesome, sweet.
Building the beakheads , you did a great job.
Cutting those groves in the beakhead rails without ruining the rails is quite an accomplishment.
I hope I can get my work to at least 90% of yours.
Building the beakheads , you did a great job.
Cutting those groves in the beakhead rails without ruining the rails is quite an accomplishment.
I hope I can get my work to at least 90% of yours.
Last edited:
I built a similar base for my Enterprise 1799.I've been thinking about how to make a stand for my BP didn't like the ZHL approach or a pedestal, so thought I'd have a go at making one. I am basing this on one I had seen on a website that would suit my BP.
View attachment 220011
This project started simply enough but then got a bit out of control.
View attachment 220012
This is all I really needed it held the ship well, the keel was locked in place and the bottom of the ship rested on rails keeping it nice and square.
View attachment 220013
A second rail was added for strength. To reinforce the glue I tried brass nails but didn't like the way they looked. Next best thing I made some 1.8mm wooden pins from toothpicks and pinned the joints.
View attachment 220016
A jig was made to drill the pinholes.
View attachment 220014View attachment 220015View attachment 220017View attachment 220018
Toothpicks reduced to 1.8mm blackened and glued in place.
View attachment 220019
Placed stand on keel and drilled 4 screw holes and one for a location pin, it's not going to move.
View attachment 220020
These are the contacts for the LEDs, the wires are not fitted yet.
View attachment 220021
This is how I planned it to be but felt that it didn't do justice to the ship.
View attachment 220027
Since I had wood left over some supports where added the problem was being on an angle glue wasn't able to hold them securely so these are also pinned in place. First I drilled holes (using the jig) where the supports are going, the support was positioned correctly and clamped in place.
View attachment 220028
The holes are transferred into the support.
View attachment 220029
Pins added ready to glue. After the supports where finished I added a brace to each one.
View attachment 220031View attachment 220032View attachment 220030
The pin is used to position the model so the contacts for the LEDs line up.
View attachment 220033View attachment 220034View attachment 220035
Like I said a simple job that wasn't so simple but I'm pleased with the way it turned out.
You however have taken it to a higher level. The detail and precision shows in the end product.
I would recommend putting some velcro pieces on the ends of the braces where they contact the ship.
This will save the hull from scrapes and scratches.
Really fine craftsmanship. Just a pleasure to see your work!
Great job, Tony! Very clean. My beakhead posts did not fit and I had to jury rig them. Then when I turned the ship around to work on the other side, I broke them all off on one side. I hope they make the trip to Omaha without breaking again. I’m watching to see how others doing the All-Scenario Version fare.Thanks for all the likes and encouragement, I hope everyone had a happy Easter and not to much chocolate. I have been pushing on with the rails and head timbers.
View attachment 225569
View attachment 225571
The rails are difficult to get right mainly because of the round joining pieces lots of dry fitting and fiddling with the parts. All the blocks are pinned and glued in place. The parts where painted after gluing for a stronger joint.
View attachment 225572
When l started the head timbers I had no idea how to make them, they needed to be bent around the bow as they stuck out to much.l couldn't find a way of assembling them off the ship. I began by making some wooden parts to insure that both sides are equal. With the rails held in place with rubber bands the vertical rails where fitted one by one.
View attachment 225577
When all the vertical rails where fitted I removed the assembly and used it as a guide to assemble the other half.
View attachment 225579
As it's easier to fit now I made up the bowsprit, the end is angled to match the front bulkhead and a dowel fitted for extra reinforcement.
View attachment 225578
A piece of rope attached to the mizen mast was used to align the bowsprit.
View attachment 225586
With the bowsprit in place I fitted the middle rail with the verticals attached then trimed the height of the vertical rails to suit the top rail.
View attachment 225587View attachment 225588
This is what I finished up with, its quite delicate and great care must taken when bending the rails.
Next up will be finishing the deck fittings then I'm saving the best for last the lanterns.
Any suggestions or questions please ask.
I was afraid of braking things that's why I fitted the bowsprit early. This is one part of the kit that hasn't been designed very well.Great job, Tony! Very clean. My beakhead posts did not fit and I had to jury rig them. Then when I turned the ship around to work on the other side, I broke them all off on one side. I hope they make the trip to Omaha without breaking again. I’m watching to see how others doing the All-Scenario Version fare.
Thanks I'll look into that, on my stand the braces are more for looks than function as the ship is held in place by the keel and they mainly only contact the wale.I built a similar base for my Enterprise 1799.
You however have taken it to a higher level. The detail and precision shows in the end product.
I would recommend putting some velcro pieces on the ends of the braces where they contact the ship.
This will save the hull from scrapes and scratches.
I wish I could take credit for those groves but they're laser cut parts, this does however make them very easy to brake when bending. Nothing I have done is that hard just take it easy and find a way that works for you. If am having problems with a part it's time to take the dog for a walk when I get back the parts go together better, luckily I have a dog that needs a lot of exercise.Stairway looks great, awesome, sweet.
Building the beakheads , you did a great job.
Cutting those groves in the beakhead rails without ruining the rails is quite an accomplishment.
I hope I can get my work to at least 90% of yours.
Compared to the excellent painting on your Vasa this is a push over.A fiddly bit of work! Well done!


