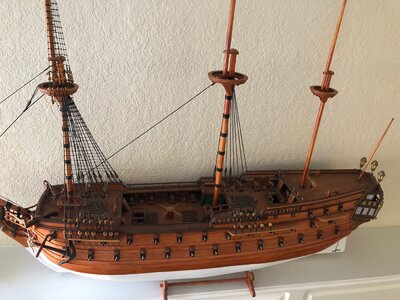
Well, I haven’t seen any of your personal limitations yet Dean, so we’ll see where your vision takes it!so we will see how far I go, given what I have to work with and my personal limits.
-

Win a Free Custom Engraved Brass Coin!!!
As a way to introduce our brass coins to the community, we will raffle off a free coin during the month of August. Follow link ABOVE for instructions for entering.
-

PRE-ORDER SHIPS IN SCALE TODAY!
The beloved Ships in Scale Magazine is back and charting a new course for 2026!
Discover new skills, new techniques, and new inspirations in every issue.
NOTE THAT OUR FIRST ISSUE WILL BE JAN/FEB 2026
You are using an out of date browser. It may not display this or other websites correctly.
You should upgrade or use an alternative browser.
You should upgrade or use an alternative browser.
NORSKE LOVE - Billing Boats 1:75 scale
- Thread starter Dean62
- Start date
- Watchers 74
-
- Tags
- billing boats norske lowe
- Joined
- Sep 3, 2021
- Messages
- 5,190
- Points
- 738

Morning Dean,There are so many great craftsman on SOS, I am often reluctant to share techniques for fear I am being rhetorical. But I remind myself there are plenty of first time ship builders as well. That said, I will share a technique I use to keep boards square and precise in length. In this case, I need three boards the exact same length, otherwise it can skew my frames and ruin my crucial ship foundation, of the keel and frames.
First, I always ensure my measurements start from the end of the board…
View attachment 259143
I use a block to assist with this. I need 57.5 mm length on three boards.
When the first one is exact, I use it with the block, to copy to a second board. But I use an xacto mark instead of a pencil, because a pencil could add distance.
Then I cut to the right side of the line, in a miter box, ensuring the left side of the saw is on the right side of the line, so as not to loose any length.
View attachment 259144View attachment 259145
Next, there may be some small wood fibers on the end, due to the hand saw. You will be tempted to sand these off…don’t! You normally end up with a convex surface when hand sanding a small board face. To ensure it remains square, I cut any wood fibers on the edge of the board with an xacto knife. This ensures I don’t ruin my square end face on the board.
View attachment 259146View attachment 259147
Then I stand the boards on end to verify they are exactly the same length…
View attachment 259148
Now you have boards that are the same exact length, with square ends, all done by hand. Those who have power tools, will have put this type of technique behind them. But for those who work by hand, this is my technique.
Using these boards (3), I ensured all of my frames were square. 1 board on top of the keel (at the bottom of the frame), and 2 boards (1 on each side) at the top of the frame. This squares the frames to each other, top to bottom, and side to side. Of course I dry fit first, and check with a square in both directions, and then verify with a square once glued.
View attachment 259149View attachment 259150
A well written and illustrated tutorial on how to ensure your frames are aligned, parallel to one another, perpendicular to your reference frame... I am most pleased with the relative simplicity (but no less effective) of your solution; in that regard I am a fervent supporter of the KISS-axiom.
The one thing that bugged me over the weekend was the 57,5mm lengths for your distance holders, just not understanding where that particular dimension was coming from. I remembered seeing a pitch of 60mm between bulkheads, but I missed the 57,5mm dimension.
But I found it; in post #15, you show figure 1A of the build plans and there it's shown; the lengths of the distance holders.
In another post, from Henk Liebre, another method was described and illustrated on the application of temporary distance holders, in this case for the POF Bluenose.
What Henk's and your posts underline for me is the importance of getting a proper "foundation"; if you get this wrong, the rest of one's build will be bothersome, at best. In the case of the partially exposed frames of the POF BN esthetics also play an important role.
And for me, I don't mind a single bit you sharing your methods on SOS, please keep doing just that!
Johan
yes. one main deck. this was mainly usedThe structure looks good Dean! Question: I am looking at the drawings that you have up behind the model and can only see one deck. Is this correct?
I build it early 70. the 1st was not laser cut. hard work to hand cut the ship. still have the sawI remember admiring this kit in the local hobby shop way back in 1970's. It must be a 50 year old design.
the one behind these picture is Karl Maize -here Kaliboot--Thanks for this info, I had forgotten about the post by @Uwek …this is a great reference and inspiration!
View attachment 259423View attachment 259424View attachment 259425View attachment 259426
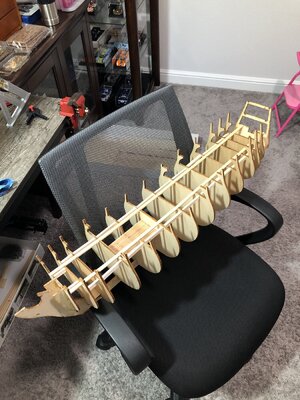
As you can see, the Bulkheads are rather thin -difficult to ad two strips together here. What I did, was to make a copy of each one, cut them by hAlves and glued to each bulkhead. from the midsection and forward to the bow, and the from mid towards the Steam on the backsideAll frames are on the keel finally! Spacer boards up top are a little random, but my only goal was to maintain an exact distance at 3 points (1 on keel, 2 port and starboard up top) within less than 1/2 mm. I measured each one in multiple places along the width as I installed them and they all pass! This is a straight, square assembly!
First milestone…
View attachment 259427View attachment 259428
- Joined
- Sep 3, 2021
- Messages
- 5,190
- Points
- 738

Would it have been an option to apply the strips of veneer the the keel at the appropriate locations?Plywood is 4mm thick and the slot in the frame is 5mm, because that should be the thickness of the ply. So I added some beechwood veneer boards inside the slot.
YES. At least with the very old model. Later they changed somewhat. the false keel was longer to add strip here. the was then two pieces of 1 mm to be glued on each side of the bow and stern keel, stern and bow part in one piece ass well piece to add. bow 1`4+1=6, bow and stern part the same. the false keel 4 mm. makes it easy to make a bow filler and the garboard, to make perfect planking.Would it have been an option to apply the strips of veneer the the keel at the appropriate locations?
YES. At least with the very old model. Later they changed somewhat. the false keel was longer to add strip here. the was then two pieces of 1 mm to be glued on each side of the bow and stern keel, stern and bow part in one piece ass well piece to add. bow 1`4+1=6, bow and stern part the same. the false keel 4 mm. makes it easy to make a bow filler and the garboard, to make perfect planking.
Thank you , welcome aboard!Interesting methodology. I don’t think I would have thought of it.
Thank you Lou, I plan to do some carving, so we will see...lol!Well, I haven’t seen any of your personal limitations yet Dean, so we’ll see where your vision takes it!
IMO, it was best to shim the frames themselves (in the notch), verses adding to the keel, bow and stern, as that would have required adding veneer to the entire surface both sides! This is not needed because the keel, at stern and bow, have additional pieces added at the edges to eliminate the need for a rabbet by terminating the boards at the raised edge. This will become apparent later in the build. The garboard plank has no provision for that, so I will be adding some veneer to the keel board below the garboard plank, to use the same method.Would it have been an option to apply the strips of veneer the the keel at the appropriate locations?
this was what i tried to explain but languages??IMO, it was best to shim the frames themselves (in the notch), verses adding to the keel, bow and stern, as that would have required adding veneer to the entire surface both sides! This is not needed because the keel, at stern and bow, have additional pieces added at the edges to eliminate the need for a rabbet by terminating the boards at the raised edge. This will become apparent later in the build. The garboard plank has no provision for that, so I will be adding some veneer to the keel board below the garboard plank, to use the same method.I also intend to use balsa blocks, bow and stern, and possibly between frames, or at least add some additional material to the sides of each frame to help with fairing and hull planking, as this is a single plank hull.

The instructions look the same, very little text, and mainly some basic 3d views and full scale plans.I am adding my instruction manual -the 1Th with Laser Cut, Riggen Bloks in Wood, but nearly all extra are in Plastic.. 2nd my basic tools-.at that time. the saw I still have
Last edited:
I’ve only done one so far on my BP. It probably looked better than the square sails, but I couldn’t figure out where to tie up the lower part of the spar and the flappy corner of the sail. I did some research online but found very little. I suppose I should buy a book on 16th century rigging. Then I would know what that flappy corner was called.
- Joined
- Sep 3, 2021
- Messages
- 5,190
- Points
- 738

Adding the veneer was at minimum the result of some careful thinking and planning ahead.IMO, it was best to shim the frames themselves (in the notch), verses adding to the keel, bow and stern, as that would have required adding veneer to the entire surface both sides! This is not needed because the keel, at stern and bow, have additional pieces added at the edges to eliminate the need for a rabbet by terminating the boards at the raised edge. This will become apparent later in the build. The garboard plank has no provision for that, so I will be adding some veneer to the keel board below the garboard plank, to use the same method.I also intend to use balsa blocks, bow and stern, and possibly between frames, or at least add some additional material to the sides of each frame to help with fairing and hull planking, as this is a single plank hull.

I understand now why you opted for shimming the bulkheads, instead of the keel members.
Up to the next update. Enjoying the show immensely.

You are making very good progress and the hull is beginning to show itself from the skeleton in place. RichAll frames are on the keel finally! Spacer boards up top are a little random, but my only goal was to maintain an exact distance at 3 points (1 on keel, 2 port and starboard up top) within less than 1/2 mm. I measured each one in multiple places along the width as I installed them and they all pass! This is a straight, square assembly!
First milestone…
View attachment 259427View attachment 259428
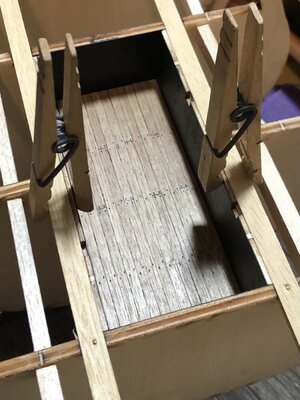
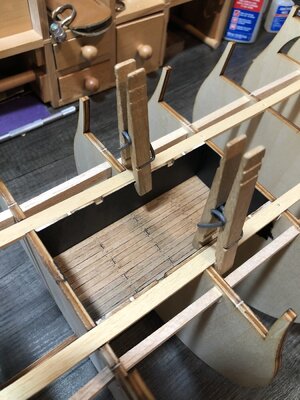
I planked the false deck… as you may know I prefer a dull finish on the deck, with an aged look I get from stain, scraping and steel wool. The idea is if the deck is dull and everything around it is pristine looking, it gives it a more natural worn look, and at the same time makes the other details stand out more. That’s my logic anyway. 
Here is the false deck and I will install it permanently next, and put in the side walls and paint them black. There is a set of stairs that go down to the false deck with a railing around it. So you don’t really see much of it.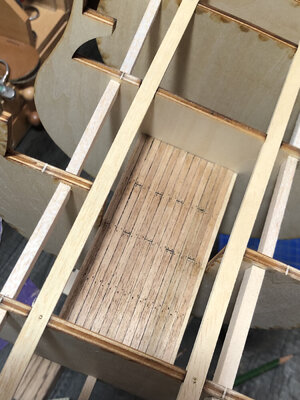
Here is the false deck and I will install it permanently next, and put in the side walls and paint them black. There is a set of stairs that go down to the false deck with a railing around it. So you don’t really see much of it.


