It's really quite beautiful!
-

Win a Free Custom Engraved Brass Coin!!!
As a way to introduce our brass coins to the community, we will raffle off a free coin during the month of August. Follow link ABOVE for instructions for entering.
-

PRE-ORDER SHIPS IN SCALE TODAY!
The beloved Ships in Scale Magazine is back and charting a new course for 2026!
Discover new skills, new techniques, and new inspirations in every issue.
NOTE THAT OUR FIRST ISSUE WILL BE JAN/FEB 2026
You are using an out of date browser. It may not display this or other websites correctly.
You should upgrade or use an alternative browser.
You should upgrade or use an alternative browser.
HMS GRANADO (1742) - midship section - POF by CAF in 1:48 - by Uwe
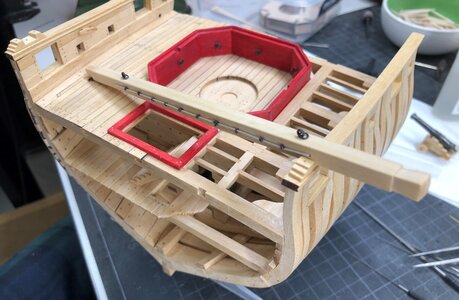
I showed already the fish davit cleats installed on top of the railing,
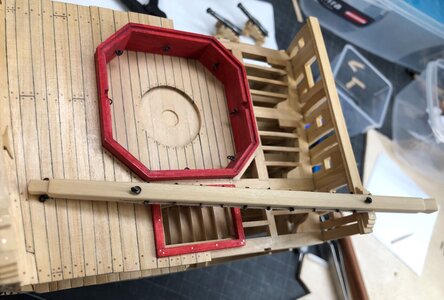
so it was logic, that I should also make a fish davit, which can be installed in addition on the deck.
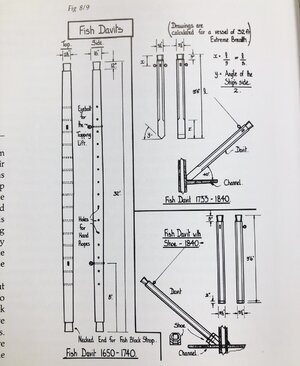
I used some scrap material of the kit, using the 9mm wooden sheet of the riders, which have a correct length, compared to the Goodwin book drawing
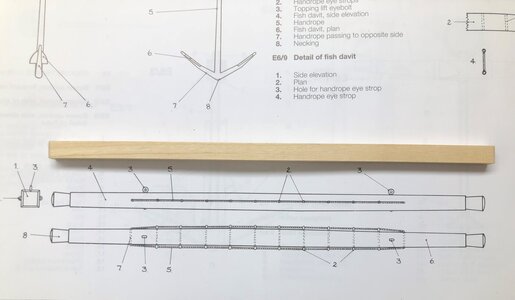
some sanding is necessary to get the correct meassures
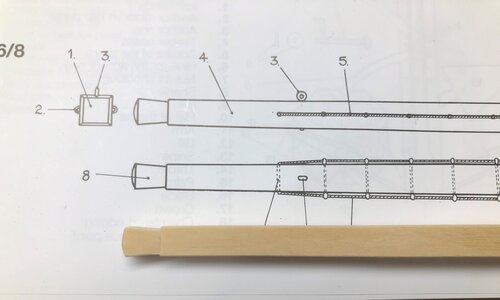
a first test of a possible arrangement
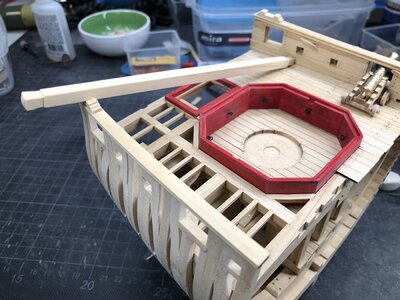
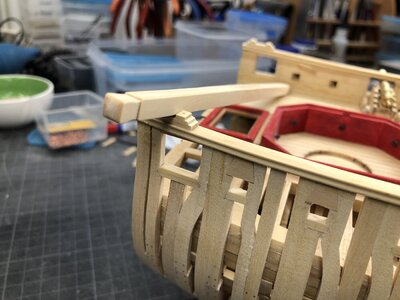
after drilling the holes for the rope(s) and some eyelets the fish davit is ready to lift the anchor for lashing
Many Thanks for your interest ..... and a nice weekend - keep care
.... to be continued .....
so it was logic, that I should also make a fish davit, which can be installed in addition on the deck.
I used some scrap material of the kit, using the 9mm wooden sheet of the riders, which have a correct length, compared to the Goodwin book drawing

some sanding is necessary to get the correct meassures

a first test of a possible arrangement


after drilling the holes for the rope(s) and some eyelets the fish davit is ready to lift the anchor for lashing


Many Thanks for your interest ..... and a nice weekend - keep care
.... to be continued .....
Last edited:
Kurt Konrath
Kurt Konrath
This is something new to me, what is/are the purposes of the fish david?
Hello Kurt, I don't know it either, but Uwe writes it's for lifting and lashing the anchor. 
It is a spar with a roller or sheave at its end, used for fishing the anchor or to be precise an anchors 'fluke' without damaging the hull.This is something new to me, what is/are the purposes of the fish david?
Hallo friends,
many thanks for your interest in my building log.
The Fish Davit was more or less on every ship, it was a technically necessary equipment, but not often shown on models.
Most know the cathead, but usually also a beam called fish davit was also necessary - therefore the special natical term of "CATTING AND FISHING" for lifting and securing the anchor
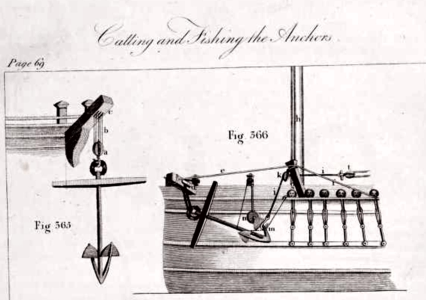
Catting and fishing an anchor, as illustrated in The Young Sea Officer's Sheet (Archive.org), refers to the process of raising and securing it to the ship. It is hoisted vertically at the cathead by a cat-tackle (catting), and the flukes are turned with a fish-tackle to secure them over the gunwhale (fishing) and to prevent damage to the ship as the anchor is stowed.
365 is showing the "CATTING" and
366 is showing the "FISHING"
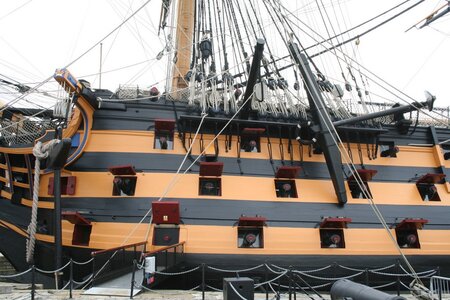
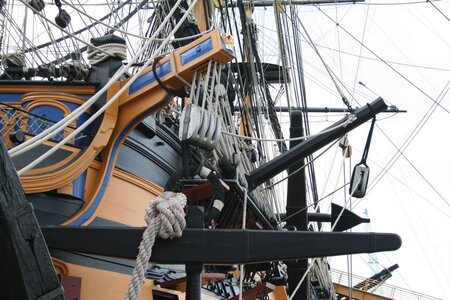
Here you can see the more modern fish davit on the HMS Victory
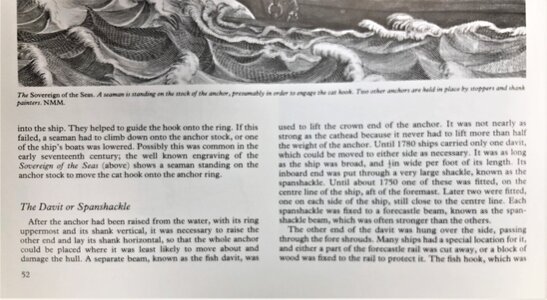
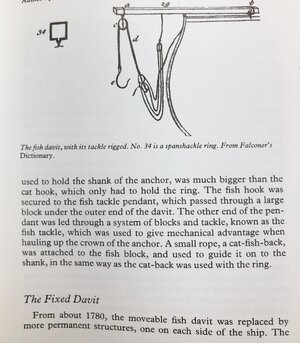
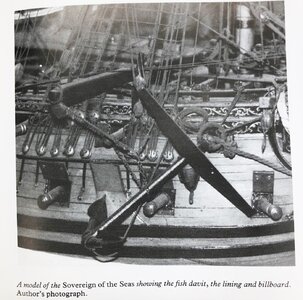
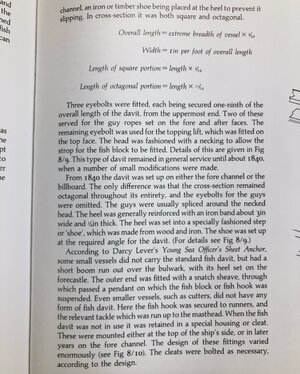
and some further details given by Lavery
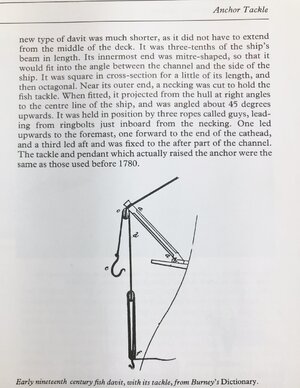
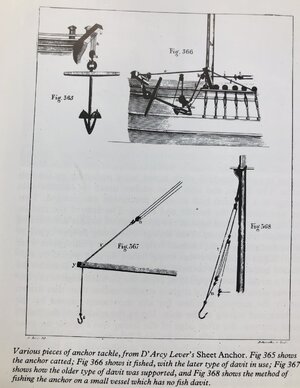
and also from Goodwin
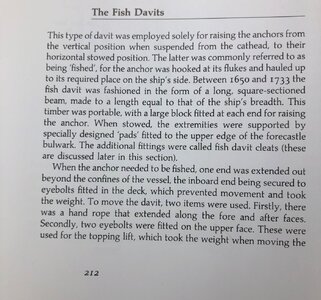
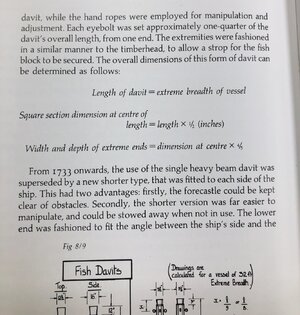
many thanks for your interest in my building log.
The Fish Davit was more or less on every ship, it was a technically necessary equipment, but not often shown on models.
Most know the cathead, but usually also a beam called fish davit was also necessary - therefore the special natical term of "CATTING AND FISHING" for lifting and securing the anchor
Catting and fishing an anchor, as illustrated in The Young Sea Officer's Sheet
 (Archive.org), refers to the process of raising and securing it to the ship. It is hoisted vertically at the cathead by a cat-tackle (catting), and the flukes are turned with a fish-tackle to secure them over the gunwhale (fishing) and to prevent damage to the ship as the anchor is stowed.
365 is showing the "CATTING" and
366 is showing the "FISHING"

Here you can see the more modern fish davit on the HMS Victory


and some further details given by Lavery


and also from Goodwin


Just beautiful! Great job on those frames and You're right. This wood is georgeous
One of the last missing parts on the section model are the two guns which should be mounted on the planked side of the model
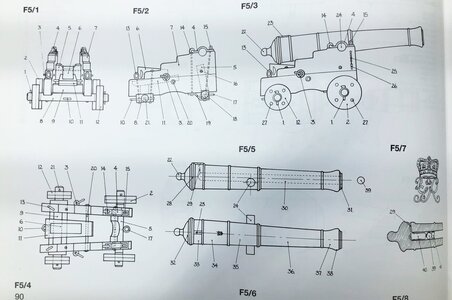
Comparing the gun muzzle and the carriage (incl. brass parts) of the kit with the given drawings in the Anatomy book are showing us, that the armamant is very well reflected
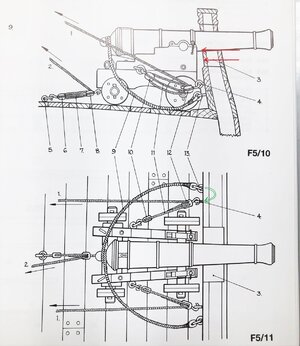
I have only problems with Goodwins drawing of the gun tackles, which I do not believe
1) Goodwin shows the ringbolts and eyebolts for the tackle and breeching very low, lower than the gunports arround the height of the wheels. In my opinion they should be higher left and right of the gunports, so the tackle will not have any contact with the wheels (red arrows). By a recoil, also if it would be for a 4pdr relartively small the front wheel would roll over the tackle, so the tackle had to be removed before firing.
2) in the top view we can see that the breeching is more outside than the tackle - I have never seen this way, so I guess they should be vertical in the same axis and not displaced (green arrow)
3) I do not know, if these small guns with only 4pdr muzzle had really a traversing tackle fall (No.2) - especially because there is no room behind the gun, because of the mortar pit. I am sure they were intirely moved via hands pushing the carriage by lever arms
I hope you will post some comments and opinions about this .......
first time the Granado is armed with her 4pdr guns
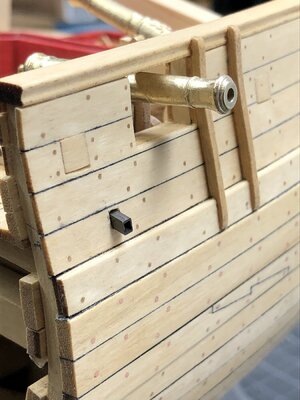
and now also blackened - with fnished wood works on the carriages
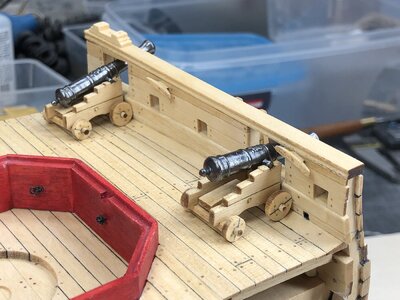
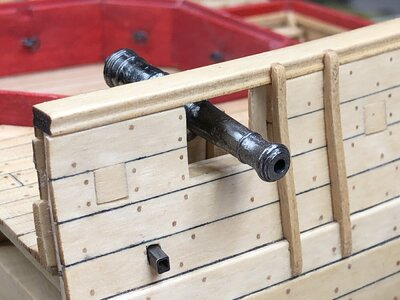
and also added the metal works on the carriages
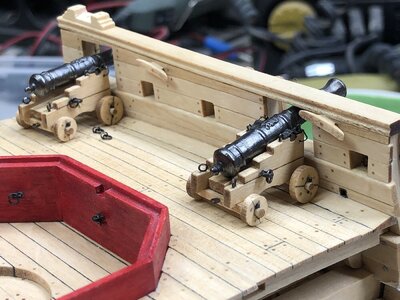
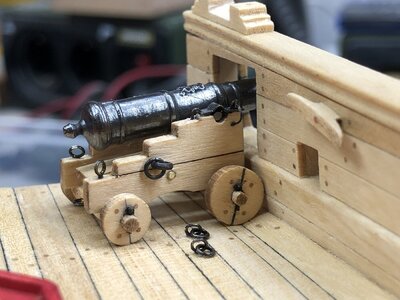
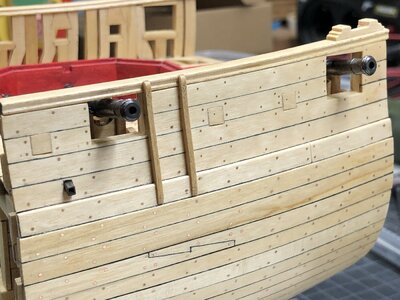
here you can see, that there was no space for a traversing tackle fall
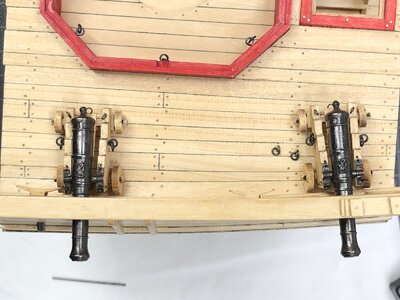
Many Thanks for your interest ......
Comparing the gun muzzle and the carriage (incl. brass parts) of the kit with the given drawings in the Anatomy book are showing us, that the armamant is very well reflected

I have only problems with Goodwins drawing of the gun tackles, which I do not believe
1) Goodwin shows the ringbolts and eyebolts for the tackle and breeching very low, lower than the gunports arround the height of the wheels. In my opinion they should be higher left and right of the gunports, so the tackle will not have any contact with the wheels (red arrows). By a recoil, also if it would be for a 4pdr relartively small the front wheel would roll over the tackle, so the tackle had to be removed before firing.
2) in the top view we can see that the breeching is more outside than the tackle - I have never seen this way, so I guess they should be vertical in the same axis and not displaced (green arrow)
3) I do not know, if these small guns with only 4pdr muzzle had really a traversing tackle fall (No.2) - especially because there is no room behind the gun, because of the mortar pit. I am sure they were intirely moved via hands pushing the carriage by lever arms
I hope you will post some comments and opinions about this .......

first time the Granado is armed with her 4pdr guns

and now also blackened - with fnished wood works on the carriages


and also added the metal works on the carriages


here you can see, that there was no space for a traversing tackle fall

Many Thanks for your interest ......
Super work Uwe, looks a fun model to build
- Joined
- Dec 9, 2019
- Messages
- 970
- Points
- 403

WitajOne of the last missing parts on the section model are the two guns which should be mounted on the planked side of the model
Comparing the gun muzzle and the carriage (incl. brass parts) of the kit with the given drawings in the Anatomy book are showing us, that the armamant is very well reflected
View attachment 293855
I have only problems with Goodwins drawing of the gun tackles, which I do not believe
1) Goodwin shows the ringbolts and eyebolts for the tackle and breeching very low, lower than the gunports arround the height of the wheels. In my opinion they should be higher left and right of the gunports, so the tackle will not have any contact with the wheels (red arrows). By a recoil, also if it would be for a 4pdr relartively small the front wheel would roll over the tackle, so the tackle had to be removed before firing.
2) w widoku z góry widać, że natylnik jest bardziej na zewnątrz niż sprzęt - nigdy tak nie widziałem, więc myślę, że powinny być pionowe w tej samej osi i nie przesunięte (zielona strzałka)
3) Nie wiem, czy te małe działa z zaledwie 4-funtowym pyskiem rzeczywiście miały upadek sprzętu poprzecznego (nr 2) - zwłaszcza, że za działem nie ma miejsca z powodu dołu moździerzowego. Jestem pewien, że były one w całości poruszane rękami pchającymi wózek za pomocą ramion dźwigni
Mam nadzieję, że opublikujesz kilka komentarzy i opinii na ten temat.......
View attachment 293865
po raz pierwszy Granado jest uzbrojony w 4-funtowe działa
View attachment 293856
a teraz też poczerniały - wykończone prace w drewnie na wagonach
View attachment 293857
View attachment 293858
a także dodał prace metalowe na wagonach
View attachment 293859
View attachment 293861
View attachment 293862
tu widać, że nie było miejsca na upadki trawersu
View attachment 293863
Wielkie dzięki za zainteresowanie ......
Wyglądaj super można podziwiać ,podziwiać
Pozdrawiam Mirek
Hello
Look super you can admire, admire
Greetings Mirek
Kurt Konrath
Kurt Konrath
Well we are always learning something on these posts about new items and how they were used on the old ships.
Many Thanks to all of you for your kind words and the likes received.
In the meantime the section model is more or less finished and I started already the next project.
Unfortunately the camera of my I-phone is defect, so I need to make final photos hopefully during next weekend.
Therefore I would like to say sorry for waiting
In the meantime the section model is more or less finished and I started already the next project.
Unfortunately the camera of my I-phone is defect, so I need to make final photos hopefully during next weekend.
Therefore I would like to say sorry for waiting
qQue trabajo más bien hecho, me encanta la madera, muy limpio
What a well done job, I love the wood, very clean.
What a well done job, I love the wood, very clean.
Last edited by a moderator:
Hallo my friends,
today I will show for the moment the last made progress on my section model.
The hinges of the sweep ports were installed and also the outside endings of the gun ringbolts
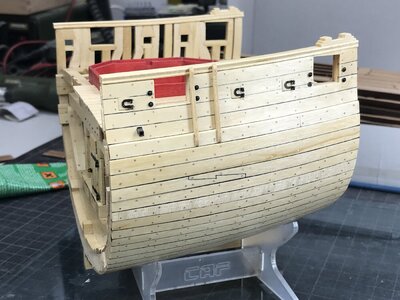
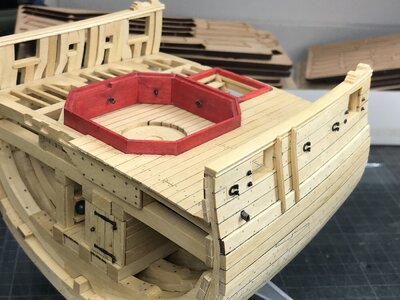
and off course some fast impressions with the guns and the mortar
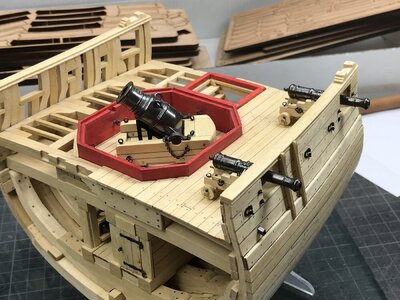
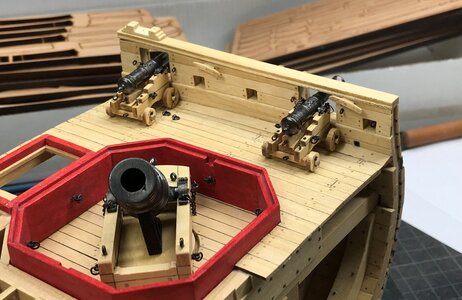
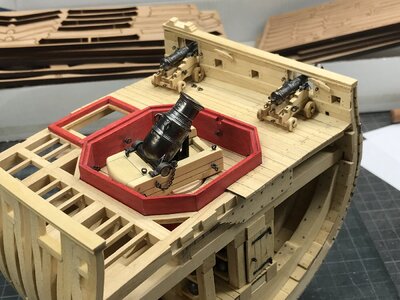
also one door of the amunition room was finally fixed
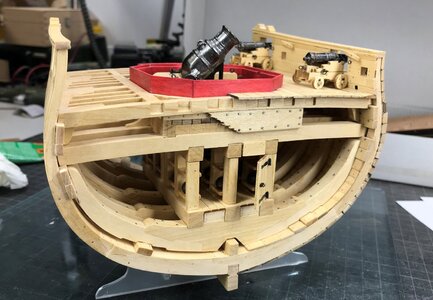
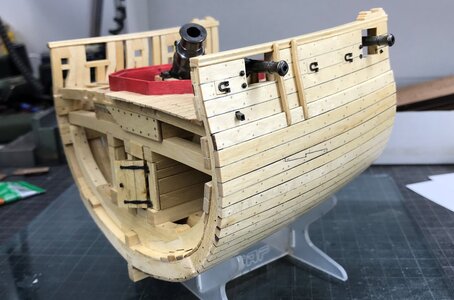
Now only the tackles of the guns are missing, but for this I need some aftermarket blocks and ropes, which will be ordered in some time, together with the necessary material for the Le Coureur and my upcoming project.
So for the moment the work on this section is now completed - some final photos of this model will come soon........
As summary I can state, that the work on this model produced really a lot of fun and enjoyable hours. It is a high quality kit with several possibilities (but no needs) for pimping some more details. The wood is great and I would love to have such a material more often in kits, although the kit would get more expensive, but it is every Euro, Dollar and cent worth. I hope, that CAF is making soon a second issue of this kit, so also other will be able to make this model.
Usually I am not listing the working hours on this model, but for this (short time) model I counted - all togther it was 256 hours - 256 hours of fun
Out of the box you could make it maybe with 120 to 150 hours.
Many Thanks for all your interest, your comments, hint and tipps you posted here, and also the likes received.
See you in my next building log......
today I will show for the moment the last made progress on my section model.
The hinges of the sweep ports were installed and also the outside endings of the gun ringbolts


and off course some fast impressions with the guns and the mortar


also one door of the amunition room was finally fixed


Now only the tackles of the guns are missing, but for this I need some aftermarket blocks and ropes, which will be ordered in some time, together with the necessary material for the Le Coureur and my upcoming project.
So for the moment the work on this section is now completed - some final photos of this model will come soon........
As summary I can state, that the work on this model produced really a lot of fun and enjoyable hours. It is a high quality kit with several possibilities (but no needs) for pimping some more details. The wood is great and I would love to have such a material more often in kits, although the kit would get more expensive, but it is every Euro, Dollar and cent worth. I hope, that CAF is making soon a second issue of this kit, so also other will be able to make this model.
Usually I am not listing the working hours on this model, but for this (short time) model I counted - all togther it was 256 hours - 256 hours of fun
Out of the box you could make it maybe with 120 to 150 hours.
Many Thanks for all your interest, your comments, hint and tipps you posted here, and also the likes received.
See you in my next building log......
Really wonderful work you did. congratulations
Congratulations Uwe! A beautiful section model!
It looks absolutely great. Spitzenmäßig, richtig toll.
- Joined
- Sep 28, 2020
- Messages
- 287
- Points
- 168

Great work Uwe!
What is your next project?
Christian
What is your next project?
Christian


