
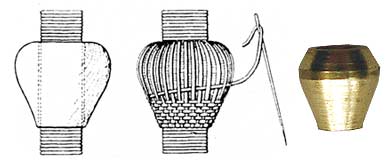
For the mouse it's better to use something as internal base (see the picture). Here it's turned from brass (or wood), but the easiest way is to make it from polymer clay.

 |
The beloved Ships in Scale Magazine is back and charting a new course for 2026! Discover new skills, new techniques, and new inspirations in every issue. NOTE THAT OUR NEXT ISSUE WILL BE MARCH/APRIL 2026 |
|
 |
As a way to introduce our brass coins to the community, we will raffle off a free coin during the month of August. Follow link ABOVE for instructions for entering. |
|
when the hobby is allowed to enter the house you now will never be allowed to stop.... Sounds like paradiseGood morning
Thank you Jan, Heinrich,Vic, Paul,Ron and Rob.
Rob, @Robp1025 even Arlene(the Admiral) is now getting to the point where maybe Grants Victory is allowed to be placed in our dinning room when I complete her...now that is the biggest compliment I have had to date.... I guess she now has a permanent berth. Cheers Grant
Very nice work GrantGood morning. I redid the anchor tackle. Made a hook. I used @Thomas Marocke diagram as I could not get the hook looking good around the block as shown by @Walterone. My “metal work” needs loads of work and some tools to assist.. The sling and messenger lines will be connected when I fit the anchors later. Cheers Grant.
View attachment 305912

Wow, takes your breath away when you give us the full picture GrantGood afternoon.
My Mizzen standing rigging progress on “Grants Victory” - it’s not a Mantua anymore way too many changes and additions and is nothing close to the historic authenticity of this majestic vessel. So we will call it Grants Victory.
Much trial and error in learning how to rig and learning about the principles of how these ships were actually rigged and what goes where. Hopefully the Main and foremast will be greatly improved.
I would like to thank all of you for your encouragement, likes and especially those wise words of advice and help. Massively appreciated.
Some pictures which are not close ups. Lots of WIP so loose ends, ropes not tied off, Main mast and Foremast not seated, stays and back stays not tensioned etc etc. Just for you guys to see “Grants Victory “ Those futtock staves and mouse’s.....Eish
View attachment 306106View attachment 306107View attachment 306108
Cheers Grant
PS- sorry Paul @dockattner still using bubble wrap

it’s not a Mantua anymore way too many changes and additions and is nothing close to the historic authenticity of this majestic vessel. So we will call it Grants Victory
Thank you Vladimir. My next mouse I will give this a go. I have stayed away from this as it did seem complicated. My Victory is a learning process so “if I don’t try I won’t know”. Cheers GrantFor the mouse it's better to use something as internal base (see the picture). Here it's turned from brass (or wood), but the easiest way is to make it from polymer clay.
Thank you Mark. Been away riding this Long weekend- as you know there are plenty public holidays in SA. Productivity not high in the minds of the powers that be .On positive side good for get away times. Cheers GrantWow, takes your breath away when you give us the full picture Grant
As for ...
Brilliant! Love it
- Mark
Good evening Daniel. Thank you. This rigging game is insane. So much to learn and the seizing, whipping, Etc goes on and on. Trial and error are a big part of my rigging process at the moment however I’m starting to understand the whys and what’s of these ships. Now I just need to get the how part right. Good to hear from you again and hope all is well with you and your Vasa. Cheers GrantHello Grant,
I'm catching up on your build again. Man, I'm just lovin your work, your handmade strops on the dead eyes at your tops are outstanding. I had no idea that top mast futtock shroud lines from post #969 ran like that! Your rigging is truly impeccable, and I too know what you mean about going through small dia seizing line. Every so often I'm like "well gota stop here and make another 3 or4 batches of 0.5mm line (the size I use for seizing). I look at it as a break from rigging because I enjoy rope making. Keep up the fantastic work my friend!
Good morning Roger. Thanks for the compliment. Being my first model, there are so many aspects I would have done differently for sure- most significant of these is : buy a simpler, less detailed practice ship and a good reference book. The positive side is I’m getting loads of practice for my next ship.Just going through some of the last few pages of your build log. Your Victory is a real beauty Grant, you are doing some fine work.
") Cheers Grant
Cheers Grant


 and cut away the bulkheads and sanded down best as possible.Could not achieve the desired effect as the Pinnace is small and sanding and tools don’t get in.
 ) and found Copper hoops which I cut in half and glued. Painted black. Stained the deck, thwarts, sternsheets and helmsman area at stern. Painting: way more difficult than I thought.


Aren't they fun to make, Grant? They are almost like a separate build.Good morning. A while back I decided to start making the Pinnace, the 2nd smallest of the 4 lifeboats. I started making the Frames according to the instructions and gave up as these are not even resembling what the life boat look like. Had no idea how to continue as don’t have the skills to make a scratch POF at this scale nor do I have enough wood.
View attachment 306762View attachment 306764
Jokita (Caldercraft) instructions, thanks to @paulv1958 advice has cool instructions so I modified my frames and gave it a go. Here are the diagrams I downloaded.
View attachment 306763
As you see the kit is so way out ......
Here is the mess as I went along - trial and error was the name of the game- outcome based vision kept me going...like so many aspects of life. Took many hours to make this little Pinnace. Been on it for some months off and on when rigging made me
I planked the Mantua frames with 0.5mm x3mm walnut. I wanted a wood planked look so polyfiller and smooth filling was avoided. The Pinnace will be painted so I used CA glue mostly.
View attachment 306765
I took my Dremmel in @Vfordyce style
Started ribbing with 0.5mm walnut cut to 1.5mm however these kept breaking so simulated the ribs with cardboard. Used one of the Mantua frames for stern bulkhead (planked the top as the plywood looked horrid). Made the transom knees.
Planked the decking onto paper which I cut to shape and double planked the stern and bow part.
View attachment 306769
The Mantua boat only had 5 thwarts (should be 8) , no sternsheets, washstrakes, crutches, oars, helmsman area and transom knees. The bulkheads are not in correct place so my ribbing and position of the thwarts will be a little out. Kept going.....
Added the foreword and stern wash strakes using 1x4mm and bent and sanded to size.
The Pinnace has 8 crutches and 4 oars. For the crutches I raided my daughter beading box (Ashtyn is in France so she won’t miss them
View attachment 306766
Made some oars (still WIP). Still need to add some decorations (gold)
My WIP Pinnace so far: I know what to do for the remaining life boats and I will be able to get these neater for sure:
View attachment 306767View attachment 306768
I am encouraged with the outcome so far and besides the dremmel slip on forward gunwale below the washstrake it is getting there.
Cheers Grant
- gave me many smiles. Rob and Paul I am making the rudder and it may be stored in the boat as they only attached these when they launched the boats. I am going to hang 2 boats from the quarter Davits however not sure which. The rudders are with the sirens at present.You know, as accurate as we try to make these ships and boats, so much remains out of scale. For example, the strakes are at least twice as wide as the ones on a real pinnace. (I was watching Special Agent Gibbs building his boat in his basement on the NCIS TV show the other day, and he had more than twice as many strakes on his boat. I still haven’t figured out how he got it out of the basement.)Good morning. Thanks @Daniel20 , @dockattner , @Heinrich , @Vfordyce , @Robp1025 ., @Nomad .
Starting with Vic, they are and gives a break from rigging. I did really enjoy making the Pinnace and thinking out the box (literally and figuratively) how to make it.
Appreciate Daniel and Heinrich comments. It does look really good on the Victory, however I do need to get the details much improved. I am happy with it tho.
Paul I quite like those sirens
Mark, as Vic said I’m having fun here so I am going to give the launch a go(the largest). I now know what process to follow so hopefully more attention will be given to the construction than trail and error on what to use and how to make it. Let’s see what the shipyard can achieve here.
Cheers Grant
Ditto, that’s a very good question.I still haven’t figured out how he got it out of the basement


