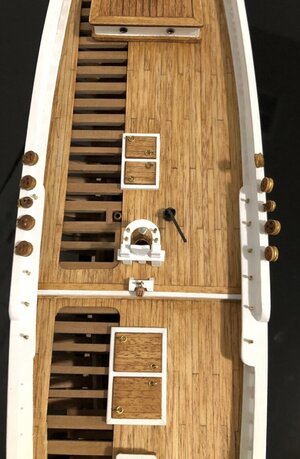
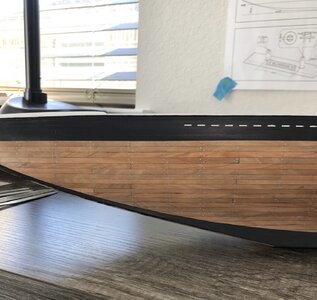
The Schooner Bluenose 1921, POF Yuanqing Models 1:72 [COMPLETED BUILD]

But if you use the jig, and spacers in between the frames at the deck beam height, the frames should be parallel to one another and equally spaced.
That's exactly what I am going to do.
If he maintains the bottom horizontal edge of the frame slot, moving the face towards the bow will not change the frame height. But this only because the bottom of the piece that was shifted is horizontal. ;)
If I were to not move the frames to their correct position then even though the notches are horizontal, the 9 frames would indeed be at the incorrect elevation relative to their position. Again, we are only talking about 1 to 1.5 mm of movement, just enough to be an irritation that has hopefully grabbed my attention for the rest of this build.
 
Good morning,
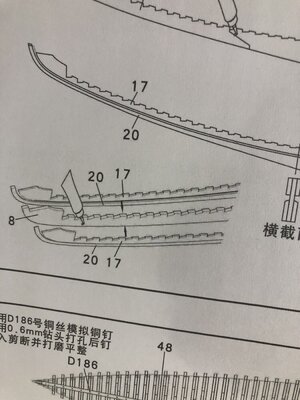
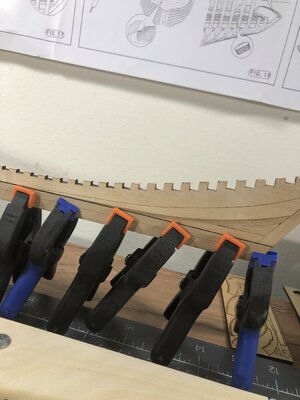
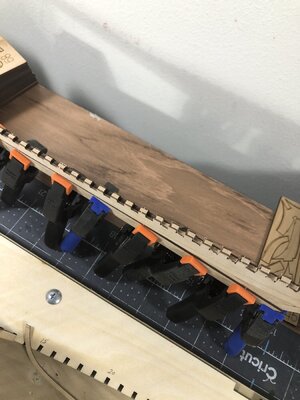
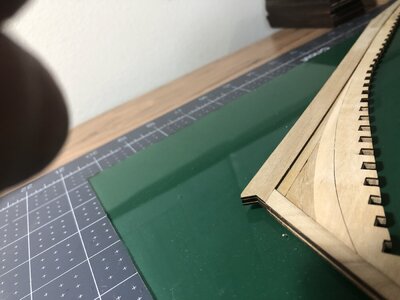
The keel construction has multiple parts but in essence is a sandwich with three layers. A central thick layer with a thinner veneer type layer on each side. Careful placement of these exterior layers which have the same notchout pattern as the center layer provided me with the correct sand out (correction template) for the rear portion where my problem lies. After an hour or so of sanding out the problem offsets I now believe I am back on track.

IMG_2400.jpgIMG_2398.jpgIMG_2399.jpg

I may have picked up an mm or so in length on the deck but should be right on at the keel. I hope!
Thank you @Dean62 and @dockattner for your helpful suggestions and all who are watching, I would hope this to be a heads up to all future Bluenose builders.
More than likely I could have prevented this whole problem with more careful dry fitting prior to glue up.

Thanks for checking in.
 
Good morning,
The keel construction has multiple parts but in essence is a sandwich with three layers. A central thick layer with a thinner veneer type layer on each side. Careful placement of these exterior layers which have the same notchout pattern as the center layer provided me with the correct sand out (correction template) for the rear portion where my problem lies. After an hour or so of sanding out the problem offsets I now believe I am back on track.

View attachment 358906View attachment 358907View attachment 358908

I may have picked up an mm or so in length on the deck but should be right on at the keel. I hope!
Thank you @Dean62 and @dockattner for your helpful suggestions and all who are watching, I would hope this to be a heads up to all future Bluenose builders.
More than likely I could have prevented this whole problem with more careful dry fitting prior to glue up.

Thanks for checking in.
I looks fine Daniel. Dry fitting is the most important part. Also with the parts that will come some later. The alignment of the notches is the most important. Dry fit also some frames to be sure all fits square.
Regards, Peter
 
Good morning,
The keel construction has multiple parts but in essence is a sandwich with three layers. A central thick layer with a thinner veneer type layer on each side. Careful placement of these exterior layers which have the same notchout pattern as the center layer provided me with the correct sand out (correction template) for the rear portion where my problem lies. After an hour or so of sanding out the problem offsets I now believe I am back on track.

View attachment 358906View attachment 358907View attachment 358908

I may have picked up an mm or so in length on the deck but should be right on at the keel. I hope!
Thank you @Dean62 and @dockattner for your helpful suggestions and all who are watching, I would hope this to be a heads up to all future Bluenose builders.
More than likely I could have prevented this whole problem with more careful dry fitting prior to glue up.

Thanks for checking in.
Daniel, I had completely forgotten the sandwich assembly. You are correct, that is the perfect template to correct the notches! If the frame locations are correct, then everything, including the deck, will be fine! Glad you are back on track. ;)
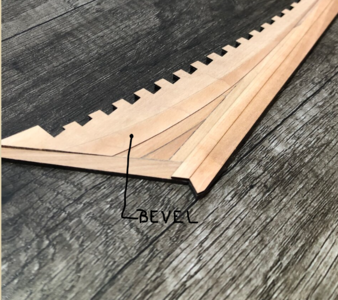
Now for the bevel on the stern pieces on each side!
1677078281550.png
 
Last edited:
Daniel, I had completely forgotten the sandwich assembly. You are correct, that is the perfect template to correct the notches! If the frame locations are correct, then everything, including the deck, will be fine! Glad you are back on track. ;)
Now for the bevel on the stern pieces on each side!
View attachment 358931
That sandwich construction gave me quite a bit of work; the cut-out in the frames for the sandwich keel construction did not allow for the bond layer thickness: approx 0.080". Result: quite a bit of dust.
The bevel on part 18 also requires a bit of attention; too late I realised that the bevel essentially needs to be sharp at the edge to facilitate smooth transitions of the hull planks. Result: a rapidly filling bad-words-jar.
Hi Johan, that explains the really tight fit in the dry fit of the frames onto the keel. Your right, I've already had to do some light sanding in all the frames keel notch. So far, I've had luck on the long bevel at piece 18. The wall behind my worktable (with the hanging plans I don't look at enough) catches most of my bad words.

The Bevel
IMG_2402.jpg
 
Hi Johan, that explains the really tight fit in the dry fit of the frames onto the keel. Your right, I've already had to do some light sanding in all the frames keel notch. So far, I've had luck on the long bevel at piece 18. The wall behind my worktable (with the hanging plans I don't look at enough) catches most of my bad words.

The Bevel
View attachment 359097
No such luck with my bad mouth... Sick
Your bevel on part 18 looks just great, wish mine looked the same.
 
Last edited:
Hi Johan, that explains the really tight fit in the dry fit of the frames onto the keel. Your right, I've already had to do some light sanding in all the frames keel notch. So far, I've had luck on the long bevel at piece 18. The wall behind my worktable (with the hanging plans I don't look at enough) catches most of my bad words.

The Bevel
View attachment 359097
Indeed, the bevel is looking nice and smooth, Daniel.
Regards, Peter
 
Hi Daniel. For the first time this week, I had some proper time to go through the logs. I am so happy that you are receiving such excellent from the Bluenose family. I told you beforehand that it is an extremely warm and friendly bunch of guys, and this has been borne out again. I am very glad to see that you could bypass that little irregularity and are progressing full steam. Your bevel of Part #18 looks superb!
 
Hi Daniel. For the first time this week, I had some proper time to go through the logs. I am so happy that you are receiving such excellent from the Bluenose family. I told you beforehand that it is an extremely warm and friendly bunch of guys, and this has been borne out again. I am very glad to see that you could bypass that little irregularity and are progressing full steam. Your bevel of Part #18 looks superb!
Thank you, Heinrich, I don't like stumbling out of the blocks like that, but it does serve as a wakeup call to pay closer attention. This is an incredibly accurate kit with little to no room for assembly error.
 
Thank you, Heinrich, I don't like stumbling out of the blocks like that, but it does serve as a wakeup call to pay closer attention. This is an incredibly accurate kit with little to no room for assembly error.
Good morning Daniel. Your “stumbling “ produced an awesome Bevel:D. Yours and Paul’s logs are the first POF models I have followed from the start and the step up from POB models is exponential.Precision and a zero degree error rate is why I will watch and learn from you guys. Enjoy. Cheers Grant
 
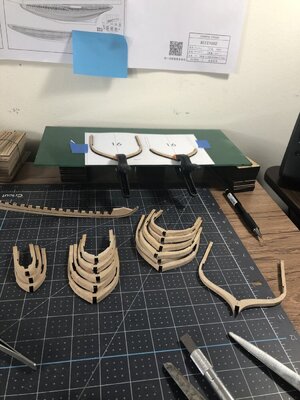
Good morning fellow modelers, I have a short weekend update. Below you can see the first 14 ribs plus one towards the stern for setting up intermittent dry fits. These ribs are ready for their final sanding with 320 grit paper. This is sort of an assembly line process where I'll get another 15 or so ready and bring them to this stage as well.

IMG_2405.jpg

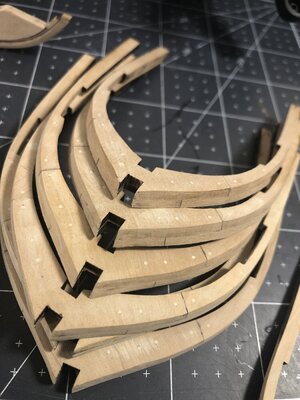
Here is a close up showing my solution to placing the faux treenails holding rib sections together. I drilled a 0.8mm hole through with my Dremel drill press then filled the holes with a neutral wood filler. I do like the way most everyone else uses toothpicks, however this method works best for me.

IMG_2406.jpg

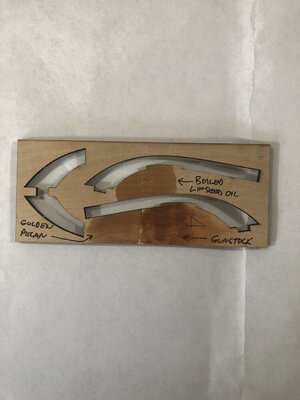
Next up is a test piece looking at different surface finishes. So far just regular linseed oil is my favorite. I am looking to preserve the contrast between the tree nails and the frames.

IMG_2407.jpg

Not being any sort of paint or staining expert, I am open to suggestions. There may be some other topcoats to add??

Thanks for checking in and am looking forward to any feedback you may have. As always happy modeling.
 
Good morning fellow modelers, I have a short weekend update. Below you can see the first 14 ribs plus one towards the stern for setting up intermittent dry fits. These ribs are ready for their final sanding with 320 grit paper. This is sort of an assembly line process where I'll get another 15 or so ready and bring them to this stage as well.

View attachment 359624

Here is a close up showing my solution to placing the faux treenails holding rib sections together. I drilled a 0.8mm hole through with my Dremel drill press then filled the holes with a neutral wood filler. I do like the way most everyone else uses toothpicks, however this method works best for me.

View attachment 359625

Next up is a test piece looking at different surface finishes. So far just regular linseed oil is my favorite. I am looking to preserve the contrast between the tree nails and the frames.

View attachment 359626

Not being any sort of paint or staining expert, I am open to suggestions. There may be some other topcoats to add??

Thanks for checking in and am looking forward to any feedback you may have. As always happy modeling.
That a nice bunch of frame, Daniel. With nice looking treenails.
It won't surprise you that I agree with you about the linseed oil. Most of my BN is set in linseed oil. It brings the pear wood to live.
Regards, Peter
 
The "woodfiller" trennels solution is new to me, nice. Thumbsup
As far as finish goes, right now you only have one feasible option and that is the boiled linseed oil, in the sense that it's the only option showing the trennels.
I used the same method for the treenails in my BN hull. Which I then clear coated with a matte finish water based polyurethane. Nails showed fine. You can reference my pics below…
My only caution about oil, is the application during construction as it inhibits glue adhesion whereas the clear coat will not. Just food for thought. ;)
0593808E-7B59-4244-9CDE-E73EAC0623A6.jpegA133137D-4AC3-4B95-A8C4-597A1C0D4DB8.jpeg
Both the deck and hull were clear coated, no oil.
Ps - I should mention that I used 0000 steel wool between coats of clear.
 
Last edited:
I used the same method for the treenails in my BN hull. Which I then clear coated with a matte finish water based polyurethane. Nails showed fine. You can reference my pics below…
My only caution about oil, is the application during construction as it inhibits glue adhesion whereas the clear coat will not. Just food for thought. ;)
View attachment 359684View attachment 359685
Both the deck and hull were clear coated, no oil.
Ps - I should mention that I used 0000 steel wool between coats of clear.
Thats good information Dean. thanks.
 
I used the same method for the treenails in my BN hull. Which I then clear coated with a matte finish water based polyurethane. Nails showed fine. You can reference my pics below…
My only caution about oil, is the application during construction as it inhibits glue adhesion whereas the clear coat will not. Just food for thought. ;)
View attachment 359684View attachment 359685
Both the deck and hull were clear coated, no oil.
Ps - I should mention that I used 0000 steel wool between coats of clear.
I never realized you used the same method for simulating trennels, but she sure looks marvelous.
 
Back
Top